What are a few things you wish for as a software/solution/product developer? In case you are thinking to answer, your list may contain some of these,
It is fun when we have to do less to achieve more.
It is more worthy when we have to pay less to build something great.
It is relaxing when we don't have to worry much about the security, patching, upgrading, and maintaining many libraries.
In a nutshell, we are happy and confident developers when we have support for these three pillars of software development and delivery,
Jamstack is a web development architecture that helps us achieve these with client-side JavaScript, reusable APIs, and prebuilt Markup. In this article, we will see the usage of the Jamstack architecture to build a super-fast, low-cost, easily maintainable Subscription Form.
You will be able to follow this article and build the subscription form without any prior knowledge to Jamstack. Of course, it would help if you had a basic understanding of HTML and JavaScript. However, if you are looking for an in-depth understanding of Jamstack, this series may help you: Jamstack for All.
To keep it simple and focused, let's split the topic into two articles. It is part - 1 to get things working with Netlify Forms. In part - 2, we will learn about the functions and data store.
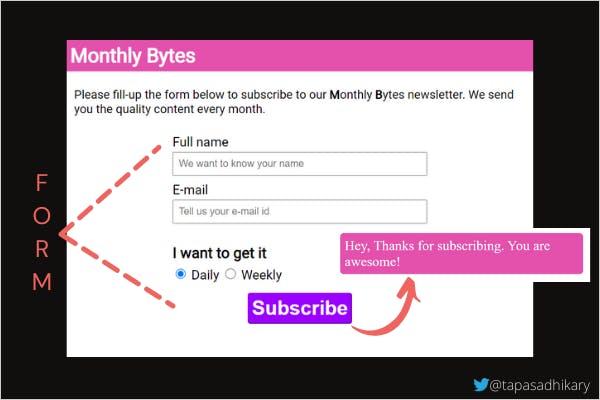
Let's take a simple subscription form that asks a user to subscribe to a newsletter by providing the following details,
Full Name
E-mail address
Frequency to get the newsletter(daily, weekly)
Once the user fill-up the form and submits it, we show the user a success page with a note of thanks. We will develop it using basic HTML and CSS.
But that's not all. What about the nuisances of handling the form data? What about an e-mail notification every time someone subscribes? How about storing the data in a store? What are the options of performing some analytics on top of the stored data?
Right, there are many essential and exciting use-cases involved in the form handling. We will use the Netlify Forms for better form handling. We will also use Fauna as a data store to store the information of the subscribers. The Fauna part is optional for a simple form handling like this, but I was greedy to try it out and found it super cool.
Create a Form using HTML and CSS
Let us now create the subscription form using HTML and CSS. First, create a project folder with the name of your choice(something like jamstack-subscription-form). Then, open a command prompt/terminal window and change the directory to the project folder.
Initiate a node project using the following command,
npm init
Provide the required details and create the package.json file. Here is a sample package.json file,
{"name":"jamstack-subscription-form","version":"1.0.0","description":"","main":"index.js","scripts":{"test":"echo \"Error: no test specified\" && exit 1"},"author":"Tapas Adhikary","license":"MIT"}
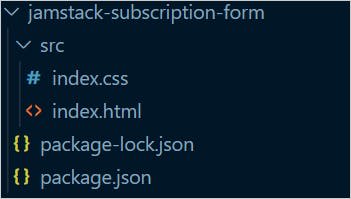
Create a folder called src at the root of the project folder. Now, create two empty files, index.js and index.css respectively, inside the src folder. At this stage, your folder structure should look like this,
Let's add the HTML part now. Copy the below code to the index.html file. It has the code to,
Link to the index.css file.
HTML structure to have a form with required input fields and a button.
Other HTML elements to show a header, paragraph to explain the purpose of the page.
<!DOCTYPE html><htmllang="en"><head><metacharset="UTF-8"><metahttp-equiv="X-UA-Compatible"content="IE=edge"><metaname="viewport"content="width=device-width, initial-scale=1.0"><linkrel="stylesheet"href="./index.css"><title>Monthly Bytes</title></head><body><header><h1>Monthly Bytes</h1></header><divclass="content"><p>Please fill-up the form below to subscribe to our <b>M</b>onthly <b>B</b>ytes newsletter.
We send you the quality content every month.</p><formaction="/success"method="POST"name="subscription"><labelfor="fullName">Full name</label><inputtype="text"name="fullName"id="fullName"placeholder="We want to know your name"/><labelfor="email">E-mail</label><inputtype="email"name="email"id="email"placeholder="Tell us your e-mail id"/><div><h2>I want to get it</h2><label><inputtype="radio"name="frequency"value="daily"checked> Daily
</label><label><inputtype="radio"name="frequency"value="weekly"> Weekly
</label></div><buttontype="submit">Subscribe</button></form></div></body></html>
Now we are ready to load and run this HTML file in the browser. If you are using an editor like VS Code, you can use the extensions(like Live Server) to run it. Alternatively, use this command from the root of the project folder to run the app and see the index.html rendered in the browser.
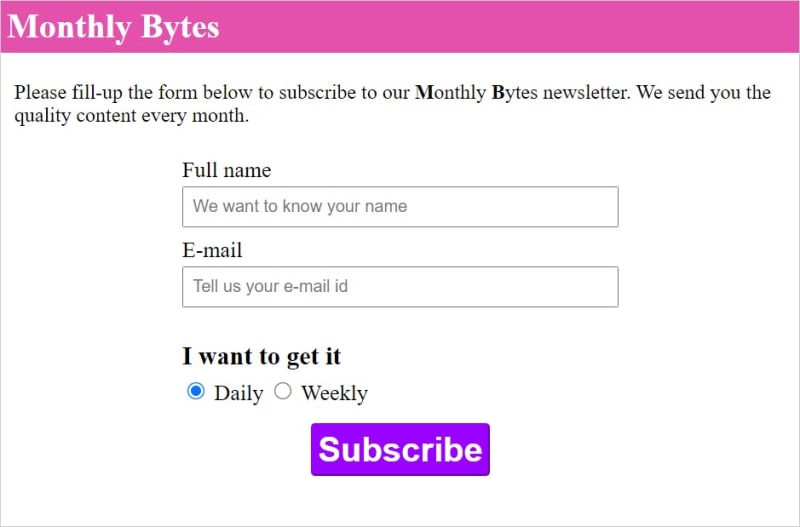
As you see, the page has all the required elements, but it misses the styles. Let us now add a few styles to make the page look better. Copy the below CSS styles to the index.css file.
Now you should see the browser tab refreshes to load the latest app with the style changes. Looks better, huh?
Create a Success page
Now it's time to create a success page to thank our subscribers with a message. First, create a file called success.html inside the src folder with the following content.
<!DOCTYPE html><htmllang="en"><head><metacharset="UTF-8"><metahttp-equiv="X-UA-Compatible"content="IE=edge"><metaname="viewport"content="width=device-width, initial-scale=1.0"><linkrel="stylesheet"href="./index.css"><title>Success</title></head><body><divclass="success">
Hey, Thanks for subscribing. You are awesome!
</div></body></html>
Also, add the following style to the index.css page to make the message look better.
Great! Now try out the subscription form. Once you fill up the details and hit the Subscribe button, we will see a success page.
Please note, we have not done many form validations here. That's purely intentional and out of the scope of the article. However, I encourage you to include it as you wish.
We have a working subscription form, but we are not doing anything with the form data yet. Next, we will use the Netlify Form to perform all the heavy lifting to handle data and perform actions using it. Before that, let us set up Netlify to use.
Netlify is a powerful serverless platform to build, deploy web applications with all the advantages of CI/CD and scalable hosting. It has a Git-based workflow that keeps your code changes integrated continuously with the deployment. In addition, the services like functions, forms are there to use instantly without having them built in-house.
Create an account with Netlify and log in. Now click on the button to create a new site from Git.
Select your Git provider.
Now, select the project you want to deploy to Netlify. In this case, it is the jamstack-subscription-form project.
In the setting window, provide the base directory as src and click on the Deploy site button.
It will take a few seconds and make your site available to use. Now you can access the subscription form using a URL provided by Netlify.
Netlify Forms
Netlify's built-in form handling is enabled for your account by default. However, we need to make a couple of changes in our form for netlify to recognize and parse it correctly.
Add data-netlify="true" or a netlify attribute to the <form> tag. It will enable form submissions in your Netlify site admin panel.
You must have a name attribute for your form. It determines the form name to show in the netlify interface.
So, let's edit our subscription form to include data-netlify="true". Also, notice the form name is subscription.
That's it. Now push your changes to the source code repository. You will see the build started in Netlify. Once the build is over and your recent changes are published, please access the app(using the app URL provided by Netlify) in the browser. Now fill in the form details and submit it.
Browse to the Forms tab from the Netlify interface.
You will see an entry with the form name. In our case, it is subscription under the Active forms section.
Click on it to see the form data we have submitted a while back. You can find the form data and a few valuable options like Download as CSV, Mark as spam.
Handling Spam Filters
Netlify uses Akismet to provide spam filters for all your form submissions. The integration with Akismet, the industry leader in spam detection, is enabled by default. However, we can add a honeypot field, a reCAPTCHA 2, or both for extra protection. Let us see an example of adding a honeypot field.
A honeypot field is a hidden form field that a bot will fill up along with other fields in the form. As humans can not see this field, we can safely reject the submission that has the honeypot field filled up. We can add the netlify-honeypot attribute to our <form> with the name of our hidden field.
Let's add a hidden field anywhere inside the form. Add a <p> tag and an <input> text field inside it with the name bot-field. Also, add a class called hidden to the <p> element to hide it.
<pclass="hidden"><label>Don’t fill this out if you’re human:
<inputname="bot-field"/></label></p>
Next, add netlify-honeypot="bot-field" to the form. Now the <form> has following attributes,
Last, add the CSS style for the class hidden in the index.css file,
.hidden{display:none;}
That's it. We have enabled the extra protection with the honeypot field.
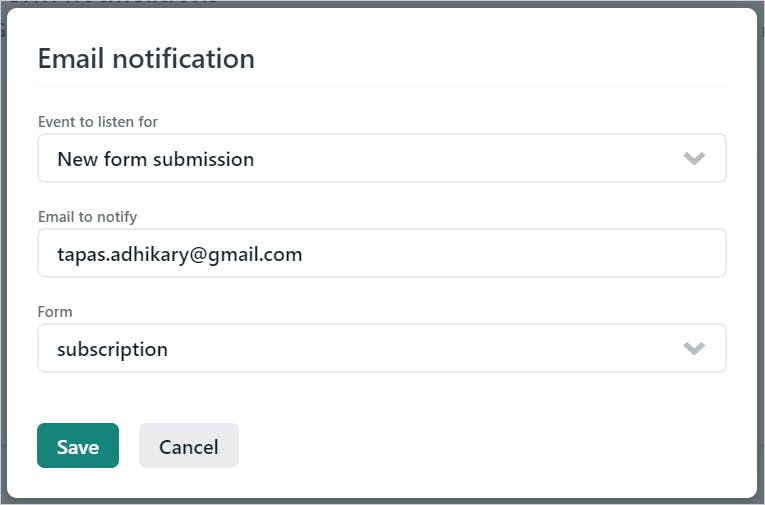
Enable Notifications
We can enable notifications such that when a form is submitted, we get an email, a notification in the slack channel, or an external service of our choice. Let's enable the e-mail notification for our subscription form.
Click on the Settings and usage button inside the Forms tab.
Go to the Form notifications section and click on the Add notification menu.
Select the Email notification option. Then, please fill-up the details with an e-mail address, form name, and save it.
That's all. Whenever someone fills up the subscription form and submits it, you will receive an email notification on the configured e-mail id. Here is a sample e-mail,
What's Next?
Thank you for reading so far. I hope you enjoyed following it and made the subscription form working with Netlify Forms. In the next part, we will use Fauna to store the form data. We will also see the Netlify Function play an important role there.
Please feel free to clone/fork the repository and try it out. Then, stay tuned for part 2.
Let's build a subscription form with the Jamstack concept using Netlify Forms, Functions, and Fauna data-store.
jamstack-subscription-form
Let's build a subscription form using the Jamstack concept. Netlify comes with the form handling capability that allows you to achieve the power of Jamstack for form handling.
With this project, we will build a simple(yet powerful) Subscription form and submit it using the Netlify forms capability. We will use the Netlify Functions to handle the form data and store it in a serverless data store called Fauna.
Want to Motivate?
Have you found this project helpful? You can give a star(⭐) to let me know, you care.
Many Thanks to all the Stargazers who has supported this project with stars(⭐)
How to run this project?
Clone this repository and change the directory to jamstack-subscription-form.
Install netlify-cli. Use this link to create an account with Netlify and install the CLI tool.
Create an account with Fauna. Create a database. Upload the schema and get the…