Part one of this series covers IAM basics and a general use case:
Part two is the implementation of the use case in part one, that is, the creation of users, groups and policies to restrict access to some AWS services.
On previous post I explained the basics of AMI and described an use case for it. Now, we're going to implement the actual solution for that problem.
As a quick recap, we have four developers that need shared and not shared access to AWS services, and an accountant that has very limited access. Specifically:
- DevOps developers: Console and programmatic access to ElasticBeanstalk, EC2, S3 and SQS
- Web developers: Console and programmatic access to ElasticBeanstalk and S3
- Mobile developers: Programmatic access to S3 and AWS mobile services such as Cognito
- Accountant: S3 read-only access to the AWS billing reports bucket
Let's get started.
Create groups
First thing we need is to create the groups- let's start with the DevOps group.
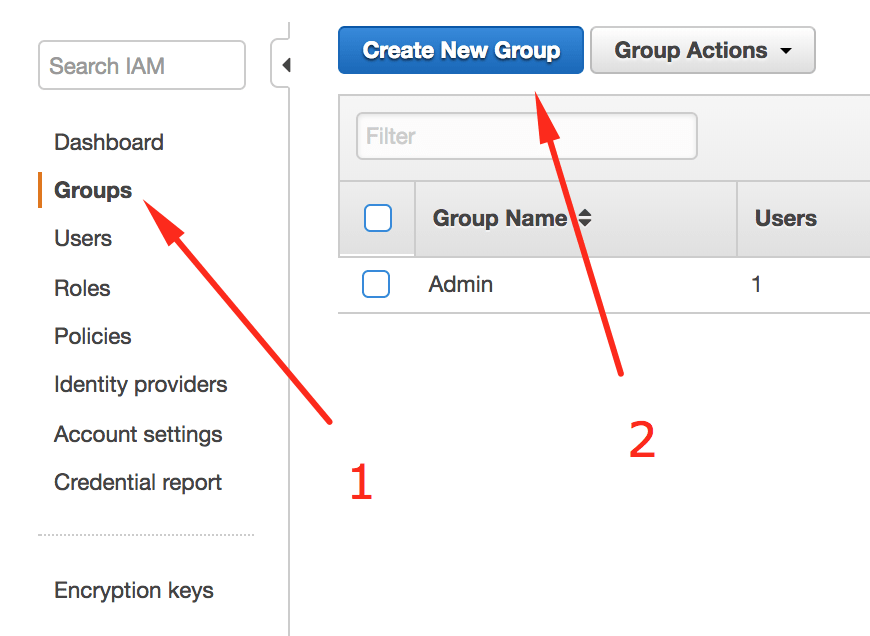
- Go the IAM console and select the groups section on the sidebar
- Press the "Create New Group" button
Name your group
Our group is going to be called DevOps:
Attach a policy
This is where it starts to get interesting. Remember that a policy is the set of "rules" that will dictate which services and actions are allowed- for the group in this case.
On the next screen you will get a seemingly endless list of already created policies. These policies are managed by AWS, that is, they already contain rules for specific permissions you may need. Luckily for us, there are polices that perfectly fits our needs. According to the problem details, the policies needed for the DevOps group are:
- AmazonS3FullAccess: Full access to S3
- AWSElasticBeanstalkFullAccess: Full access to ElasticBeanstalk
- AmazonEC2FullAccess: Full access to EC2
- AmazonSQSFullAccess: Full access to SQS
Selecting these policies you are saying: All users in this group will have full access to S3, EC2, ElasticBeanstalk and SQS. Go for it.
NOTES:
- You can proceed to the next step without attaching any policy. That means that the group will have no permissions at all.
- If the name of a policy is not descriptive enough you can always go to the policies section of the IAM dashboard and look for the details:
Review group
Last step in group creation is to review and make sure the name and policies are the ones we intended to set. So, make sure the name and policies are ones we intended to set 😛
You now have the DevOps group created. Go ahead and create the two developers groups remaining. The general process is the same, but you need a different name and a different set of policies.
Create users
Time to create each of our users.
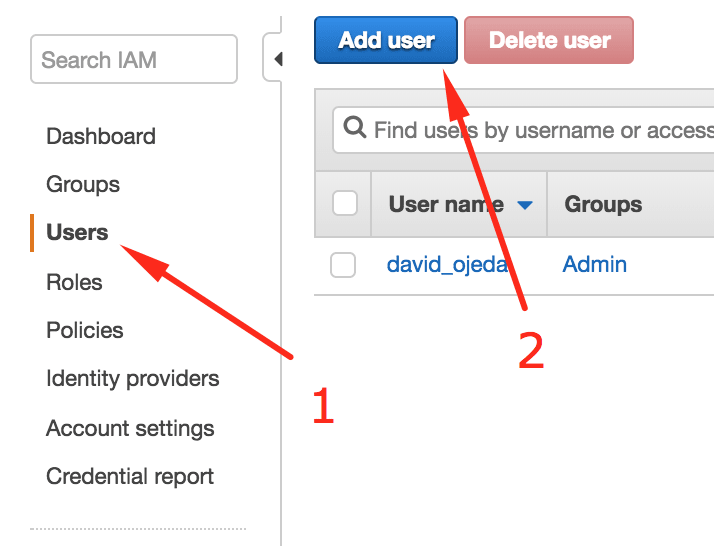
- Go the IAM console and select the users section on the sidebar
- Press the "Add user" button
Name your user and select access type
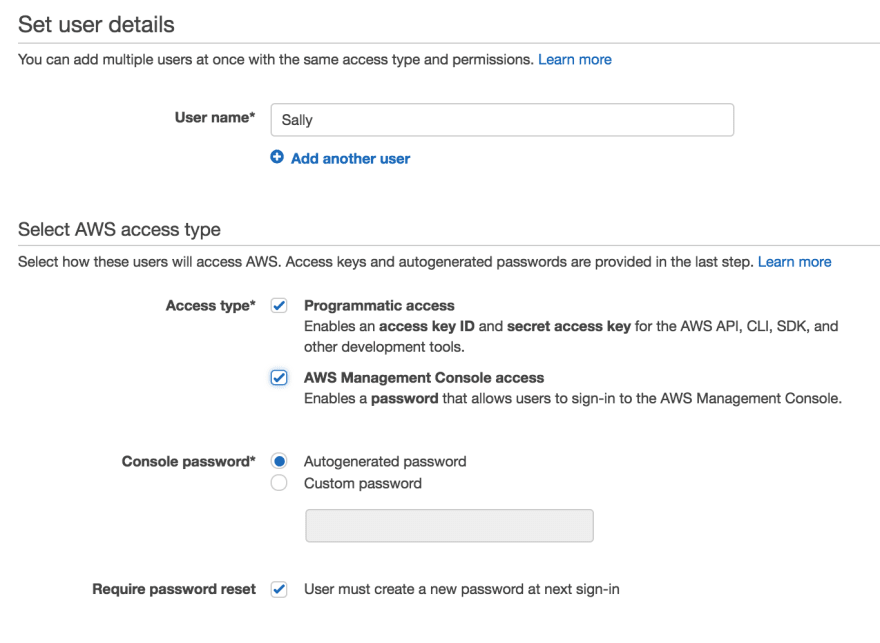
Our first user will be Sally- a DevOps engineer- and these are the configurations needed according to the details of the problem previously stated:
So the user will have programmatic and console access. The user will first enter with an autogenerated password, and then asked to reset it.
Set permissions
At this point you need to define the permissions for this new user. You can either:
- Add user to a group
- Copy permissions from existing user
- Attach existing policies directly
Since you already did the heavy lifting of creating a group with the needed policies, we're going to select the first option: Add user to a group. Go ahead and select the group you created on the previous steps:
Review
As in the groups creation, review everything is configured as intended and proceed to create the user.
At this point you will be given the credentials of the user as well as its password. I recommend you to download and email them to the person the AWS user is intended.
You now have your first user assigned to the adequate group according to its job requirements. You can now proceed to create the remaining users and add them to the required groups.
The accountant group and user
The accountant only requires read-access to a specific bucket- that's a very limited permission scope. There is no AWS managed policy to manage this case. It's time to create your own policy.
Create a custom policy
To create an IAM policy:
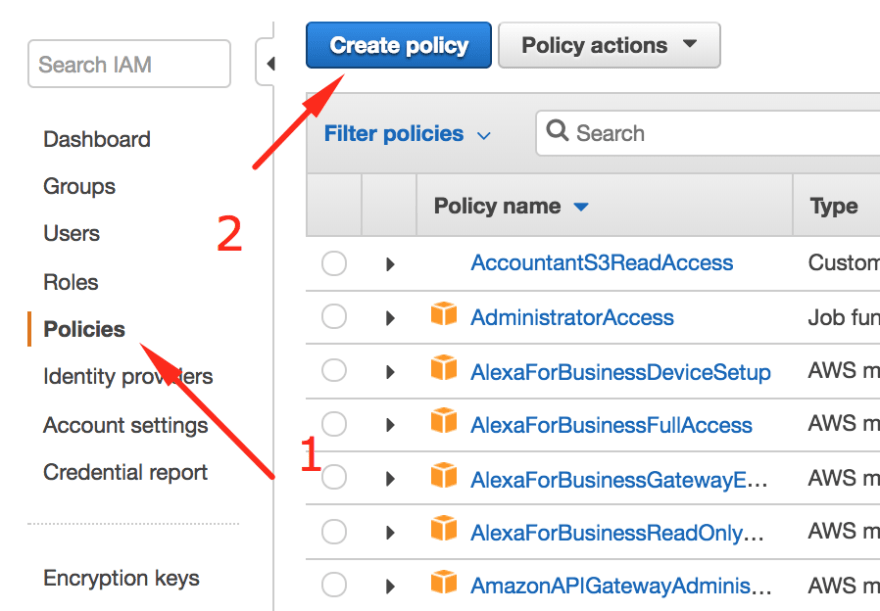
- Go the IAM console and select the policies section on the sidebar
- Press the "Create policy" button
Now you are redirected to the policy creation page. There are two ways to create a policy on this page:
- Visual editor
- JSON document
We're going to use the Visual editor option because I think is more friendly. Here, he need to select to which service(s) we want access to, to what specific actions, and to what specific resources of this/these service(s) we can access.
We want S3 read-only access to the billing reports bucket.
NOTE: I'm assuming you have at least one S3 bucket with which you can try this exercise. If you don't have any, please go to S3 and create one with the default settings.
First permission you need to add is this:
The ListAllMyBuckets and GetBucketLocation actions combined with the All resources option allows the user to see every bucket that exists on your account. You actually need this permission if you want the user to be able to access the bucket through the AWS console. Don't worry, they will no be able to access anything but the bucket names.
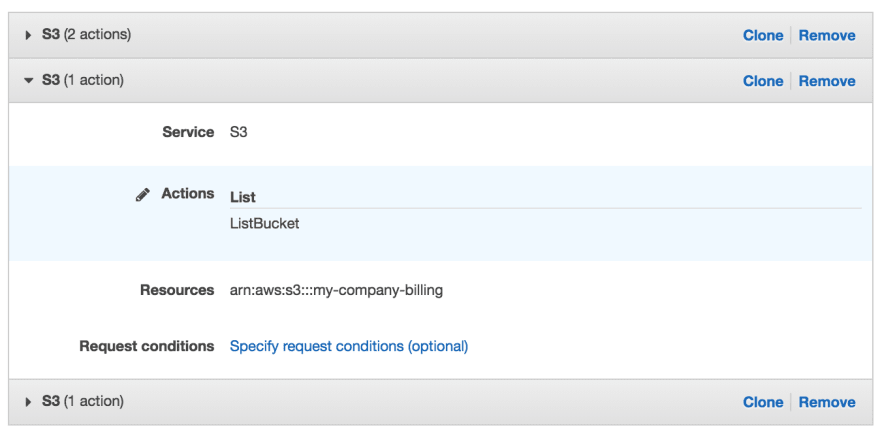
Now, add another permission with the bottom right button. This time you only need the ListBucket action and to define the bucket ARN you need access to. My bucket is called my-company-billing. So, the options look like this:
You can get your bucket ARN by selecting your bucket on S3. The ARN is arn:aws:s3:::{YOUR_BUCKET_NAME}.
This permission allows users to list the contents of a bucket, but not to access them yet. We're missing one last permission, so let's add it.
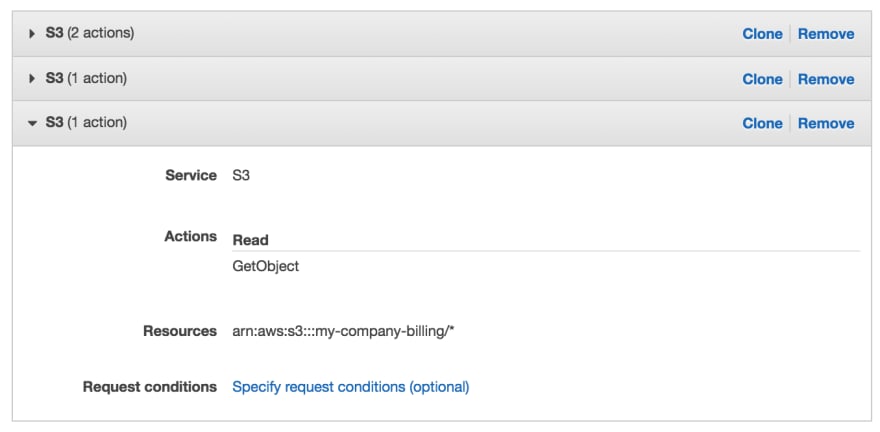
Last but not least, this permission will allow the user to actually access the objects on the desired bucket:
We're using the wildcard "*" after the bucket name as our resource ARN to indicate that we want access to every object in the bucket.
Go to next step, name your policy, add an useful description and finish the policy creation! I recommend you to have a naming convention for every resource you create. It doesn't matter much which convention you choose, but stick with it. I use camel caps (ThisIsCamelCaps) because AWS managed policies are named that way.
TIP: You can use the AWS Policy Simuator to test your policies and verify they only provide access to the resources they need to.
Use custom policy
You now have your accountant custom policy with S3 read-only access. Last thing you need to do to solve the stated problem is to create your accountant group and user, and tie them together. You can do that with the knowledge acquired so far 😉
Wrap-up
So far you have created four groups- three for developers and one for your accountant. Also, you created a user for each of your employees and added them to the adequate group according to their job needs.
All your users should now have permissions to perform their jobs and everyone should be happy 👏🏼
Thanks for reading me! ❤️

