
There is always a common scenario that requires cloud engineers to configure infrastructure which allows developers to safely and securely connect to the RDS or Aurora database that is in a private subnet.
For development purpose, some developers tend to create a public IP address to access the databases on AWS as part of setup. This makes it easy for the developers to gain access to their database, but it is undoubtedly not a recommended method because it has huge security vulnerability that can compromise sensitive data.
Architecture Design
In order to make our database secure, the recommended approach by AWS is to place our database in a private subnet. Since a private subnet has no ability to communicate with the public Internet directly, we are able to isolate our data from the outside world.
Then in order to enable the developers to connect remotely to our database instance, we will setup a bastion host that allows them to connect to the database via SSH tunnelling.
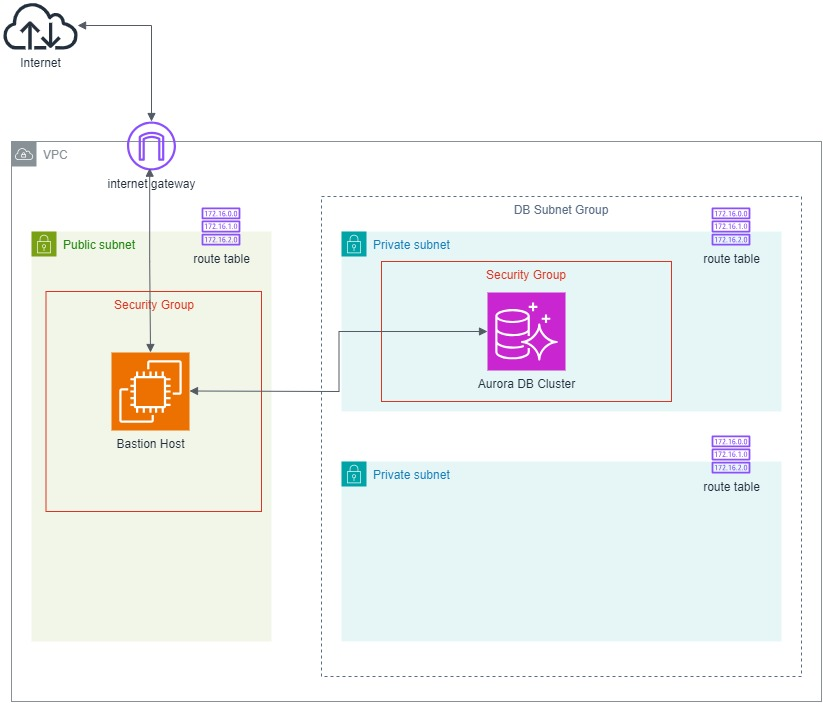
The following diagram describes the overall architecture that we will be setting up for this scenario.

We will be configuring with CloudFormation template. The reason why we use CloudFormation is because it provides us with a simple way to create and manage a collection of AWS resources by provisioning and updating them in a predictable way.
Step 1: Specify Parameters
In the CloudFormation template, we will be using the following parameters.
Parameters:
  ProjectName:
    Type: String
    Default: my-project
  EC2InstanceType:
    Type: String
    Default: t2.micro
  EC2AMI:
    Type: String
    Default: ami-020283e959651b381 # Amazon Linux 2023 AMI 2023.3.20240219.0 x86_64 HVM kernel-6.1
  EC2KeyPairName:
    Type: String
    Default: my-project-ap-northeast-1-keypair
  MasterUsername:
    Type: String
    Default: admin
  MasterUserPassword:
    Type: String
    AllowedPattern: "[a-zA-Z0-9]+"
    NoEcho: true
  EngineVersion:
    Type: String
    Default: 8.0
  MinCapacity:
    Type: String
    Default: 0.5
  MaxCapacity:
    Type: String
    Default: 1
As you have noticed in the parameters for EC2, we choose to use the Amazon Linux 2023 AMI, which is shown in the following screenshot.

We can easily retrieve the AMI ID of an image in the AWS Console.
We are also using a keypair that we have already created. It is a keypair called “my-project-ap-northeast-1-keypair”.
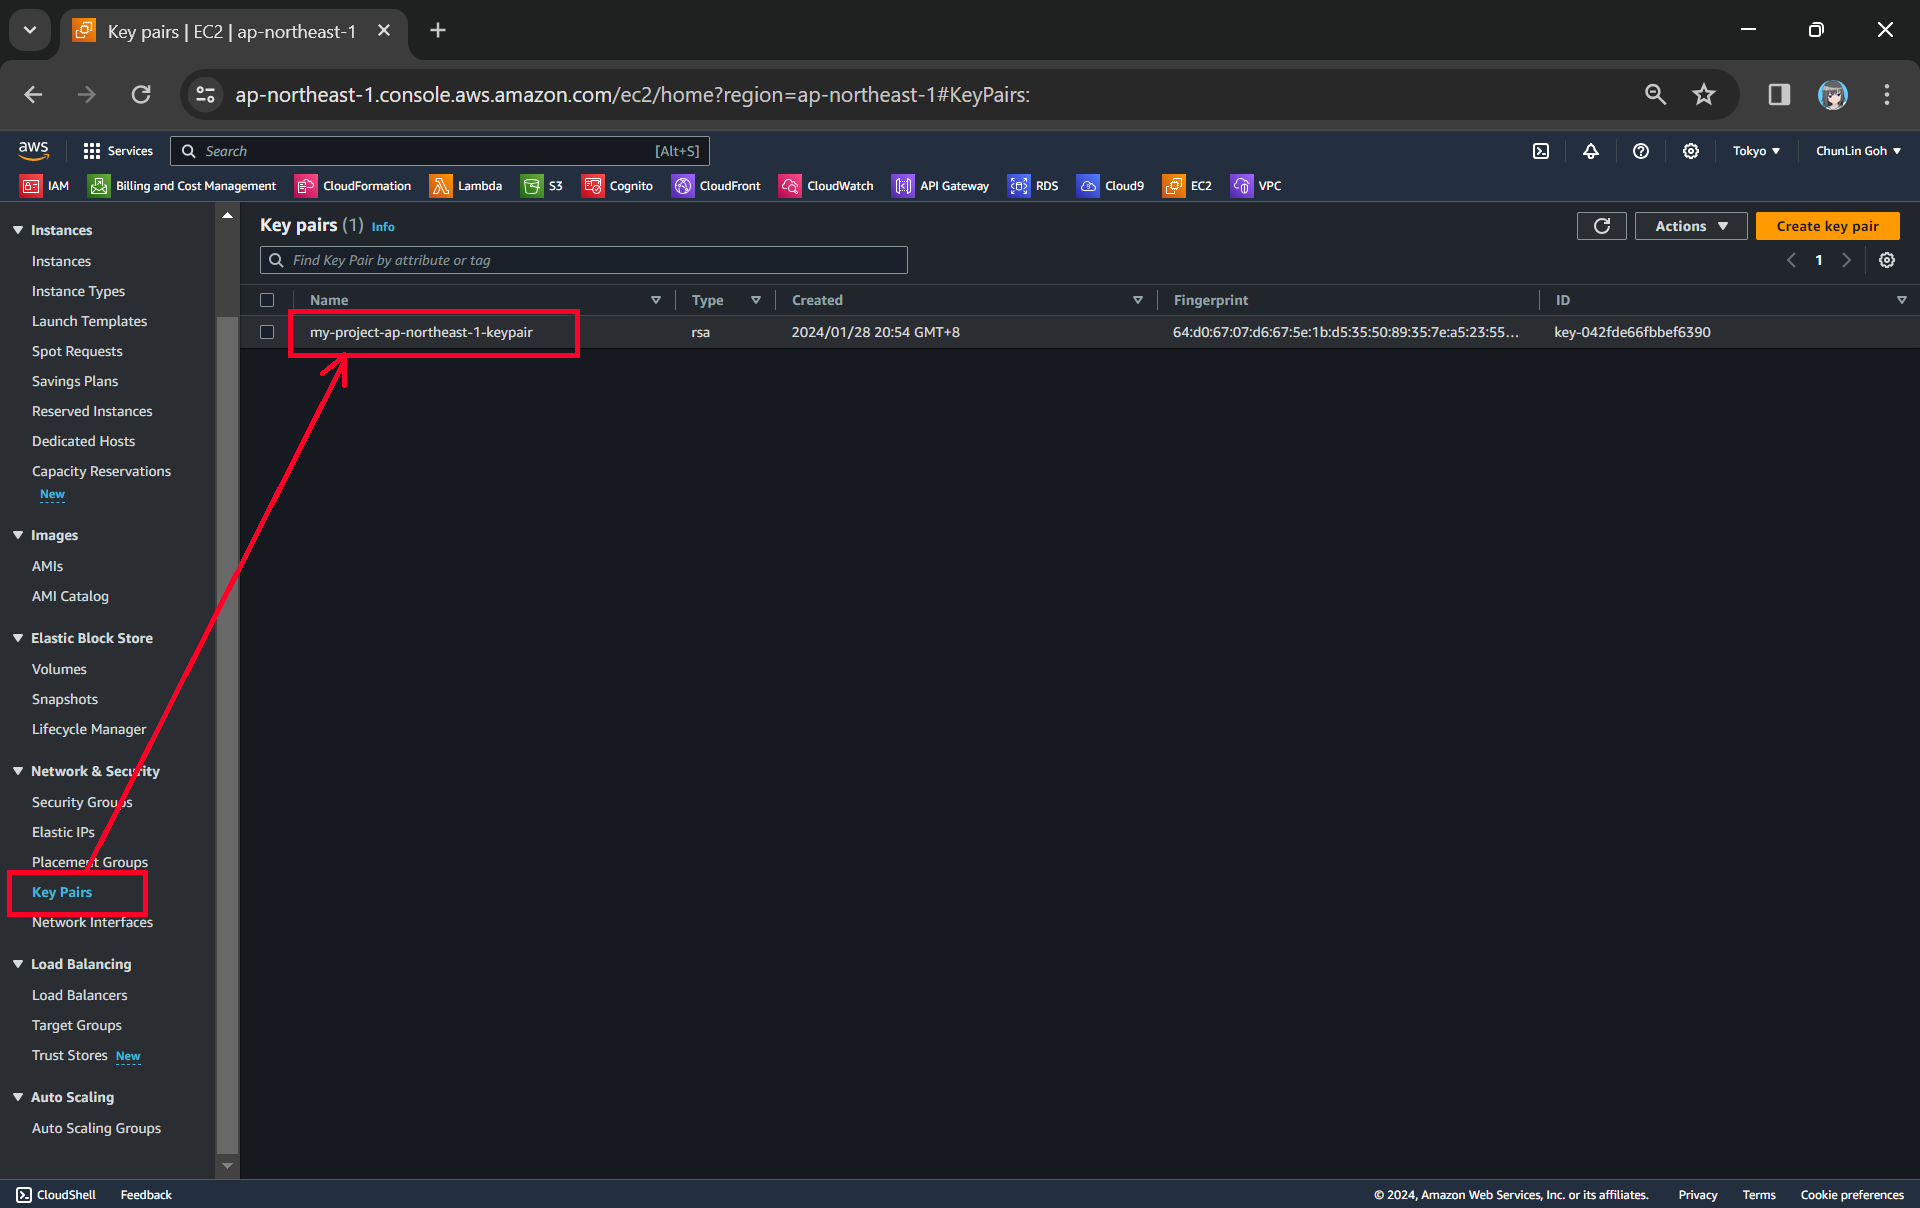
We can locate existing key pairs in the EC2 instances page.
Step 2: Setup VPC
Amazon Virtual Private Cloud (VPC) is a foundational service for networking and compute categories. It lets us provision a logically isolated section of the AWS cloud to launch our AWS resources. VPC allows resources within a VPC to access AWS services without needing to go over the Internet.
When we use a VPC, we have control over our virtual networking environment. We can choose our own IP address range, create subnets, and configure routing and access control lists.
VPC:
  Type: AWS::EC2::VPC
  Properties:
    CidrBlock: 38.0.0.0/16
    Tags:
      - Key: Name
        Value: !Sub '${AWS::StackName}-vpc'
      - Key: Project
        Value: !Ref ProjectName
Step 3: Setup Public Subnet, IGW, and Bastion Host
A bastion host, also known as a jump server, is used as a bridge between the public Internet and a private subnet in a network architecture. It acts as a gateway that allows secure access from external networks to internal resources without directly exposing those resources to the public.
This setup enhances security by providing a single point of entry that can be closely monitored and controlled, reducing the attack surface of the internal network.
In this step, we will be launching an EC2 instance which is also our bastion host into our public subnet which is defined as follows.
PublicSubnet:
  Type: AWS::EC2::Subnet
  Properties:
    AvailabilityZone: !Select [0, !GetAZs '']
    VpcId: !Ref VPC
    CidrBlock: 38.0.0.0/20
    MapPublicIpOnLaunch: true
    Tags:
      - Key: Name
        Value: !Sub '${AWS::StackName}-vpc-public-subnet1'
      - Key: AZ
        Value: !Select [0, !GetAZs '']
      - Key: Project
        Value: !Ref ProjectName
This public subnet will be able to receive public connection requests from the Internet. However, we should make sure that our bastion host to only be accessible via SSH at port 22.
BastionSecurityGroup:
  Type: AWS::EC2::SecurityGroup
  Properties:
    GroupName: !Sub '${AWS::StackName}-bastion-sg'
    GroupDescription:
      !Sub 'Security group for ${AWS::StackName} bastion host'
    VpcId: !Ref VPC

BastionAllowInboundSSHFromInternet:
  Type: AWS::EC2::SecurityGroupIngress
  Properties:
    GroupId: !Ref BastionSecurityGroup
    IpProtocol: tcp
    FromPort: 22
    ToPort: 22
    CidrIp: 0.0.0.0/0
CidrIp defines the IP address range that is permitted to send inbound traffic through the security group. 0.0.0.0/0 means from the whole Internet. Thus, we can also make sure that the connections are from certain IP addresses such as our home or workplace networks. Doing so will reduce the risk of exposing our bastion host to unintended outside audiences.
In order to enable resources in our public subnets, which is our bastion host in this case, to connect to the Internet, we also need to add Internet Gateway (IGW). IGW is a VPC component that allows communication between the VPC and the Internet.
InternetGateway:
  Type: AWS::EC2::InternetGateway
  Properties:
    Tags:
      - Key: Name
        Value: !Sub '${AWS::StackName}-igw'
      - Key: Project
        Value: !Ref ProjectName

VPCGatewayAttachment:
  Type: AWS::EC2::VPCGatewayAttachment
  Properties:
    InternetGatewayId: !Ref InternetGateway
    VpcId: !Ref VPC
For outbound traffic, a route table for the IGW is necessary. When resources within a subnet need to communicate with resources outside of the VPC, such as accessing the public Internet or other AWS services, they need a route to the IGW.
PublicRouteTable:
  Type: AWS::EC2::RouteTable
  Properties:
    VpcId: !Ref VPC
    Tags:
      - Key: Name
        Value: !Sub '${AWS::StackName}-route-table'
      - Key: Project
        Value: !Ref ProjectName

InternetRoute:
  Type: AWS::EC2::Route
  DependsOn: VPCGatewayAttachment
  Properties:
    RouteTableId: !Ref PublicRouteTable
    DestinationCidrBlock: 0.0.0.0/0
    GatewayId: !Ref InternetGateway

SubnetRouteTableAssociationAZ1:
  Type: AWS::EC2::SubnetRouteTableAssociation
  Properties:
    RouteTableId: !Ref PublicRouteTable
    SubnetId: !Ref PublicSubnet
A destination of 0.0.0.0/0 in the DestinationCidrBlock means that all traffic that is trying to access the Internet needs to flow through the target, i.e. the IGW.
Finally, we can define our bastion host EC2 instance with the following template.
BastionInstance:
  Type: AWS::EC2::Instance
  Properties:
    ImageId: !Ref EC2AMI
    InstanceType: !Ref EC2InstanceType
    KeyName: !Ref EC2KeyPairName
    SubnetId: !Ref PublicSubnet
    SecurityGroupIds:
      - !Ref BastionSecurityGroup
    Tags:
      - Key: Name
        Value: !Sub '${AWS::StackName}-bastion'
      - Key: Project
        Value: !Ref ProjectName
Step 4: Configure Private Subnets and Subnet Group
The database instance, as shown in the diagram above, is hosted in a private subnet so that it is securely protected from direct public Internet access.
When we are creating a database instance, we need to provide something called a Subnet Group. Subnet group helps deploy our instances across multiple Availability Zones (AZs), providing high availability and fault tolerance. Hence, we need to create two private subnets in order to successfully setup our database cluster.
PrivateSubnet1:
  Type: AWS::EC2::Subnet
  Properties:
    VpcId: !Ref VPC
    AvailabilityZone: !Select [0, !GetAZs '']
    CidrBlock: 38.0.128.0/20
    Tags:
      - Key: Name
        Value: !Sub '${AWS::StackName}-vpc-private-subnet1'
      - Key: AZ
        Value: !Select [0, !GetAZs '']
      - Key: Project
        Value: !Ref ProjectName

PrivateSubnet2:
  Type: AWS::EC2::Subnet
  Properties:
    VpcId: !Ref VPC
    AvailabilityZone: !Select [1, !GetAZs '']
    CidrBlock: 38.0.144.0/20
    Tags:
      - Key: Name
        Value: !Sub '${AWS::StackName}-vpc-private-subnet2'
      - Key: AZ
        Value: !Select [1, !GetAZs '']
      - Key: Project
        Value: !Ref ProjectName
Even thought resources in private subnets should not be directly accessible from the internet, they still need to communicate with other resources within the VPC. Hence, route table is neccessary to define routes that enable this internal communication.
PrivateRouteTable1:
  Type: AWS::EC2::RouteTable
  Properties:
    VpcId: !Ref VPC
    Tags:
      - Key: Name
        Value: !Sub '${AWS::StackName}-route-table-private-1'
      - Key: Project
        Value: !Ref ProjectName

PrivateSubnetRouteTableAssociationAZ1:
  Type: AWS::EC2::SubnetRouteTableAssociation
  Properties:
    RouteTableId: !Ref PrivateRouteTable1
    SubnetId: !Ref PrivateSubnet1

PrivateRouteTable2:
  Type: AWS::EC2::RouteTable
  Properties:
    VpcId: !Ref VPC
    Tags:
      - Key: Name
        Value: !Sub '${AWS::StackName}-route-table-private-2'
      - Key: Project
        Value: !Ref ProjectName

PrivateSubnetRouteTableAssociationAZ2:
  Type: AWS::EC2::SubnetRouteTableAssociation
  Properties:
    RouteTableId: !Ref PrivateRouteTable2
    SubnetId: !Ref PrivateSubnet2
In this article, as shown in the diagram above, one of the private subnets is not used. The additional subnet makes it easier for us to switch to a Multi-AZ database instance deployment in the future.
After we have defined the two private subnets, we can thus proceed to configure the subnet group as follows.
DBSubnetGroup:
  Type: 'AWS::RDS::DBSubnetGroup'
  Properties:
    DBSubnetGroupDescription:
      !Sub 'Subnet group for ${AWS::StackName}-core-db DB Cluster'
    SubnetIds:
      - !Ref PrivateSubnet1
      - !Ref PrivateSubnet2
    Tags:
      - Key: Project
        Value: !Ref ProjectName
Step 5: Define Database Cluster and Instance
As mentioned earlier, we will be using Amazon Aurora. So what is Aurora?
In 2014, Aurora was introduced to the public. Aurora is a fully-managed MySQL and PostgreSQL-compatible RDBMS. Aurora has 5x the throughput of MySQL and 3x of PostgreSQL, at 1/10th the cost of commercial databases. Aurora.
Five years after that, in 2019, Aurora Serverless was generally available in several regions such as US, EU, and Japan. Aurora Serverless is a flexible and cost-effective RDBMS option on AWS for apps with variable or unpredictable workloads because it offers an on-demand and auto-scaling way to run Aurora database clusters.
In 2022, Aurora Serverless v2 is generally available and supports CloudFormation.
RDSDBCluster:
  Type: 'AWS::RDS::DBCluster'
  Properties:
    Engine: aurora-mysql
    DBClusterIdentifier: !Sub '${AWS::StackName}-core-db'
    DBSubnetGroupName: !Ref DBSubnetGroup
    NetworkType: IPV4
    VpcSecurityGroupIds:
    - !Ref DatabaseSecurityGroup
    AvailabilityZones:
    - !Select [0, !GetAZs '']
    EngineVersion: !Ref EngineVersion
    MasterUsername: !Ref MasterUsername
    MasterUserPassword: !Ref MasterUserPassword
    ServerlessV2ScalingConfiguration:
      MinCapacity: !Ref MinCapacity
      MaxCapacity: !Ref MaxCapacity

RDSDBInstance:
  Type: 'AWS::RDS::DBInstance'
  Properties:
    Engine: aurora-mysql
    DBInstanceClass: db.serverless
    DBClusterIdentifier: !Ref RDSDBCluster
The ServerlessV2ScalingConfiguration property is specially designed for Aurora Serverless v2 only. Here, we configure the minimum and maximum capacities for our database cluster to be 0.5 and 1 ACUs, respectively.
Choose 0.5 for the minimum because that allows our database instance to scale down the most when it is completely idle. For the maximum, we choose the lowest possible value, i.e. 1 ACU, to avoid the possibility of unexpected charges.
Step 6: Allow Connection from Bastion Host to the Database Instance
Finally, we need to allow the traffic from our bastion host to the database. Hence, our database security group template should be defined in the following manner.
DatabaseSecurityGroup:
  Type: AWS::EC2::SecurityGroup
  Properties:
    GroupName: !Sub '${AWS::StackName}-core-database-sg'
    GroupDescription:
      !Sub 'Security group for ${AWS::StackName} core database'
    VpcId: !Ref VPC

DatabaseAllowInboundFromBastion:
  Type: AWS::EC2::SecurityGroupIngress
  Properties:
    GroupId: !Ref DatabaseSecurityGroup
    IpProtocol: tcp
    FromPort: 3306
    ToPort: 3306
    SourceSecurityGroupId:
      Fn::GetAtt:
        - BastionSecurityGroup
        - GroupId
    GroupId:
      Fn::GetAtt:
        - DatabaseSecurityGroup
        - GroupId
To connect to the database instance from the bastion host, we need to navigate to the folder containing the private key and perform the following.
ssh -i <private-key.pem> -f -N -L 3306:<db-instance-endpoint>:3306 ec2-user@<bastion-host-ip-address> -vvv
The -L option in the format of port:host:hostport in the command above basically specifies that connections to the given TCP port on the local host are to be forwarded to the given host and port on the remote side.
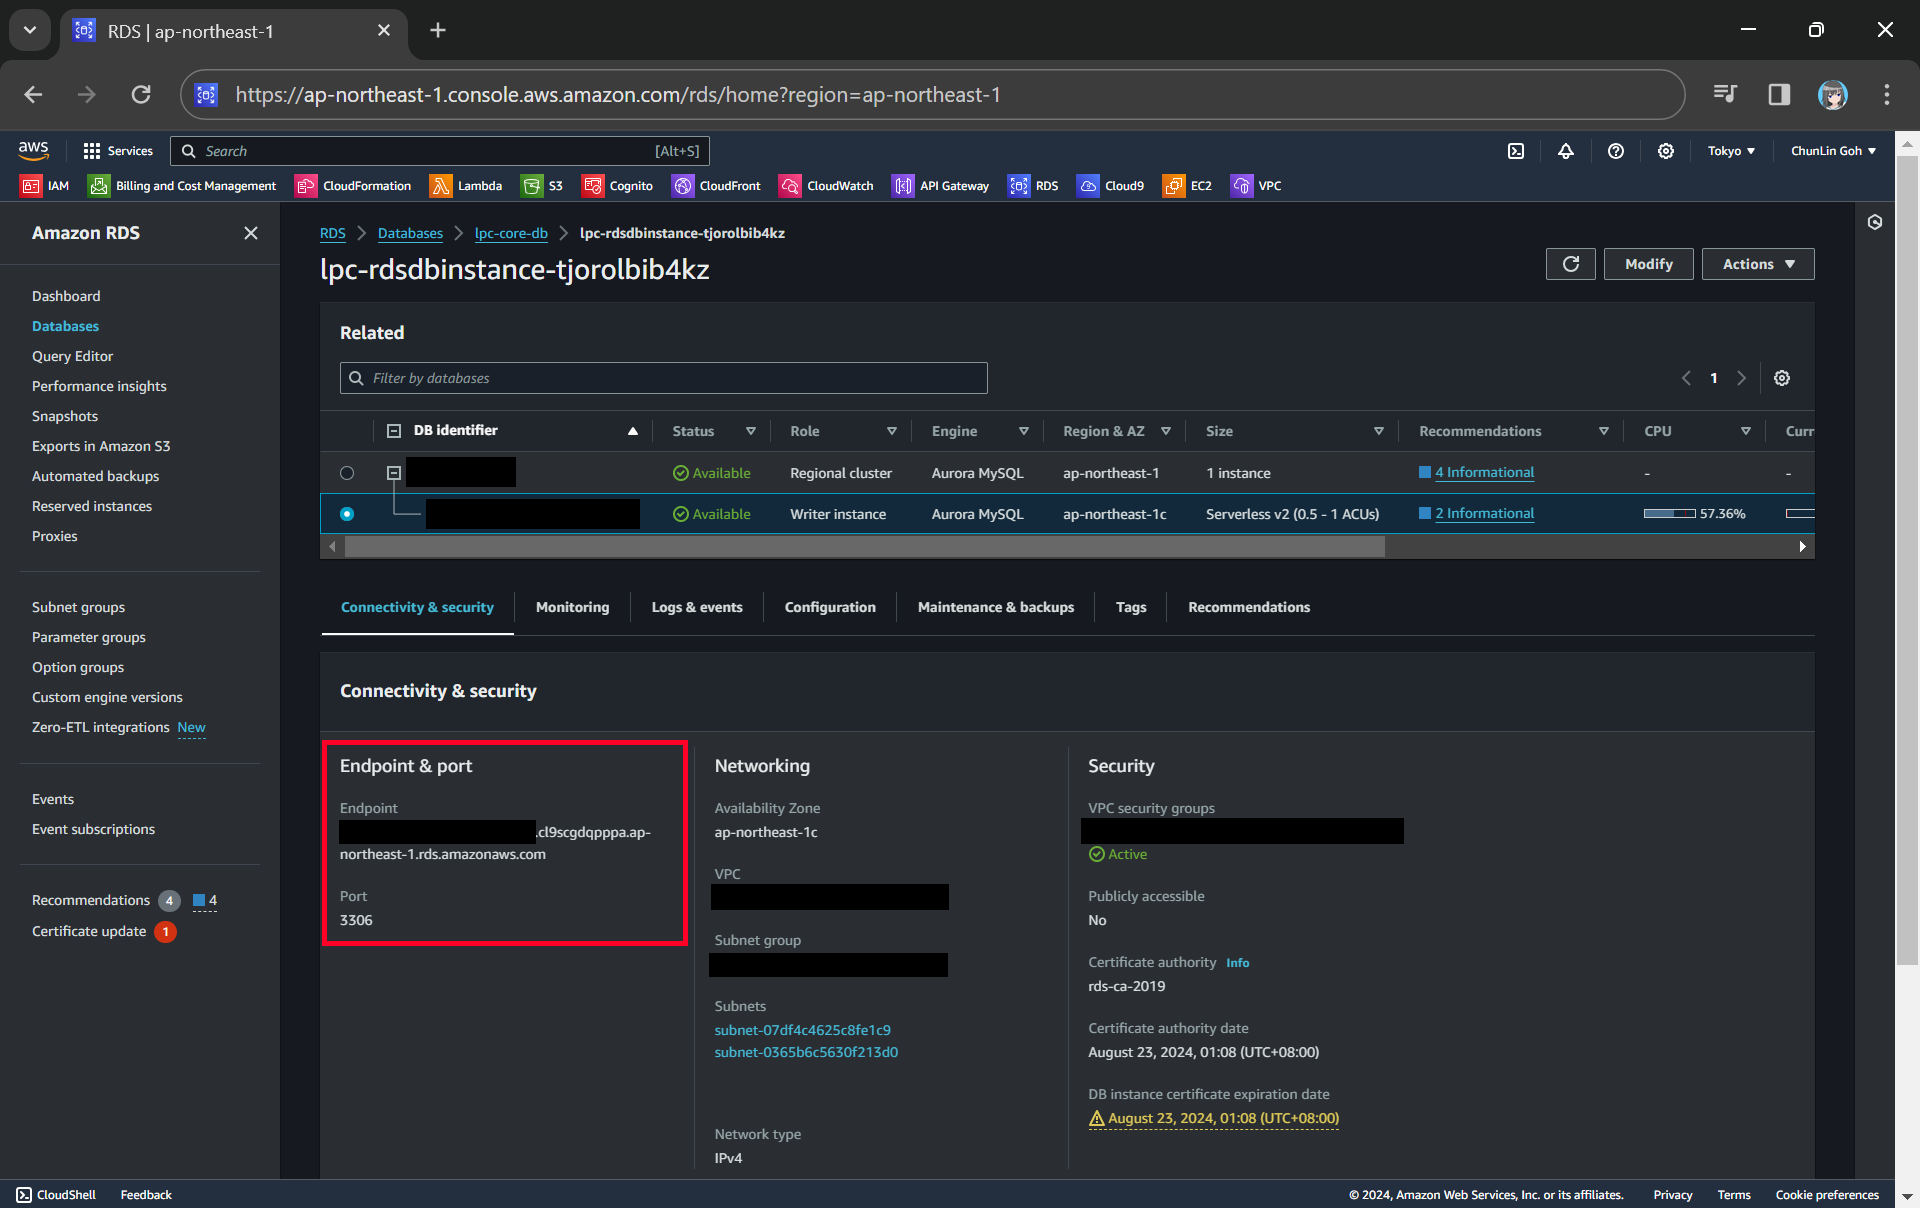
We can get the endpoint and port of our DB instance from the AWS Console.
With the command above, we should be able to connect to our database instance via our bastion host, as shown in the screenshot below.
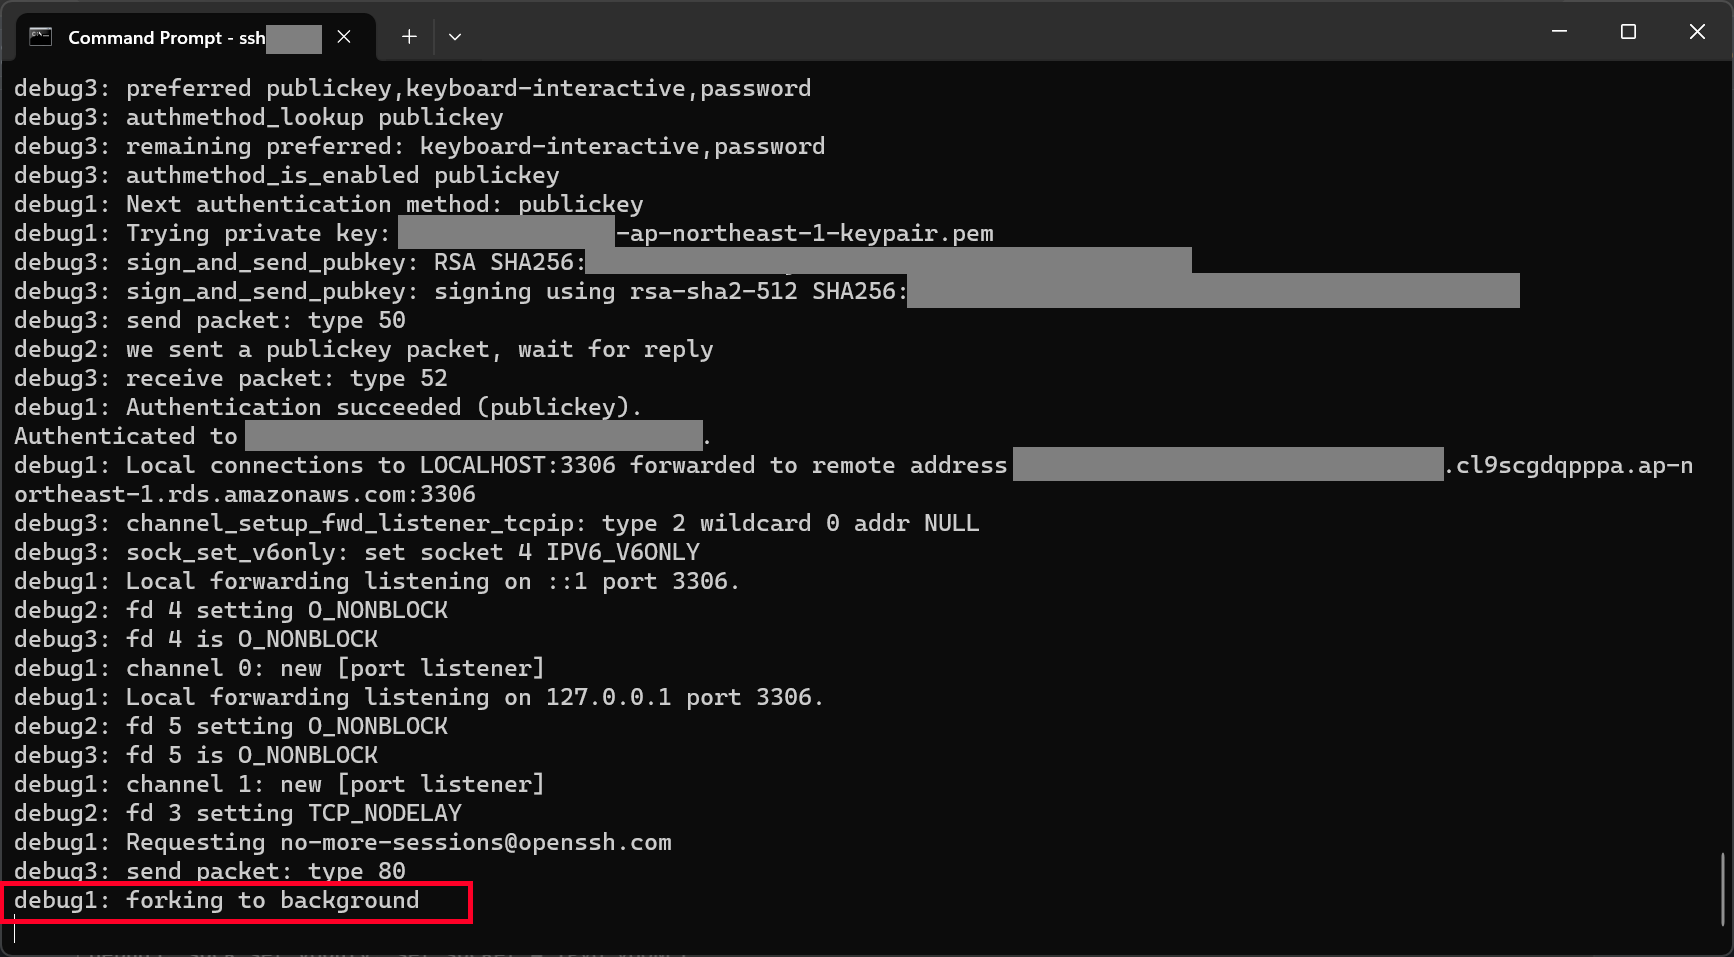
We can proceed to connect to our database instance after reaching this step.
Now, we are able to connect to our Aurora database on MySQL Workbench.

Connecting to our Aurora Serverless database on AWS!
WRAP-UP
That’s all for how we have to configure the infrastructure described in the following diagram so that we can connect to our RDS databases in private subnets through a bastion host.
I have also attached the complete CloudFormation template below for your reference.
# This is the complete template for our scenario discussed in this article.
---
AWSTemplateFormatVersion: '2010-09-09'
Description: 'Setup and Access Private RDS Database via a Bastion Host'

Parameters:
  ProjectName:
    Type: String
    Default: my-project
  EC2InstanceType:
    Type: String
    Default: t2.micro
  EC2AMI:
    Type: String
    Default: ami-020283e959651b381 # Amazon Linux 2023 AMI 2023.3.20240219.0 x86_64 HVM kernel-6.1
  EC2KeyPairName:
    Type: String
    Default: my-project-ap-northeast-1-keypair
  MasterUsername:
    Type: String
    Default: admin
  MasterUserPassword:
    Type: String
    AllowedPattern: "[a-zA-Z0-9]+"
    NoEcho: true
  EngineVersion:
    Type: String
    Default: 8.0
  MinCapacity:
    Type: String
    Default: 0.5
  MaxCapacity:
    Type: String
    Default: 1

Resources:
  VPC:
    Type: AWS::EC2::VPC
    Properties:
      CidrBlock: 38.0.0.0/16
      Tags:
        - Key: Name
          Value: !Sub '${AWS::StackName}-vpc'
        - Key: Project
          Value: !Ref ProjectName

  PublicSubnet:
    Type: AWS::EC2::Subnet
    Properties:
      AvailabilityZone: !Select [0, !GetAZs '']
      VpcId: !Ref VPC
      CidrBlock: 38.0.0.0/20
      MapPublicIpOnLaunch: true
      Tags:
        - Key: Name
          Value: !Sub '${AWS::StackName}-vpc-public-subnet1'
        - Key: AZ
          Value: !Select [0, !GetAZs '']
        - Key: Project
          Value: !Ref ProjectName

  PrivateSubnet1:
    Type: AWS::EC2::Subnet
    Properties:
      VpcId: !Ref VPC
      AvailabilityZone: !Select [0, !GetAZs '']
      CidrBlock: 38.0.128.0/20
      Tags:
        - Key: Name
          Value: !Sub '${AWS::StackName}-vpc-private-subnet1'
        - Key: AZ
          Value: !Select [0, !GetAZs '']
        - Key: Project
          Value: !Ref ProjectName

  PrivateSubnet2:
    Type: AWS::EC2::Subnet
    Properties:
      VpcId: !Ref VPC
      AvailabilityZone: !Select [1, !GetAZs '']
      CidrBlock: 38.0.144.0/20
      Tags:
        - Key: Name
          Value: !Sub '${AWS::StackName}-vpc-private-subnet2'
        - Key: AZ
          Value: !Select [1, !GetAZs '']
        - Key: Project
          Value: !Ref ProjectName

  InternetGateway:
    Type: AWS::EC2::InternetGateway
    Properties:
      Tags:
        - Key: Name
          Value: !Sub '${AWS::StackName}-igw'
        - Key: Project
          Value: !Ref ProjectName

  VPCGatewayAttachment:
    Type: AWS::EC2::VPCGatewayAttachment
    Properties:
      InternetGatewayId: !Ref InternetGateway
      VpcId: !Ref VPC

  PublicRouteTable:
    Type: AWS::EC2::RouteTable
    Properties:
      VpcId: !Ref VPC
      Tags:
        - Key: Name
          Value: !Sub '${AWS::StackName}-route-table'
        - Key: Project
          Value: !Ref ProjectName

  InternetRoute:
    Type: AWS::EC2::Route
    DependsOn: VPCGatewayAttachment
    Properties:
      RouteTableId: !Ref PublicRouteTable
      DestinationCidrBlock: 0.0.0.0/0
      GatewayId: !Ref InternetGateway

  SubnetRouteTableAssociationAZ1:
    Type: AWS::EC2::SubnetRouteTableAssociation
    Properties:
      RouteTableId: !Ref PublicRouteTable
      SubnetId: !Ref PublicSubnet

  PrivateRouteTable1:
    Type: AWS::EC2::RouteTable
    Properties:
      VpcId: !Ref VPC
      Tags:
        - Key: Name
          Value: !Sub '${AWS::StackName}-route-table-private-1'
        - Key: Project
          Value: !Ref ProjectName

  PrivateSubnetRouteTableAssociationAZ1:
    Type: AWS::EC2::SubnetRouteTableAssociation
    Properties:
      RouteTableId: !Ref PrivateRouteTable1
      SubnetId: !Ref PrivateSubnet1

  PrivateRouteTable2:
    Type: AWS::EC2::RouteTable
    Properties:
      VpcId: !Ref VPC
      Tags:
        - Key: Name
          Value: !Sub '${AWS::StackName}-route-table-private-2'
        - Key: Project
          Value: !Ref ProjectName

  PrivateSubnetRouteTableAssociationAZ2:
    Type: AWS::EC2::SubnetRouteTableAssociation
    Properties:
      RouteTableId: !Ref PrivateRouteTable2
      SubnetId: !Ref PrivateSubnet2

  BastionSecurityGroup:
    Type: AWS::EC2::SecurityGroup
    Properties:
      GroupName: !Sub '${AWS::StackName}-bastion-sg'
      GroupDescription:
        !Sub 'Security group for ${AWS::StackName} bastion host'
      VpcId: !Ref VPC

  BastionAllowInboundSSHFromInternet:
    Type: AWS::EC2::SecurityGroupIngress
    Properties:
      GroupId: !Ref BastionSecurityGroup
      IpProtocol: tcp
      FromPort: 22
      ToPort: 22
      CidrIp: 0.0.0.0/0

  BastionInstance:
    Type: AWS::EC2::Instance
    Properties:
      ImageId: !Ref EC2AMI
      InstanceType: !Ref EC2InstanceType
      KeyName: !Ref EC2KeyPairName
      SubnetId: !Ref PublicSubnet
      SecurityGroupIds:
        - !Ref BastionSecurityGroup
      Tags:
        - Key: Name
          Value: !Sub '${AWS::StackName}-bastion'
        - Key: Project
          Value: !Ref ProjectName

  DatabaseSecurityGroup:
    Type: AWS::EC2::SecurityGroup
    Properties:
      GroupName: !Sub '${AWS::StackName}-core-database-sg'
      GroupDescription:
        !Sub 'Security group for ${AWS::StackName} core database'
      VpcId: !Ref VPC

  DatabaseAllowInboundFromBastion:
    Type: AWS::EC2::SecurityGroupIngress
    Properties:
      GroupId: !Ref DatabaseSecurityGroup
      IpProtocol: tcp
      FromPort: 3306
      ToPort: 3306
      SourceSecurityGroupId:
        Fn::GetAtt:
          - BastionSecurityGroup
          - GroupId
      GroupId:
        Fn::GetAtt:
          - DatabaseSecurityGroup
          - GroupId

  DBSubnetGroup:
    Type: 'AWS::RDS::DBSubnetGroup'
    Properties:
      DBSubnetGroupDescription:
        !Sub 'Subnet group for ${AWS::StackName}-core-db DB Cluster'
      SubnetIds:
        - !Ref PrivateSubnet1
        - !Ref PrivateSubnet2
      Tags:
        - Key: Project
          Value: !Ref ProjectName

  RDSDBCluster:
    Type: 'AWS::RDS::DBCluster'
    Properties:
      Engine: aurora-mysql
      DBClusterIdentifier: !Sub '${AWS::StackName}-core-db'
      DBSubnetGroupName: !Ref DBSubnetGroup
      NetworkType: IPV4
      VpcSecurityGroupIds:
      - !Ref DatabaseSecurityGroup
      AvailabilityZones:
      - !Select [0, !GetAZs '']
      EngineVersion: !Ref EngineVersion
      MasterUsername: !Ref MasterUsername
      MasterUserPassword: !Ref MasterUserPassword
      ServerlessV2ScalingConfiguration:
        MinCapacity: !Ref MinCapacity
        MaxCapacity: !Ref MaxCapacity

  RDSDBInstance:
    Type: 'AWS::RDS::DBInstance'
    Properties:
      Engine: aurora-mysql
      DBInstanceClass: db.serverless
      DBClusterIdentifier: !Ref RDSDBCluster


