
A few months back, the Ionic team introduced Capacitor, a new runtime for cross-platform development. Capacitor supports Android, iOS, PWA, and Electron platforms.
We covered PWA development with Capacitor in another article. In this article, we will be focusing on native workflow and functionalities.
Alternative to Cordova
Both Cordova and Capacitor are runtimes providing native functionalities over WebView. Cordova is a quite mature runtime with numerous plugins and robust tooling. Capacitor is a relatively new runtime with a different approach.
The Cordova framework provides a lot of native features like file management and camera to develop applications. The framework can be extended via multiple community plugins.
Frameworks like Ionic and OnsenUI were built on top Cordova and integrated the Cordova CLI into their tooling. The build process is handled by cordova-cli which could be extended via hooks. Native App features can be controlled via the config.xml file. The application logic is usually in the www folder. Ionic applications usually have it in the src folder which is then compiled to www via the Ionic CLI. In this context, the www or src folders are important. The platforms folder, which has native code, can be configured at build time. There is little need for the platforms to be a part of the developer workflow.
This is where Capacitor differs from Cordova. Capacitor considers the platforms folder as a source asset instead of a build time asset. Developers are encouraged to use Native IDEs, namely Android Studio and X-Code for development. The native code in the platforms folder is a part of the developer's git repository. Developers have more control over native code as compared to Cordova. Capacitor apps don't require a deviceready event. All plugin methods are available as soon as the WebView loads. However, Capacitor has limited backward compatibility with Cordova plugins. Due to the lack of support for hooks, the plugins have to be manually set up beforehand.
Starting a new project
We can initialize a Capacitor project in multiple ways. The simplest way to create a new project is by using the Ionic CLI.
ionic start CapacitorProject sidemenu --capacitor
We can add Capacitor to an existing Ionic project using
ionic integrations enable cordova
Capacitor is platform-agnostic - which means that we can also add it to an existing web app using
npm install --save @capacitor/core @capacitor/cli
npx cap init
Alternatively, we can start a project using the Capacitor CLI.
npx @capacitor/cli create
Capacitor Config
We can configure Capacitor projects using capacitor.config.json. This file provides configuration to the Capacitor's tooling. Here is the JSON which we used in the RealWorldApp docs.
{
  "appId": "me.karandpr.conduit",
  "appName": "Conduit",
  "bundledWebRuntime": false,
  "npmClient": "npm",
  "webDir": "build"
}
appID is the package identifier and appName is the application name. npmClient is the package manager in use. webDir is the directory where the build web assets are stored. The rest of the config options can be found here
Developer Workflow
In Cordova projects, we simply used the following command to run on a device:
ionic cordova run android
The developer workflow for Capacitor projects is below.
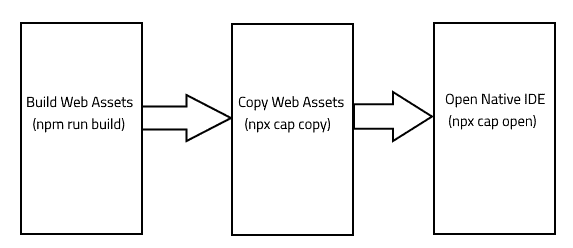
As shown, we can build projects using relevant build command like
npm run build
yarn run build
ionic build
The built web app should be available in folders like www or build. We have already specified the folder to be webDir in capacitor.config.json. To copy the assets to native platforms, we will execute
npx cap copy
If we have installed a new plugin, we will have to use the command
npx cap sync
Lastly, we can open the project in a native IDE using
npx cap open
Background Tasks
Now that we covered the main developer workflow, let’s zoom into how background services work in Capacitor.
Capacitor has default plugins to ease up native development. The usual suspects File, Camera, Geolocation and Push are already present. One plugin API which caught our fancy is Background Task. The Background Task API allows the Capacitor app to run short tasks in the background. This comes in handy if we want to finish some tasks after the app is pushed to the background. Currently, the plugin provides two functions.
-
BackgroundTask.beforeExit: This function allows certain tasks to be run in the background. -
BackgroundTask.finish: This function notifies the OS that the task is over. This is important for iOS.
In the future, the plugin may support background fetch operations.
Let's look at a code snippet to see how Background Task works. The purpose of the snippet is to get the Latitude & Longitude of the device after the app is pushed to the background. We have used Geolocation and LocalNotifications API for that purpose.
 App.addListener('appStateChange', (state) => {
      if (!state.isActive) {
        // We are using the appStateChange event to detect a change.

        let taskId = BackgroundTask.beforeExit(async () => {
          // We will be using this function to get geolocation.
          let location = await this.getCurrentPosition();
          // The location is fetched using Geolocation service.

          LocalNotifications.schedule({
            notifications: [
              {
                title: "Last Known Location",
                body: "Latitude: "+ location.coords.latitude +"Longitude: "+ location.coords.longitude,
                id: 1,
                schedule: { at: new Date(Date.now() + 1000 * 10) },
                sound: null,
                attachments: null,
                actionTypeId: "",
                extra: null
              }
            ]
          });
          // We have scheduled a notification after 10 seconds.
          BackgroundTask.finish({
              taskId
            });
            // We have notified the OS that the task is finished.
        });
      }
    })

    async getCurrentPosition() {
      const coordinates = await Geolocation.getCurrentPosition();
      return coordinates
    }
The iOS implementation uses UIApplication's Background Task. It's mandatory in iOS to invoke finish - otherwise, the app may be labeled as impacting battery life. The usual time allowed for running the task is around 180 seconds. After the time limit, iOS may close the app. Also, setInterval and setTimeout won't work once the app is in the background.
The Android Implementation uses IntentService to execute background tasks. IntentService runs outside the application in a background process. Hence, a task can run independently even after the app is removed from memory. On Android, there is no restriction on the length of the task.
Closing Thoughts
Capacitor introduces us to a new way to develop WebView Apps. It has some interesting plugin APIs like Background Task. Currently, there are some incompatible plugins which might require some workarounds. If you are a seasoned developer, you should try Capacitor in your upcoming projects.
As a drawback, old or private Cordova plugins might cause build issues with Capacitor. There is no specific guideline for integrating such plugins. In such cases, it's better to stick to current build processes and plan out a migration strategy. Also, it might be frustrating for new developers to work in three workspaces. If you don't want to work with native platforms, you can always use Cordova.
As a final note, don't forget that, before deploying your commercial or enterprise Ionic apps to production, you should always protect their logic against reverse-engineering, abuse, and tampering by following this guide.
Originally published on the Jscrambler Blog.


