The management of user access stands as a pivotal aspect of web application development. In this comprehensive guide, you will learn and understand the intricate workings of authorization and authentication in React.js. This article caters to readers possessing a fundamental understanding of React, providing them with invaluable insights. Moreover, seasoned front-end engineers will discover a detailed workflow for session management within the realm of this guide.
To get started, you will need to set up a React project by running the command
npx create-react-app your-project-name
Also, you can run
npm install react-router-dom
This will help you install React Router Dom for an efficient routing system.
Build Login Component
We'll start with a simple login component that accepts two inputs: an email field and a password field. When an onChange event occurs, these two input fields trigger the handleInput function. The name attribute on the input is also used by the function to set the input state. This is an effective method for managing input fields in ReactJS. If the button is pressed, the parent listens for an onSubmit event and invokes the handleSubmitEvent handler.
import { useState } from "react";

const Login = () => {
  const [input, setInput] = useState({
    username: "",
    password: "",
  });

  const handleSubmitEvent = (e) => {
    e.preventDefault();
    if (input.username !== "" && input.password !== "") {
      //dispatch action from hooks
    }
    alert("please provide a valid input");
  };

  const handleInput = (e) => {
    const { name, value } = e.target;
    setInput((prev) => ({
      ...prev,
      [name]: value,
    }));
  };

  return (
    <form onSubmit={handleSubmitEvent}>
      <div className="form_control">
        <label htmlFor="user-email">Email:</label>
        <input
          type="email"
          id="user-email"
          name="email"
          placeholder="example@yahoo.com"
          aria-describedby="user-email"
          aria-invalid="false"
          onChange={handleInput}
        />
        <div id="user-email" className="sr-only">
          Please enter a valid username. It must contain at least 6 characters.
        </div>
      </div>
      <div className="form_control">
        <label htmlFor="password">Password:</label>
        <input
          type="password"
          id="password"
          name="password"
          aria-describedby="user-password"
          aria-invalid="false"
          onChange={handleInput}
        />
        <div id="user-password" className="sr-only">
          your password should be more than 6 character
        </div>
      </div>
      <button className="btn-submit">Submit</button>
    </form>
  );
};

export default Login;
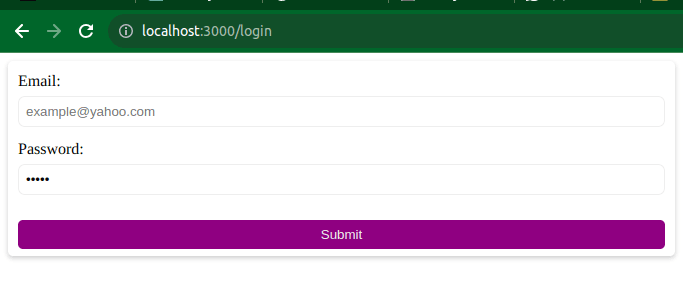
This image shows the output of our login component, which contains two input fields and a button.
Create AuthContext and AuthProvider
The context API is generally used for managing states that will be needed across an application. For example, we need our user data or tokens that are returned as part of the login response in the dashboard components. Also, some parts of our application need user data as well, so making use of the context API is more than solving the problem for us.
Next, in an AuthProvider.js file, create an AuthContext for managing the user state and an AuthProvider for consuming the content of our context.
import { useContext, createContext } from "react";
const AuthContext = createContext();

const AuthProvider = ({ children }) => {
  return <AuthContext.Provider>{children}</AuthContext.Provider>;
};

export default AuthProvider;

export const useAuth = () => {
  return useContext(AuthContext);
};
The code set up above is used for creating the authentication context in React using the Context API. It creates an AuthContext using createContext() to manage the authentication state.
The AuthProvider component is designed to wrap the application and provide the authentication context to its child components using the AuthContext.Provider.
The useAuth custom hook utilizes useContext to access the authentication context from within components, allowing them to consume the authentication state and related functions stored in the context. As this article progresses, we will add the authentication logics that control the login and logout processes, passing them via the AuthContext.Provider. You will then have access to them and be able to use them when you call the useAuth function.
Next, import and wrap the AuthProvider around the app content in App.js.
import AuthProvider from "./hooks/AuthProvider";

function App() {
  return (
    <div className="App">
      <AuthProvider>{/* App content */}</AuthProvider>
    </div>
  );
}

export default App;
Now that the AuthProvider has been wrapped around the App components, we can access all the context values in any of our pages or components within the application when we add all the routes needed to the App component.
Create Authentication Logic
Next, the AuthProvider component will be updated with login and logout functions. This function will be passed down through the AuthContext.Provider and it will be accessible globally.
import { useContext, createContext, useState } from "react";
import { useNavigate } from "react-router-dom";

const AuthContext = createContext();

const AuthProvider = ({ children }) => {
  const [user, setUser] = useState(null);
  const [token, setToken] = useState(localStorage.getItem("site") || "");
  const navigate = useNavigate();
  const loginAction = async (data) => {
    try {
      const response = await fetch("your-api-endpoint/auth/login", {
        method: "POST",
        headers: {
          "Content-Type": "application/json",
        },
        body: JSON.stringify(data),
      });
      const res = await response.json();
      if (res.data) {
        setUser(res.data.user);
        setToken(res.token);
        localStorage.setItem("site", res.token);
        navigate("/dashboard");
        return;
      }
      throw new Error(res.message);
    } catch (err) {
      console.error(err);
    }
  };

  const logOut = () => {
    setUser(null);
    setToken("");
    localStorage.removeItem("site");
    navigate("/login");
  };

  return (
    <AuthContext.Provider value={{ token, user, loginAction, logOut }}>
      {children}
    </AuthContext.Provider>
  );

};

export default AuthProvider;

export const useAuth = () => {
  return useContext(AuthContext);
};
In this code, the AuthProvider component manages the user authentication state, providing functionalities like login, logout, and token storage using useState hooks.
The loginAction function handles user login by sending a POST request to an authentication endpoint, updating the user and token state upon a successful response, and storing the token in local storage.
The logOut function clears user and token data, removing the token from local storage. The AuthContext.Provider makes the authentication state and related functions available to its child components, accessible via the useAuth hook, enabling components to consume authentication data and actions within the application.
Protect Routes with Authorization
Next up, we will set up a route guard that protects any route that is private in the application. To achieve this, the useAuth hook for accessing our context data will be needed. Here is the code on how to work through it.
import React from "react";
import { Navigate, Outlet } from "react-router-dom";
import { useAuth } from "../hooks/AuthProvider";

const PrivateRoute = () => {
  const user = useAuth();
  if (!user.token) return <Navigate to="/login" />;
  return <Outlet />;
};

export default PrivateRoute;
This code defines a PrivateRoute component for handling authentication. It utilizes the useAuth hook from the AuthProvider to access user authentication data. If the user does not possess a token, indicating they are not logged in, the code triggers a redirect to the /login route using the <Navigate> component. Otherwise, it renders the child components nested within the PrivateRoute component accessed via <Outlet />, allowing authenticated users to access the protected routes while redirecting unauthenticated users to the login page.
Add Routing
Next, we will update the App.js component by adding routing to it. It serves as the root component, enclosing the entire application. Within the App.js, it uses the Router component to set up the routing mechanism.
import { BrowserRouter as Router, Route, Routes } from "react-router-dom";
import Login from "./components/Login";
import Dashboard from "./components/Dashboard";
import AuthProvider from "./hooks/AuthProvider";
import PrivateRoute from "./router/route";

function App() {
  return (
    <div className="App">
      <Router>
        <AuthProvider>
          <Routes>
            <Route path="/login" element={<Login />} />
            <Route element={<PrivateRoute />}>
              <Route path="/dashboard" element={<Dashboard />} />
            </Route>
            {/* Other routes */}
          </Routes>
        </AuthProvider>
      </Router>
    </div>
  );
}

export default App;
The Routes component establishes the route configuration: the '/login' path is mapped to the Login component, rendering it when the URL matches. The <PrivateRoute /> component serves as a guard for protecting the /dashboard route. When a user navigates to /dashboard, the PrivateRoute checks for authentication using the AuthProvider. If the user is authenticated (has a token), it renders the Dashboard component; otherwise, it redirects to the /login route, ensuring protected access to the dashboard.
API Integration
If you've reached this point, great job! We're nearing the end of this article. Yet there are a few more steps to cover. We've successfully created a login component, established an AuthContext to manage user sessions, and set up a route guard. Now, the next step is to trigger the login action by utilizing the useAuth hook to access the function. This approach enables the handleSubmitEvent function in the Login Component to trigger the API request. Upon a successful response, the tokens and user data will be saved and passed down through the AuthContext.
Here is the updated code for the login component.
import { useState } from "react";
import { useAuth } from "../hooks/AuthProvider";

const Login = () => {
  const [input, setInput] = useState({
    username: "",
    password: "",
  });

  const auth = useAuth();
  const handleSubmitEvent = (e) => {
    e.preventDefault();
    if (input.username !== "" && input.password !== "") {
      auth.loginAction(input);
      return;
    }
    alert("pleae provide a valid input");
  };

  return (
    <form onSubmit={handleSubmitEvent}>
      {/* Form inputs are provided in the above examples */}
    </form>
  );
};

export default Login;
The above example shows how to dispatch the loginAction using the useAuth hook.
Add Logout Button
Next, we need to add a button to dispatch the logOut action for ending the user session by clearing the user state in the context and also clarifying the token localStorage. Now create a dashboard component and add the code below.
import React, { useEffect } from "react";
import { useAuth } from "../hooks/AuthProvider";

const Dashboard = () => {
  const auth = useAuth();
  return (
    <div className="container">
      <div>
        <h1>Welcome! {auth.user?.username}</h1>
        <button onClick={() => auth.logOut()} className="btn-submit">
          logout
        </button>
      </div>
    </div>
  );
};

export default Dashboard;
In the code above, the Dashboard component utilizes the useAuth hook from theAuthProvider to access authentication information. The component displays a welcome message with the username of the logged-in user and a logout button, which triggers the logOut function to log the user out.

The image above shows two input fields and a button. The user enters the email address and password.
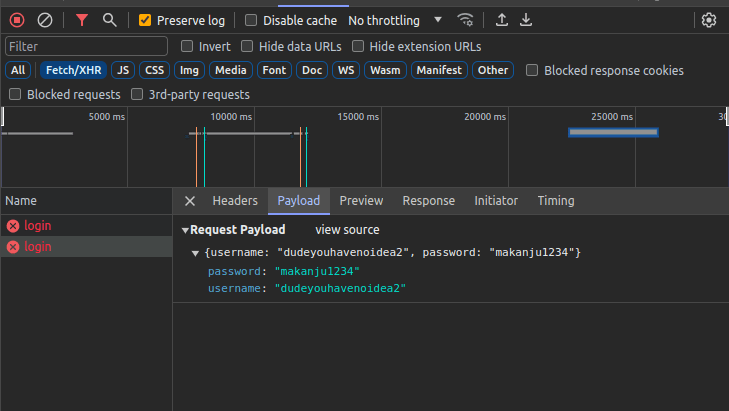
This image illustrates the input data being passed as an object to the backend after a user enters their details.
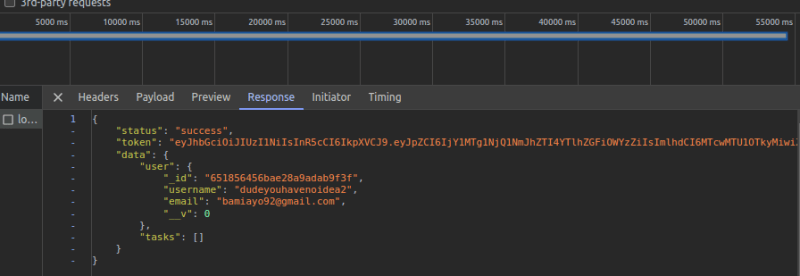
This image depicts the backend API response data, which includes user data, user tasks, and a token for managing user sessions.
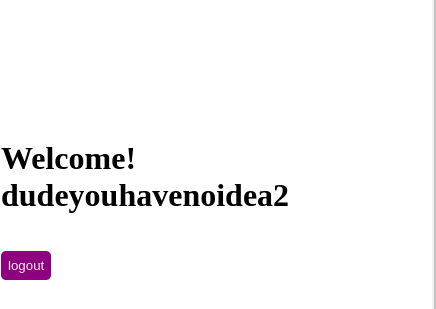
After logging in successfully, the user is redirected to the dashboard, where the username and logout buttons are displayed.
The images provided illustrate the login process from our implementation. When a user enters the correct information, it sends it to the server as a payload, and the server checks to see if the user exits. If they do, we receive a response with a user object containing all of the user's information, such as name and email address, and they are redirected to the dashboard page. In addition, we receive a token, which is saved to the browser's local storage. This allows us to manage user sessions more effectively. When the user clicks the log-out action, the last action occurs. It clears the user's local storage and redirects them to the login page.
Conclusion
Understanding how to use the Context API and React Router in authentication workflows is critical for managing user sessions in React applications. From creating authentication contexts to creating guarded routes and enabling user actions like login and logout, this comprehensive guide equips developers to handle user authentication seamlessly and securely within their React projects.