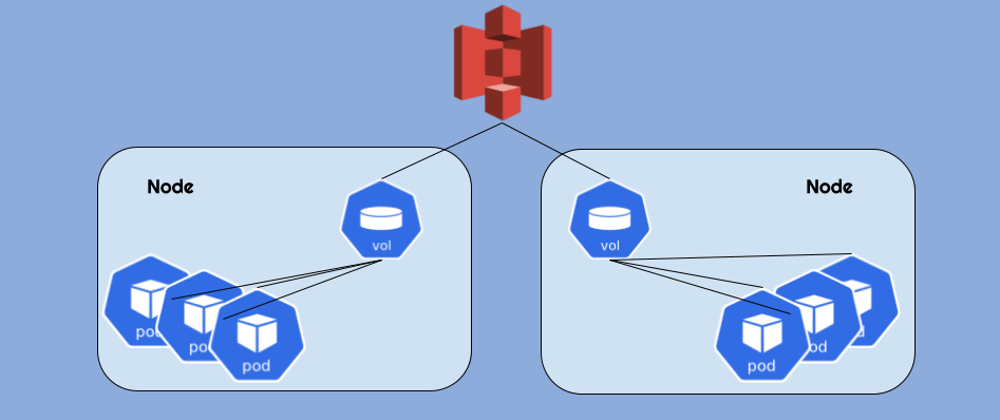
This post describes how to mount an S3 bucket to all the nodes in an EKS cluster and make it available to pods as a hostPath volume. Yes, we're aware of the security implications of hostPath volumes, but in this case it's less of an issue - because the actual access is granted to the S3 bucket (not the host filesystem) and access permissions are provided per serviceAccount.
Goofys
We're using goofys as the mounting utility. It's a "high-performance, POSIX-ish Amazon S3 file system written in Go" based on FUSE (file system in user space) technology.
Daemonset
In order to provide the mount transparently we need to run a daemonset - so the mount is created on all nodes in the cluster.
The Dockerfile and the Helm Chart
We've built our own goofys Docker image based on Alpine Linux and a Helm chart that installs the DaemonSet.
The image is found on our Docker hub repo here: https://hub.docker.com/r/otomato/goofys
The Dockerfile and the Helm chart can be found here: https://github.com/otomato-gh/s3-mounter
S3 Access per ServiceAccount
The Helm chart currently assumes that S3 access is provided by using an IAM Role attached to a kubernetes serviceAccount. We may add API access keys support in the future if needed.
HowTo:
Here's how to set it all up:
1. OIDC Provider for EKS
Make sure you have an IAM OIDC identity provider for your cluster. If not - you can use the following commands (you'll need eksctl installed):
aws eks describe-cluster --name cluster_name --query "cluster.identity.oidc.issuer" --output text`
Example output:
https://oidc.eks.region-code.amazonaws.com/id/EXAMPLED539D4633E53DE1B716D3041E
List the IAM OIDC providers in your account. Replace EXAMPLED539D4633E53DE1B716D3041E with the value returned from the previous command.
aws iam list-open-id-connect-providers | grep EXAMPLED539D4633E53DE1B716D3041E
Example output
"Arn": "arn:aws:iam::111122223333:oidc-provider/oidc.eks.region-code.amazonaws.com/id/EXAMPLED539D4633E53DE1B716D3041E"
If output is returned from the previous command, then you already have a provider for your cluster. If no output is returned, then you must create an IAM OIDC provider with the following command. Replace cluster_name with your own value.
eksctl utils associate-iam-oidc-provider --cluster cluster_name --approve
2. Create a Managed Policy for Bucket Access
Create json file named policy.json with the appropriate policy definition. For example - the following code snippet creates a json file that allows full access to a bucket named my-kubernetes-bucket:
read -r -d '' MY_POLICY <<EOF
{
    "Version": "2012-10-17",
    "Statement": [
        {
            "Effect": "Allow",
            "Action": [
                "s3:*",
            ],
            "Resource": [
                "arn:aws:s3:::my-kubernetes-bucket"
            ]
        }
    ]
}
EOF
echo "${MY_POLICY}" > policy.json
Create the managed policy by running:
aws iam create-policy --policy-name kubernetes-s3-access --policy-document file://policy.json
Example output:
{
"Policy": {
"PolicyName": "kubernetes-s3-access",
"PolicyId": "ANPAS3DOMWSIX73USJOHK",
"Arn":"arn:aws:iam::04968064045764:policy/kubernetes-s3-access",
Note the policy ARN for the next step.
3. Create a Role for S3 Access
Set your AWS account ID to an environment variable with the following command:
ACCOUNT_ID=$(aws sts get-caller-identity --query "Account" --output text)
Set your OIDC identity provider to an environment variable with the following command. Replace the example values with your own values:
OIDC_PROVIDER=$(aws eks describe-cluster --name cluster-name --query "cluster.identity.oidc.issuer" --output text | sed -e "s/^https:\/\///")
Copy the following code block to your computer and replace the example values with your own values.
read -r -d '' TRUST_RELATIONSHIP <<EOF
{
  "Version": "2012-10-17",
  "Statement": [
    {
      "Effect": "Allow",
      "Principal": {
        "Federated": "arn:aws:iam::${ACCOUNT_ID}:oidc-provider/${OIDC_PROVIDER}"
      },
      "Action": "sts:AssumeRoleWithWebIdentity",
      "Condition": {
        "StringEquals": {
          "${OIDC_PROVIDER}:sub": "system:serviceaccount:my-namespace:my-service-account"
        }
      }
    }
  ]
}
EOF
echo "${TRUST_RELATIONSHIP}" > trust.json
Run the modified code block from the previous step to create a file named trust.json.
Run the following AWS CLI command to create the role:
aws iam create-role --role-name eks-otomounter-role --assume-role-policy-document file://trust.json --description "Mount s3 bucket to EKS"
Run the following command to attach the IAM policy using the ARN created in the previous section to your role:
aws iam attach-role-policy --role-name eks-otomounter-role --policy-arn=IAM_POLICY_ARN
4. Finally - Install the S3 Mounter!
- Add the helm repo to your repo list:
helm repo add otomount https://otomato-gh.github.io/s3-mounter
- Inspect its arguments in
values.yaml
helm show values otomount/s3-otomount
The values you want to set are in the end:
bucketName: my-bucket
iamRoleARN: my-role
mountPath: /var/s3
hostPath: /mnt/s3data
- Install the chart by providing your own values:
helm upgrade --install s3-mounter otomount/s3-otomount   \
--namespace otomount --set bucketName=<your-bucket-name> \
--set iamRoleARN=<your-role-arn> --create-namespace
This will use the default hostPath for the mount - i.e /mnt/s3data
5. Use the mounted S3 bucket in your Deployments.
Here's an example pod definition that provides its container the access to the mounted bucket:
apiVersion: v1
kind: Pod
metadata:
  name: sleeper
spec:
  containers:
  - command:
    - sleep
    - infinity
    image: ubuntu
    name: ubuntu
    volumeMounts:
    - mountPath: /mydata:shared
      name: s3data
  volumes:
  - hostPath:
      path: /mnt/s3data
    name: s3data
Note the :shared - it's a mount propagation modifier in the mountPath field that allows this volume to be shared by multiple pods/containers on the same node.
And that's it! You can now access your bucket. If you've created the pod from our example - you can exec to verify:
kubectl exec sleeper -- ls /mydata
Note: running this on your cluster will cost you a few additional $ for S3 API calls that goofys performs to maintain the mount. So remember to monitor your cloud costs. But you should do that anyway, right?
Happy delivering!


