Hello there! This is my fourth day documenting my journey during the SingleStore Database Hackathon. In this article, we are going to explore SingleStore as a distributed cloud SQL database and how to connect it to a FastAPI application.
This tutorial is helpful for anyone looking for a way to connect to a remote MySQL server from a FastAPI application, especially on a SingleStoreDB cluster. However, the SingleStore docs don't contain information about connecting FastAPI to a remote SingleStore database, nor is there any tutorial out there covering this topic. Therefore, in this tutorial, you will learn how to connect to a remote MySQL server, SingleStoreDB, in this case, from a FastAPI app.
Note that SingleStore provides short documentation on accessing MySQL databases from SQLAlchemy in a synchronous manner. Though we want to unleash the full potential of FastAPI through asynchronous programming, I found there were a few things that could use extra documentation for FastAPI support. In this blog post, I will walk you through the process of connecting SingleStore to FastAPI in a fully asynchronous fashion so that you can take advantage of all the benefits of asynchronous programming.
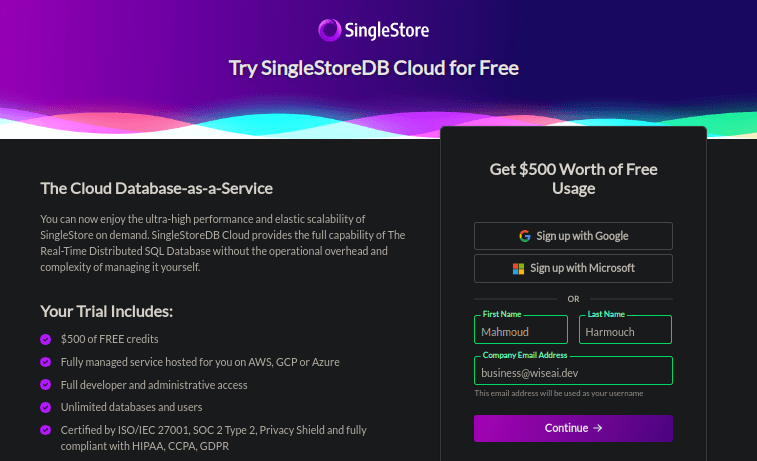
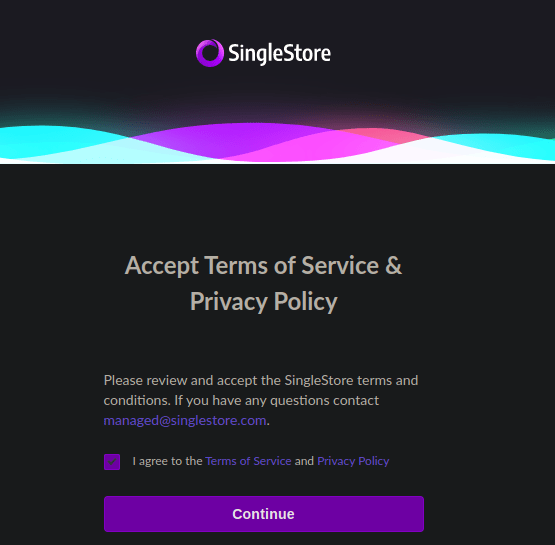
In this section, we are going to address some of the main features of SingleStore, and show you how to set up your own SingleStore database in the cloud.
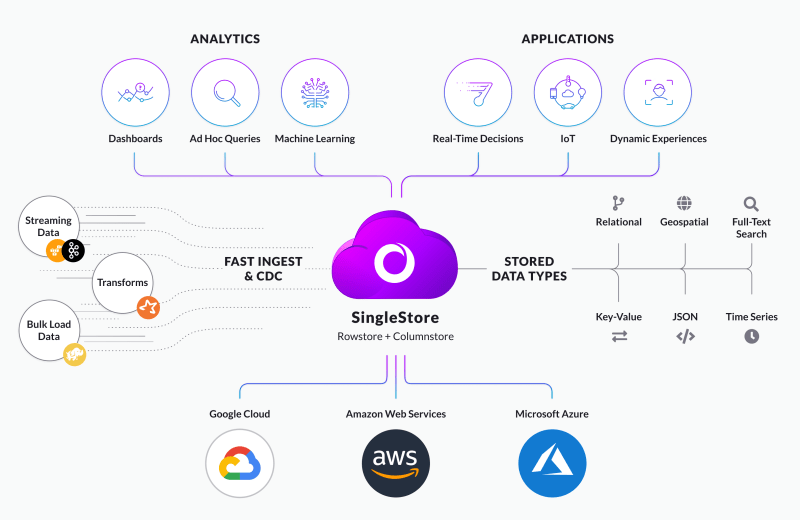
As their website puts it, SingleStore is a cloud service that unifies transactions and analytics in a single engine. This makes it perfect for developers like us :-), who need fast, modern enterprise applications. SingleStore is based on a distributed SQL architecture, making it 10-100 milliseconds fast on complex queries. It's also easy to scale, so your business can grow without any headaches.
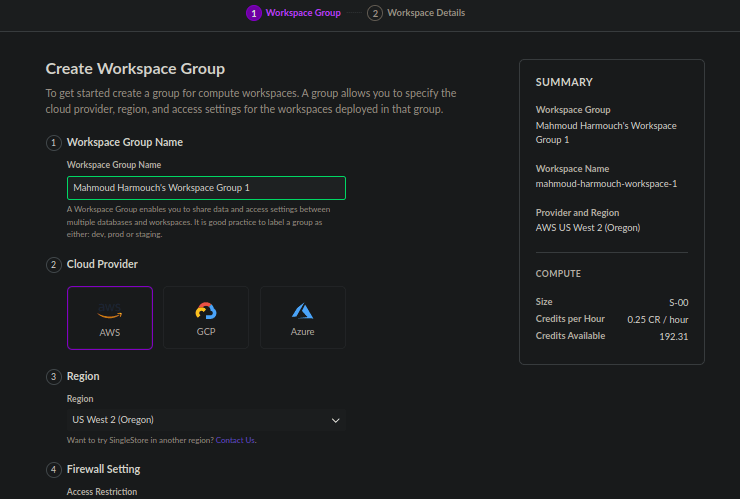
SingleStoreDB is a cloud database service that makes it easy to deploy, manage, and scale your databases. It is available on AWS, GCP, and Azure. SingleStoreDB abstracts most operations, such as deployment, management, and diagnostics. It is purpose-built to power global real-time applications with high throughput and low latency.
SingleStoreDB enables you to move away from traditional sharded architectures that are complex to manage and scale. With SingleStoreDB, you can use a single database for mission-critical applications without compromising performance or availability.
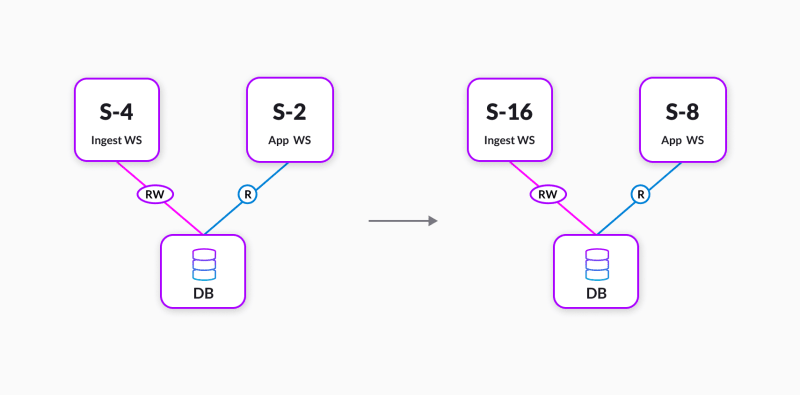
SingleStore workspaces are powerful, traditional deployments of the SingleStoreDB product. Each workspace has its own set of dedicated computing resources, making it excellent for running production workloads. You can attach and detach databases as needed, allowing you to quickly scale your data storage without having to worry about complex data management across different cloud regions.
There are two ways to create a MySQL database attached to a SingleStore Workspace: either by using the SQL Editor in the Cloud portal to enter your MySQL command CREATE DATABASE command or by using the GUI by clicking the Create Database button.
Creating a MySQL database from the GUI is easy and only requires two clicks. To do so:
Click on the Create Database button.
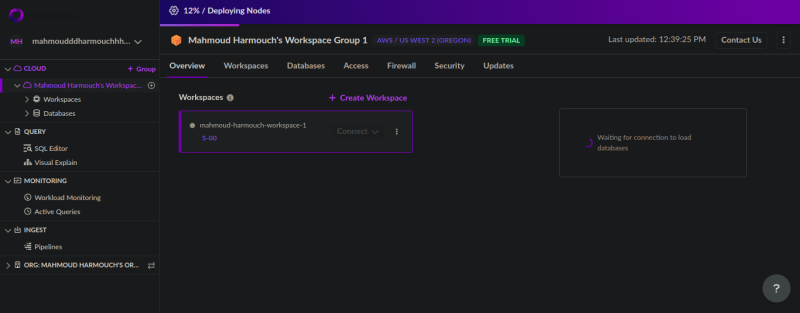
Create and connect a database to a workspace.
You will be prompted to enter a database name.
Database creation form.
Then select the workspace that the database needs to be attached to.
Finally, Click on the Create Database button.
To use the SQL Editor in the Cloud portal, type in your MySQL command CREATE DATABASE followed by the name of your new database and its schema. You can follow the docs for the syntax of the SQL command you need to enter.
This will create a new database with the specified name. You can look at the newly created database on the side panel. Or using the use MySQL command to access this database.
In order to interact with the database, let’s type the following code:
usechat
The console will respond with the result. We can query and work on our database. For instance, to see the available tables inside the chat database, try the following command:
SHOWtables;
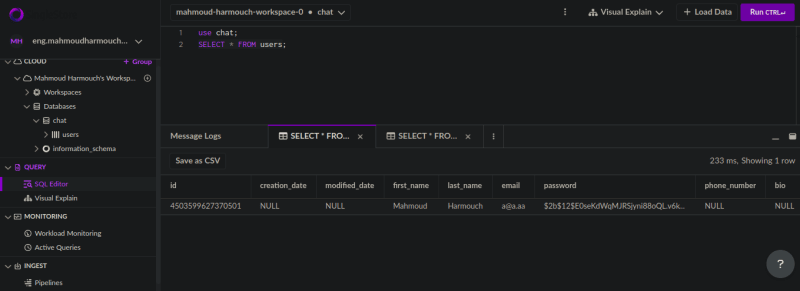
Note that there is also the default MySQL database that holds all the info about the MySQL database, such as registered users, tables, schemas, etc.
The default MySQL users table.
With SingleStoreDB set up, we need to create our FastAPI app and connect it to this database.
Arguably, one of the easiest ways to create API endpoints is using a framework such as FastAPI for a robust and scalable backend. Therefore, in this section, we will go through some simple endpoints that are minimal self-contained REST APIs.
We'll be using SQLAlchemy as our ORM (object-relational mapping) tool and Pydantic for data validation. SQLAlchemy will allow us to interact with our database easily and efficiently, while Pydantic will help ensure that the data being passed into our API is valid.
You tend to reuse existing code in your project when developing web applications. And to make your code reusable, the recommended way to structure a FastAPI project is to create each app in a separate folder. This way, your codebase will look much more organized and structured.
Creating each app in a separate folder has another advantage. It makes it easier to reuse code from one app to another. For example, if you have created an authentication app, you can easily reuse the code in other apps that require authentication.
Of course, you are not required to follow this structure. But if you want to make your code reusable, I think this is the best practice. I'm particularly obsessed with this way of organizing code, inspired by the Django REST framework.
Notice we have the root app folder, which contains multiple folders, each representing an App, as you call it in Django. Inside each app folder, we have four essential files:
The crud file contains all CRUD queries to interact with the database.
The model file contains all models related to this app.
The schemas file contains all pydantic schemas for data validation.
The router file contains all routes related to this app.
This makes it easy to reuse apps across projects and keep them well organized.
SQLAlchemy is a powerful Python library for working with relational databases. It gives developers easy ways to work with databases in their Python code. SQLAlchemy is one of the most widely used and highest-quality Python third-party libraries.
Getting started with SQLAlchemy is easy. In the following sections, I will walk you through the basics of setting up a database connection and running some basic queries. We'll also go through how to use SQLAlchemy's ORM layer to map database tables to Python objects.
MySQL is a powerful and popular database, and it's well-suited for use with Python. In the following section, we are going through how to set up a connection to a MySQL database in an asynchronous manner using the create_asynchrouns_engine function from SQLAlchemy. We'll also use the databases package and the aiomysql extra dependency. We'll also adapt the SQLAlchemy declarative approach to defining our users' table.
It is important to note that there are two ways to declare a data table in SQLAlchemy. However, as the name suggests, the declarative approach is much more readable and easy to understand. Therefore, we will be using the declarative approach in our project.
When building an application, it's crucial to adhere to the DRY principle: "Don't Repeat Yourself". This means defining a common base class from which all other classes inherit. For example, all tables in our app will have an id column. By defining this column in a common mixin, we avoid repetition and make our code more streamlined.
In addition, for monitoring purposes, we'll define a TimestampMixin with creation_date and modified_date columns. This can help monitor CRUD operations in our app (e.g., when a particular MySQL command was executed?). I think these columns are especially needed if you're implementing OTP functionality, so you can track when users last received their OTP code.
The SQLAlchemy docs are extremely helpful when getting started with the library. In particular, the section on mixins is handy. By making use of the declarative_mixin and declared_attr decorators, it is possible to build powerful mixins that can make working with SQLAlchemy much easier. By reading this section of the docs, we can implement our CommonMixin class like the following:
importrefromsqlalchemy.ormimportdeclared_attr,declarative_mixinfromsqlalchemyimportBIGINT,Column,DateTime@declarative_mixinclassCommonMixin:"""define a series of common elements that may be applied to mapped
classes using this class as a mixin class."""__name__:str__table_args__={"mysql_engine":"InnoDB"}__mapper_args__={"eager_defaults":True}id:int=Column(BIGINT,primary_key=True,autoincrement=True)@declared_attrdef__tablename__(cls)->str:split_cap=re.findall("[A-Z][^A-Z]*",cls.__name__)table_name=("".join(map(lambdaword:word.lower()+"_",split_cap[:-1]))+split_cap[-1].lower())returntable_name
As you can see, each of our data models has an id column used as the primary key. This is a common column that is shared among all of our data tables. The __tablename__ attribute is a helpful method that takes a class name like AccessToken and converts it into a snake case name access_token when initialising the data tables.
We need to define our Base class using the registry and DeclarativeMeta classes. This will allow us to utilise mypy's static type-checking capabilities.
Notice that we have three indexes email, password, and user_status. These are the most commonly accessed columns when fetching records, such as in the login endpoint. By indexing these columns, we can speed up record retrieval significantly.
Note that we are using SQLAlchemy v1.4 because the databases package doesn't currently support SQLAlchemy V2.0. SQLAlchemy v2.0 introduced a new function called mapped_column which can be used instead of Column to define much more powerful columns data tables.
As mentioned above, Pydantic will help us ensure that the data being passed into our API is valid. It’s a tool which allows you to be much more precise with your data structures.
This is especially useful when working with APIs, as it can help you avoid passing in invalid data. For example, let’s say you have a register endpoint that accepts first_name, last_name, email, and password. With Pydantic, you can define exactly what data is allowed for each field.
fromtypingimportOptionalfrompydanticimportBaseModel,Fieldfromapp.users.schemasimportUserObjectSchemaclassUserSchema(BaseModel):user:Optional[UserObjectSchema]token:Optional[dict[str,str]]=Field(...,example="eyJ0eXAiOiJKV1QiLCJhbGciOiJIUzI1NiJ9")status_code:int=Field(...,example=200)message:str=Field(...,example="You have successfully logged in!")classResponseSchema(BaseModel):status_code:int=Field(...,example=400)message:str=Field(...,example="Something went wrong!")classUserCreate(BaseModel):first_name:str=Field(...,example="Mahmoud")last_name:str=Field(...,example="Harmouch")email:str=Field(...,example="business@wiseai.dev")password:str=Field(...,example="SEc11r3P@ssw0rD")
This ensures that only valid data is ever passed into your API, saving you a lot of time and headaches down the road. In our example, the register endpoint will validate the data and return either UserSchema or ResponseSchema according to some logic:
fromtypingimportUnionfromfastapiimportAPIRouter,Dependsfromfastapi.securityimportOAuth2PasswordRequestFormfromapp.auth.crudimportregister_userfromapp.auth.schemasimportResponseSchema,UserCreate,UserSchemarouter=APIRouter(prefix="/api/v1")@router.post("/auth/register",name="auth:register",response_model=Union[UserSchema,ResponseSchema],responses={201:{"model":UserCreate,"description":"Welcome to this blazingly fast chat app!",},400:{"model":ResponseSchema,"description":"User already signed up!",},},)asyncdefregister(user:UserCreate):results=awaitregister_user(user)returnresults
This way, it can help you validate data before it is stored in a database, saving you a lot of time and effort in the long run.
To make SQLAlchemy create our data models on the SingleStoreDB server, we need to specify the MySQL connection URL. To do so, login into your SingleStore dashboard and then fill in the following variables in your .env file accordingly.
SINGLESTORE_HOST: Your remote MySQL server's domain name, the SingleStore domain name.
SINGLESTORE_DATABASE: The name of the database you want to access, in our case, the chat database.
SINGLESTORE_USERNAME: This is the user name you'll be creating for remote accesses. By default, this variable is equal to admin.
SINGLESTORE_PASSWORD: The corresponding password for that user.
SINGLESTORE_PORT: The port number where MySQL is listening to.
Next, we need to establish a database connection by instantiating the Database class provided by the databases package. The code below will return a Database instance:
But, to run this query, we must first create the users table. This can be accomplished through SQLAlchemy as follows:
fromsqlalchemy.ext.asyncioimportcreate_async_engineasyncdefinit_models(database_url):engine=create_async_engine(database_url,pool_pre_ping=True,pool_size=30,max_overflow=30,echo_pool=True,future=True,echo=True,# verbose output
pool_recycle=3600,)# recycle every hour
asyncwithengine.begin()asconn:awaitconn.run_sync(Base.metadata.drop_all)awaitconn.run_sync(Base.metadata.create_all)awaitengine.dispose()
As described previously, we use the create_async_engine function to create an asynchronous engine to translate our models into MySQL CREATE statements by executing the Base.metadata.create_all method. Our users model is being translated into the following CREATE statement:
This command will be executed on the SingleStore cluster to create our users' table in our chat database.
Note that translating a large number of data models is time-consuming and should be done once at the moment of creating our app. This method can be placed inside the on_startup event:
Awesome. You've now completed the tutorial and should have a solid understanding of connecting to a remote MySQL server running on a SingleStore cluster from your FastAPI application. This will prove invaluable as you begin developing more complex applications.
I hope you found this tutorial helpful and informative. We covered a lot of ground in explaining FastAPI, MySQL, databases, SingleStoreDB, and many more.
If you're still not sure how to use Database from databases, stay tuned for more tutorials on how you can create relational tables, add rows, fetch data, etc. Thanks for reading!
A Fully Async-based backend for Brave Chat. It is a multi-model server that is fully functional and supports all the usual messaging app capabilities, such as one-on-one (private) and room messaging. It enables users to send text and multimedia messages(e.g. images). Also, users can freely create, join, and leave chat rooms where everyone can message each other.