According to the first part in this delivery you can verify the deployment using unique credentials and central account. Suppose that the goal is create a simple stack, for demo purpose an s3 bucket, but in the next sessions the goal is create an end-to-end DevSecOps pipeline for serverless applications, containers and more use cases based on this pattern.
Hands On
Requirements
cdk >= 2.43.0
AWS CLI >= 2.7.0
Python >= 3.10.4
AWS Services
AWS Cloud Development Kit (CDK): is an open-source software development framework to define your cloud application resources using familiar programming languages.
AWS CodeBuild: fully managed continuous integration service that compiles source code, runs tests, and produces software packages that are ready to deploy.
AWS CodeCommit: secure, highly scalable, managed source control service that hosts private Git repositories.
AWS CodePipeline: fully managed continuous delivery service that helps you automate your release pipelines for fast and reliable application and infrastructure updates.
AWS Key Management Service (AWS KMS): lets you create, manage, and control cryptographic keys across your applications and more than 100 AWS services.
AWS CloudFormation: Speed up cloud provisioning with infrastructure as code
Solution Overview
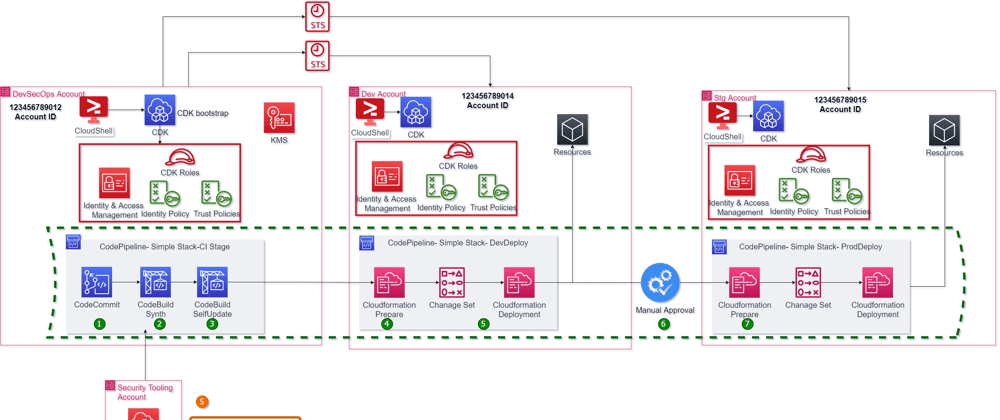
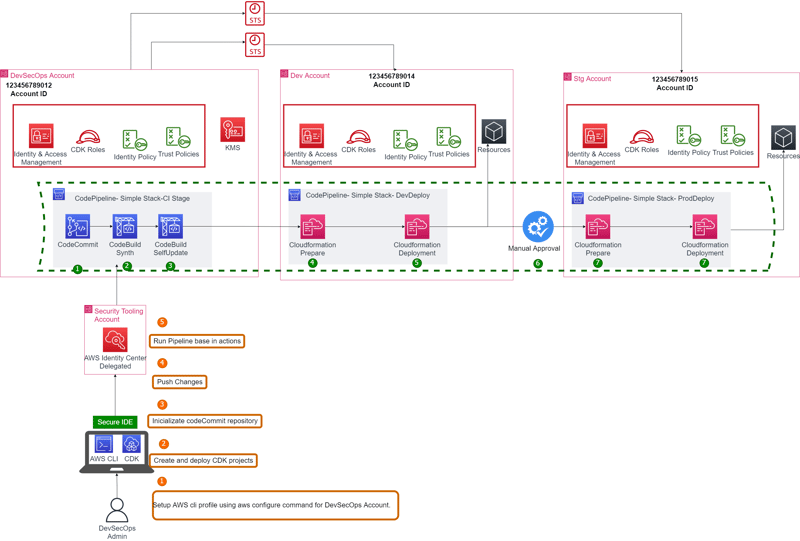
Figure 1. Solution Overview – Simple CDK Pipeline
The Figure 1 shows the steps to accomplish this task. Also, it shows a cross account pipeline using AWS CodePipeline, AWS CodeCommit, AWS Codebuild and AWS CloudFormation. But, how can you construct this pipeline secure and with the minimum effort? The answer CDK Pipelines.
This pipeline is a default pipeline composed by next steps:
1.The changes are detected and activate de pipeline. For this demo the branch master is the default branch.
2.The CDK project is synthesized.
3.The pipeline run self-update action.
4.The Cloudformation stack is prepared for developer environment.
5.The Cloudformation stack is deployed for developer environment.
6.To move between environments a manual approval step is added.
7.The Cloudformation stack is prepared for staging environment.
8.The Cloudformation stack is deployed for staging environment.
Step by Step
Setup AWS cli profile using aws configure command for DevSecOps Account.
aws configure sso --profile labxl-devsecops
SSO start URL [None]: https://my-sso-portal.awsapps.com/start
SSO region [None]:us-east-1
Using a browser, open the following URL:
https://my-sso-portal.awsapps.com/verify
and enter the following code:
QCFK-N451
There are 3 AWS accounts available to you.
Using the account ID 123456789012
The only role available to you is: AWSAdministratorAccess
Using the role name "AWSAdministratorAccess"
CLI default client Region [None]: us-east-2
CLI default output format [None]: json
To use this profile, specify the profile name using --profile, as shown:
aws s3 ls--profile labxl-devsecops
This structure is good but if you prefer can apply changes and customization based on best practices. For example:
A good practice is to separate declarative definitions from code, in this case in a folder project_configurations and logic will be in src folder.
For other hand, is recommended separate the stack from constructs and stateful services such databases, object storages and files systems **from stales services **as containers, lambdas, Api Gateways and others. For this purpose, the folder stacks and constructs are created.
The main idea is creating a pipeline with de infrastructure definitions the folder pipeline will be contains the definitions and stages.
This is a project for CDK development with Python for creating multi AWS account deployment.
Solution Overview
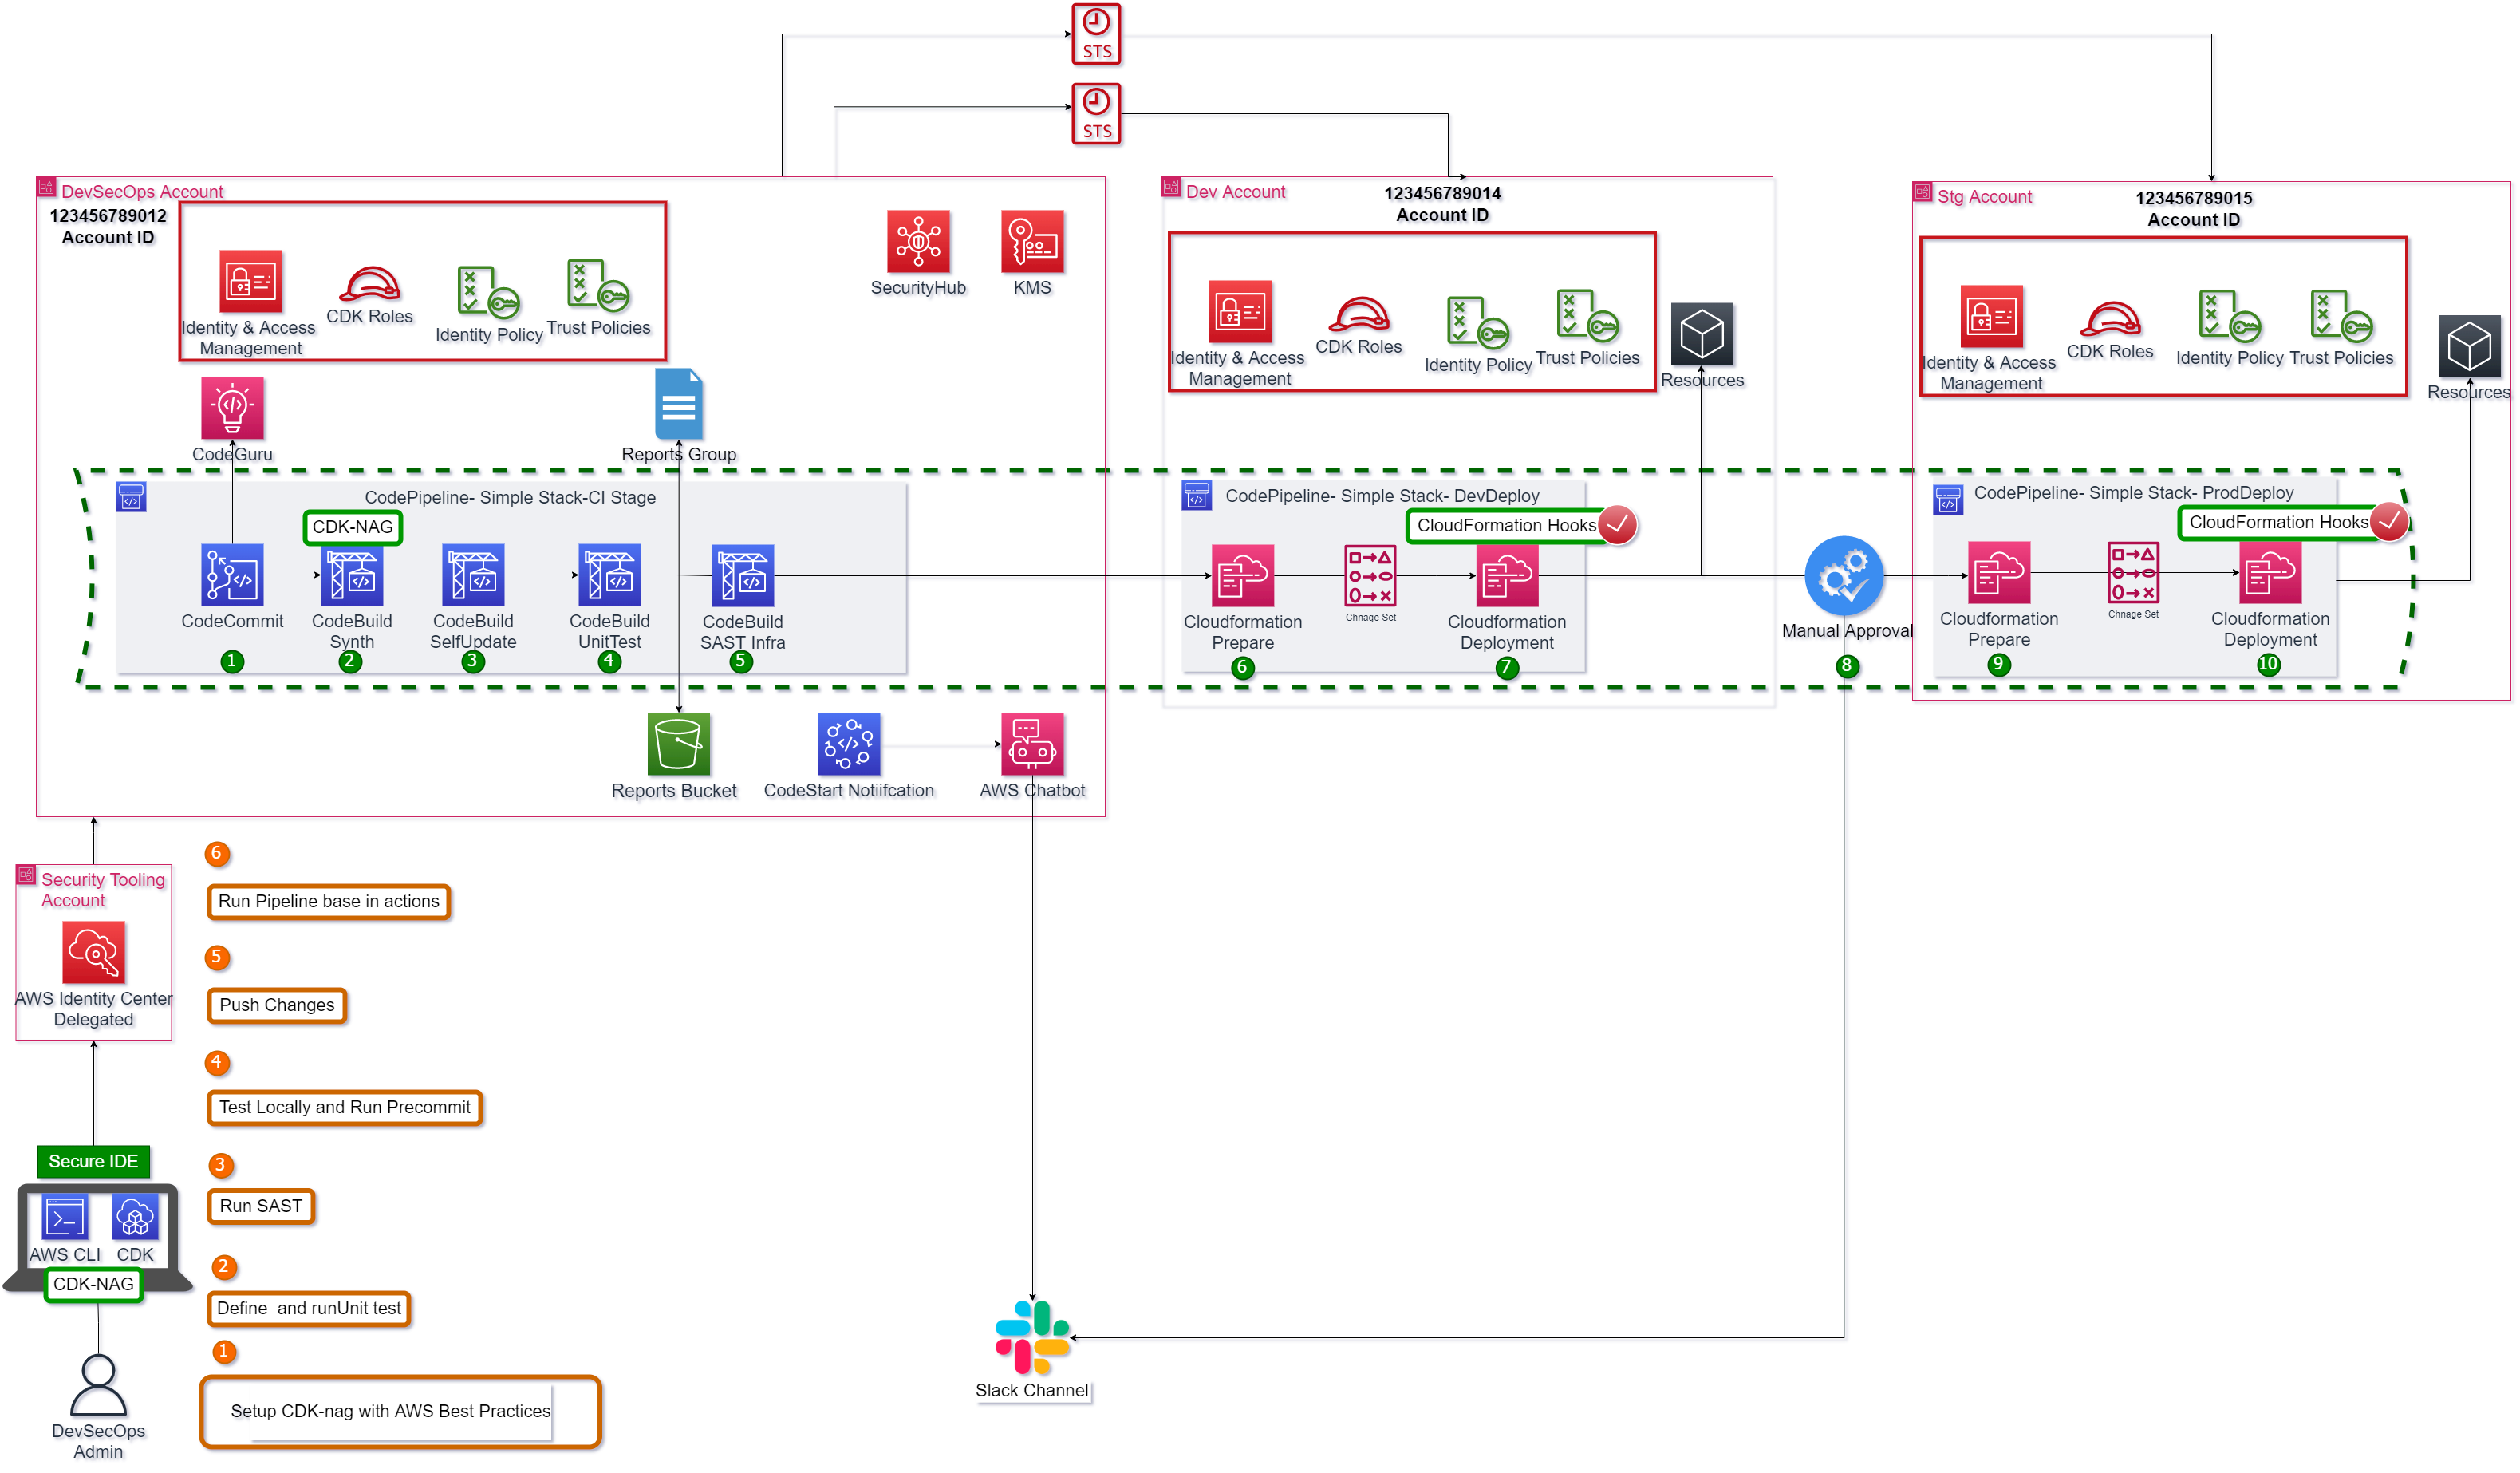
Solution Overview – Enhanced CDK Pipeline
The Figure shows the steps to accomplish this task. Also, it shows a cross account pipeline using AWS CodePipeline, AWS CodeCommit, AWS Codebuild and AWS CloudFormation. But, how can you construct this pipeline secure and with the minimum effort? The answer [CDK Pipelines](https://docs.aws.amazon.com/cdk/v2/guide/cdk_pipeline.html).
This pipeline is a default pipeline composed by next steps
1.The changes are detected and activate de pipeline. For this demo the branch master is the default branch.
2.The CDK project is synthesized if is aligned with AWS Security Best practices.
3.The pipeline run self-update action.
4.The unit test runs, and its report is published in codebuild reports group.
5.The SAST…
All project definitions are in project_configs/environment_options/environment_options.yaml
project_name:"multiDev"# Repository definitionsrepository_properties:repository_name:"cdk_pipeline_multienvironment"create_repository:"true"description:"Repositoryforpipelinemultiaccountdemo"branch:"master"# Multi Environment setupdevsecops_account:"123456789012"devsecops_region:"us-east-2"deployment_account:"123456789013"deployment_region:"us-east-2"stg_account:"123456789014"stg_region:"us-east-2"storage_resources:s3:-bucket_name:"multi-env-demo"versioned:"enable"# Tags definitions align with corporation instructionstags:-key:"Project"value:"multiDev"-key:"Environment"value:"dev"-key:"Owner"value:"DevSecOpsAdm"
The infrastructure
The file src/stacks/simple_s3_stack.py has the infrastructure based on project parameters:
fromaws_cdkimport(Stack,aws_s3ass3,CfnOutput,RemovalPolicy)fromconstructsimportConstructclassSimpleS3Stack(Stack):def__init__(self,scope:Construct,construct_id:str,props:dict=None,**kwargs)->None:super().__init__(scope,construct_id,**kwargs)# The code that defines your stack goes here
bucket=s3.Bucket(self,id=props["bucket_name"],bucket_name=f'{props["bucket_name"]}-{props["environment"]}',versioned=Trueifprops["versioned"]=="enable"elseNone,enforce_ssl=True,encryption=s3.BucketEncryption.S3_MANAGED,removal_policy=RemovalPolicy.DESTROY)# Define outputs
CfnOutput(self,id="S3ARNOutput",value=bucket.bucket_arn,description="Bucket ARN")
The Pipeline
The file src/pipeline/cdk_pipeline_multienvironment_stack.py defines the pipelien with CDK pipelines construct.
Suppose that the repository also will be created.
fromaws_cdkimport(# Duration,
Stack,pipelines,aws_codecommitascodecommit,Environment,CfnOutput)fromconstructsimportConstructfrom.stages.deploy_app_stageimportPipelineStageDeployAppclassCdkPipelineMultienvironmentStack(Stack):def__init__(self,scope:Construct,construct_id:str,dev_env=Environment,stg_env=Environment,props:dict=None,**kwargs)->None:super().__init__(scope,construct_id,**kwargs)# The code that defines your stack goes here
# Create repository
rep=codecommit.Repository(self,props["repository_properties"]["repository_name"],repository_name=props["repository_properties"]["repository_name"],description=props["repository_properties"]["description"],)# Create pipeline source based on codecommit repository
source=pipelines.CodePipelineSource.code_commit(repository=rep,branch=props["repository_properties"]["branch"])# Create pipeline
pipeline=pipelines.CodePipeline(self,f"Pipeline{props['project_name']}",cross_account_keys=True,pipeline_name=f"Pipeline{props['project_name']}",synth=pipelines.ShellStep("Synth",input=source,commands=["npm install -g aws-cdk","pip install -r requirements.txt","npx cdk synth"]),self_mutation=True,)# Modify properties, bucket name
props["storage_resources"]["s3"][0]["environment"]='dev'# Create stages
deploy_dev=PipelineStageDeployApp(self,"DeployDev",props=props["storage_resources"]["s3"][0],env=dev_env)# Add Stage
deploy_dev_stg=pipeline.add_stage(deploy_dev)# Add manual approval to promote staging
manual_approval=pipelines.ManualApprovalStep("PromoteToStg",comment="Promote to Staging Gate")# Define Dependency
deploy_dev_stg.add_post(manual_approval)# Create Stage for Staging Environment
# Modify properties, bucket name
props["storage_resources"]["s3"][0]["environment"]='stg'# Create stages
deploy_stg=PipelineStageDeployApp(self,"DeployStg",props=props["storage_resources"]["s3"][0],env=stg_env)# Add Stage
pipeline.add_stage(deploy_stg)# Build Pipeline
pipeline.build_pipeline()# Define Outputs
CfnOutput(self,"GRCRepoUrl",value=rep.repository_clone_url_grc,description="GRC Repository Url")CfnOutput(self,"PipelineArn",value=pipeline.pipeline.pipeline_arn,description="Pipeline ARN")CfnOutput(self,"StageDev",value=deploy_dev.stage_name,description="Stage Dev Name")
If you don’t pass a codepipeline to construct pipelines.CodePipeline(... a new underlying pipeline is created. This is a good option if you want to experiment but in production environments to manage limits and have more control over resources is recommended create custom CodePipeline with an artifact bucket and pass to cdk Pipelines construct.
Use CDK command to verify and deploy. Now, you can see the stacks.
$ cdk ls
CdkPipelineMultienvironmentStack
CdkPipelineMultienvironmentStack/DeployDev/SimpleS3Stack
CdkPipelineMultienvironmentStack/DeployStg/SimpleS3Stack
These 3 stacks are:
Main stack CdkPipelineMultienvironmentStack create the codepipeline Pipeline with stages and codecommit repository.
Deployment stack for development account CdkPipelineMultienvironmentStack/DeployDev/SimpleS3Stack.
Deployment stack for Staging account CdkPipelineMultienvironmentStack/DeployStg/SimpleS3Stack
Finally, you can deploy using the following command:
$ cdk deploy -e CdkPipelineMultienvironmentStack --profile labxl-devsecops
...
Do you wish to deploy these changes (y/n)? y
...

✨  Synthesis time: 13.01s

CdkPipelineMultienvironmentStack: building assets...

[0%] start: Building 9e7ae300d6878e9ed61c1139167fb9b5edde5d66b34eb6dfb3a0519c95375328:105171185823-us-east-2
[100%] success: Built 9e7ae300d6878e9ed61c1139167fb9b5edde5d66b34eb6dfb3a0519c95375328:105171185823-us-east-2

CdkPipelineMultienvironmentStack: assets built

CdkPipelineMultienvironmentStack: deploying...
[0%] start: Publishing 9e7ae300d6878e9ed61c1139167fb9b5edde5d66b34eb6dfb3a0519c95375328:105171185823-us-east-2
[100%] success: Published 9e7ae300d6878e9ed61c1139167fb9b5edde5d66b34eb6dfb3a0519c95375328:105171185823-us-east-2
CdkPipelineMultienvironmentStack: creating CloudFormation changeset...

 ✅  CdkPipelineMultienvironmentStack


Outputs:
CdkPipelineMultienvironmentStack.GRCRepoUrl = codecommit::us-east-2://cdk_pipeline_multienvironment
CdkPipelineMultienvironmentStack.PipelineArn = arn:aws:codepipeline:us-east-2:123456789012:PipelinemultiDev
CdkPipelineMultienvironmentStack.StageDev = DeployDev
...
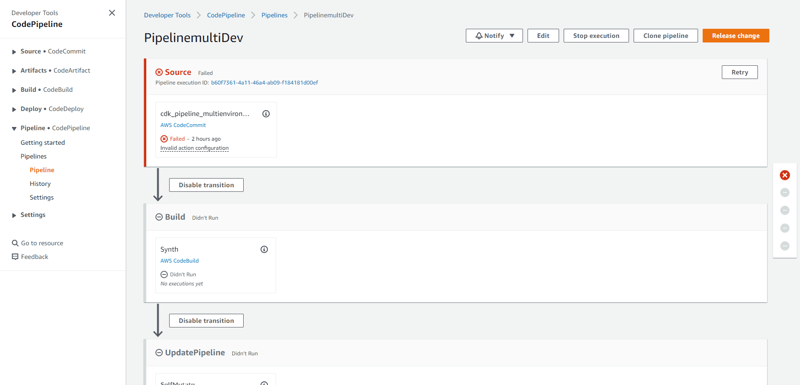
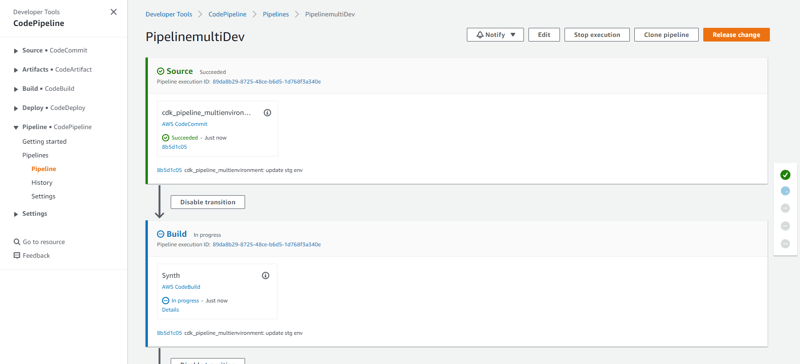
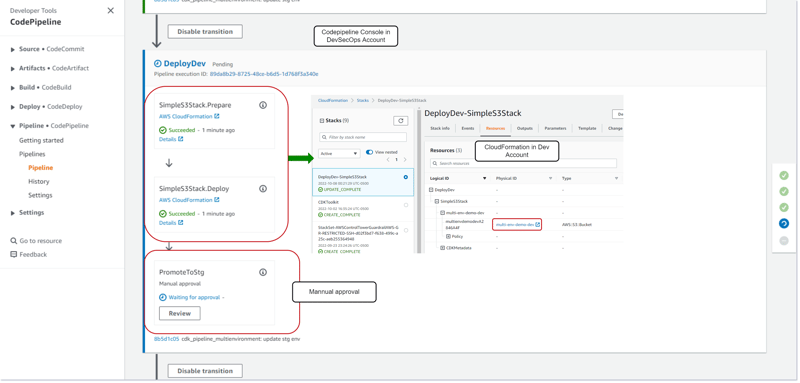
You can verify the resources into DevSecOps Account in Developer Tools >> CodePipeline
Figure 2. Pipeline Multi Environment- AWS Console
The first pipeline execution will fail, you need to add code to repository using git add command with grc url with your devsecops profile, labxl-devsecops for demo: