Hasura is a great way for storing data and you can create your own endpoint in a matter of minutes with no backend experience required. But did you know you should secure your endpoint and doing so is not that difficult.
In order to secure your GraphQL endpoint, and make sure the Hasura console is not publicly accessible, you need to configure an admin secret key. For this example I have my api deployed to Heroku, so in Heroku under the settings tab scroll down to config vars and add the HASURA_GRAPHQL_ADMIN_SECRET environment variable and a value for the secret key. This can be anything but for this example we will use the value mySecret.
Setting this environment variable will automatically restart the dyno which means now when you access your console, you’ll be prompted for the admin secret key.
Now you will notice that if you go to your browser your api won't work and you will get an error. Let's take a look in the Hasura console to understand what is going on. We have a table called food which is populated with data and we are querying that data in our Nuxt.js application using graphQL. All we are doing is displaying a list of data but as soon as we add an admin secret we now have no access to this data as our Nuxt.js application doesn't know the secret key and therefore cannot access the data. In the Hasura console if we uncheck the x-hasura-admin-secret we will see what we have access to if we do not add this secret key. And if you uncheck it you will notice that you don't have access to anything and cannot make a query because the validation failed. Which makes sense.
Your query works perfect when we check the admin-secret-key but doesn't work without it. The HASURA_GRAPHQL_ADMIN_SECRET should never be passed from the client to the Hasura GraphQL engine as it would give the client full admin rights to your Hasura instance. So what do we do in order for the call to our api to work in our browser? What do we do so that our Nuxt.js project can access this data while still having a secure endpoint? At first I thought a serverless function, or server middleware or some sort of JWT token or web hook but it is far easier than that. As we are only showing data on our website and not doing anything out of the ordinary such as sending emails we really don't need any of the above. Instead what we need to do is create a public role and give that role permissions to query your table.
In the Hasura console click on one of your tables and click on the permissions tab. You will see the admin role which has a green tick for insert, select, update and delete. Let's create a new role called public (you can name it what you want but public sounds good to me) and give it some permissions. We don't want the public user to be able to insert, update or delete so we won't modify any of these however if you do have a post method then you will want to to give them insert permissions. For this example we will just give them select permissions as we want them to be able to select the data from the database though our graphQL query.
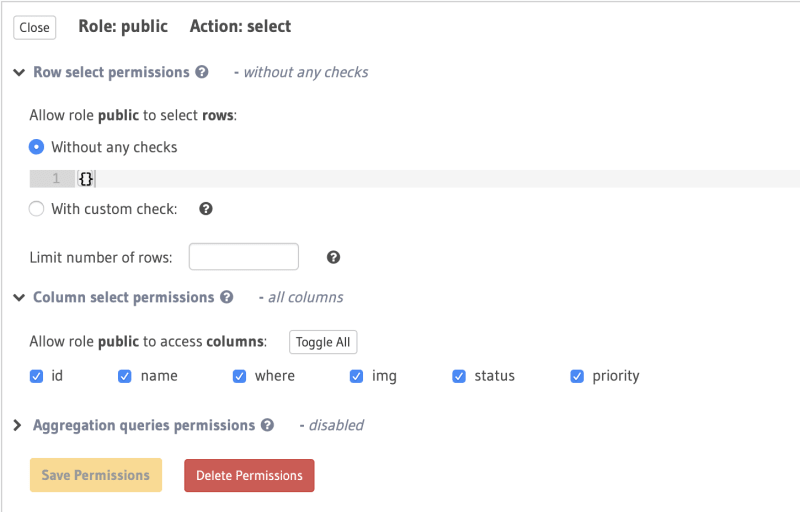
There are a few things we need to select. First we need to allow the role public to select the rows without any checks. That means they can see everything. We could however add a custom check such as is_published: {_eq: true}. So if the is_published column is true then the public user can see that data only and if false then it is not show at all. This is really helpful for when you are not ready to publish some of your content.
We then need to select the columns that the public user can see. You can select them individually or you can toggle all to select all of them. Make sure that any sensitive information is not exposed so deselect any that you don't need or want the public user to see. Then you can click the save permissions button.
There is only one more more step left and that is to register this new user in Heroku. Under the settings tab scroll dow to the confiv vars and under the HASURA_GRAPHQL_ADMIN_SECRET secret add a new config var called HASURA_GRAPHQL_UNAUTHORIZED_ROLE and give it the value of public.
Now if we go back to the GraphiQL and deselect our Hasura secret key you will see we now have permissions to see this table and make queries. You will also see that you have no access to mutations and the public user therefore cannot update, insert or delete your table. That means our public users can now query our database which means our api calls can be made yet our Hasura console is safe and our api is protected from anyone trying to add data or delete data.
Depending on what you want your public user to do you can modify the permissions and you can also create more than one role and have different permissions per role. For more info on roles in Hasura see the Hasura docs
The repo for this tip can be found here. And if you would like to read up more about how to create your own endpoint check out my previous blog post


