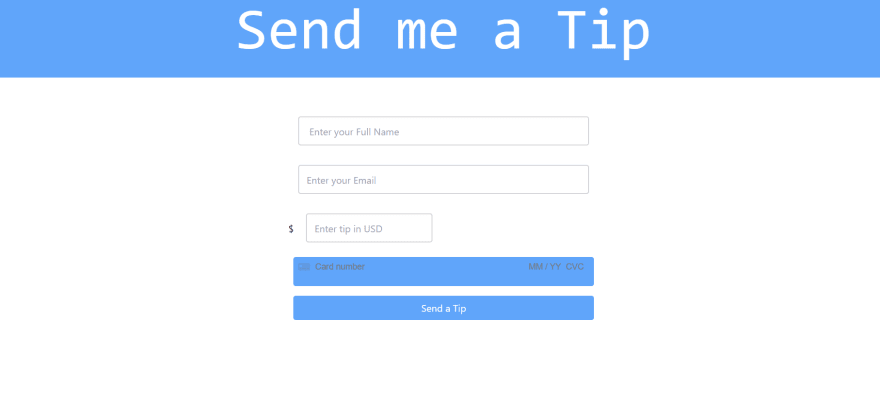
Integrating payments to a project is one of the most important and challenging part and in this article we will be looking at how to integrate payment schemes using Stripe to a nodejs project by building a Tip sending App.
Prerequisites
Basic Knowledge of nodejs,express framework ,callback functions, promises, HTML & tailwind css
Why use stripe
- Highly customizable and secured
- Easy to integrate supporting almost all th payment gateways
- Structured and easy to understand documentation
- Sdks available for most of the programming languages like python ,ruby , nodejs , C# ,etc.
- Used by most of the leading companies for payment outsourcing
Dependencies installation
In order to build this tip sending app we need to install the following dependencies via npm
npm i express hbs stripe body-parser
Folder structure
index.js will be in the root directory followed by index.html, pay.js & success.html under the views folder

Start the server
Inorder to create an express server add the following code to your index.js file
const express = require('express');
const bodyParser = require('body-parser');
const app = express();
const port = process.env.PORT || 5000;
app.listen(port, () => console.log('Listening on port 5000...'));
Now open the terminal and use node index.js and your server will be started.
Create the Payment Page
Inside the views folder create a index.html and add the following code
<!DOCTYPE html>
<html lang="en">

<head>
  <meta charset="UTF-8">
  <meta name="viewport" content="width=device-width, initial-scale=1.0">
  <meta http-equiv="X-UA-Compatible" content="ie=edge">
  <script src="https://cdn.tailwindcss.com"></script>
</head>

<body>
  <nav class="bg-blue-400 h-32 flex justify-center">
    <h1 class="text-white text-8xl font-mono">Send me a Tip</h1>
  </nav>

  <div class="flex justify-center my-12">
    <form action="/tip" method="POST" class="flex flex-col w-1/3">
      <input class="p-3 h-12 border-2 m-4  bg-gray border-zinc-300 rounded outline-none" type="text" name="name" placeholder=" Enter your Full Name">
      <input class="p-3 h-12 border-2 m-4  bg-gray border-zinc-300 rounded outline-none"type="email"  name="email" placeholder="Enter your Email ">
     <span>$ <input class="p-3 h-12 border-2 m-4  bg-gray border-zinc-300 rounded outline-none" type="text" name="amount" placeholder="Enter tip in USD"></span>
      <div id="pay-element" class="bg-blue-400 p-2 h-12 m-2 rounded"></div>
      <div id="pay-errors" role="alert"></div>
      <button class="text-white bg-blue-400 p-2 m-2 rounded">Send a Tip</button>
    </form>
  </div>

<script src="https://js.stripe.com/v3/"></script>
<script src="pay.js"></script>
</body>
</html>
Here you can see that there are two empty div elements having the id of pay-element and pay-errors and there we will collect the card details from the user with the help of stripe card elements.
Now create the pay.js file and add the following code
const stripe = Stripe('STRIPE PUBLISHER KEY');
const elements = stripe.elements();

var style = {
  base: {
    color: "#00000"
  }
};

/* Create a payment Element*/
const payment = elements.create('card', { style });

payment.mount('#pay-element');

const form = document.querySelector('form');
const errorEl = document.querySelector('#pay-errors');

const tokenHandler = token => {
  const hiddenInput = document.createElement('input');
  hiddenInput.setAttribute('type', 'hidden');
  hiddenInput.setAttribute('name', 'stripeToken');
  hiddenInput.setAttribute('value', token.id);
  form.appendChild(hiddenInput);

  form.submit();
}

/*Generate token using form data */
form.addEventListener('submit', e => {
  e.preventDefault();

  stripe.createToken(payment).then(res => {
    if (res.error) errorEl.textContent = res.error.message;
    else tokenHandler(res.token);
  })
})
Here we are using the Stripe Elements object in order to create a card element and we are passing these card elements to those empty divs.
Now let's create a success page , so that on every successful payment the user will be redirected to a confirmation page. Again in the views folder Create a success.html and add the following code.
<!DOCTYPE html>
<html lang="en">

<head>
  <meta charset="UTF-8">
  <meta name="viewport" content="width=device-width, initial-scale=1.0">
  <meta http-equiv="X-UA-Compatible" content="ie=edge">
  <script src="https://cdn.tailwindcss.com"></script>
  <title>Payment successful</title>
</head>

<body >
  <div class="flex flex-col items-center mt-24 text-black text-4xl">
  <h1>Your payment was successful !</h1>
    <a href="/"><button class="bg-gray-400 rounded px-4 m-3">Home</button></a>
  </div>
</body>

</html>
Setup the handle bars
In the index.js file add the following code in order to render these html pages
var hbs = require('hbs');
app.set('view engine', 'html');
app.engine('html', require('hbs').__express);
app.use(express.static(path.join(__dirname, './views')));
Let's preview our app now using node index.js
For now the payment will not work as we haven't add the request to our backend
Implementing the stripe payment request
Inorder to implement payments to our app now lets add the stripe module in our server code
const stripe = require('stripe')('STRIPE SECRET KEY');
/* Create a payment request using stripe */
app.post("/tip", (req, res) => {
  try {
    stripe.customers
      .create({
        name: req.body.name,
        email: req.body.email,
        source: req.body.stripeToken
      })
      .then(customer =>
        stripe.charges.create({
          amount: req.body.amount * 100,
          currency: "usd",
          customer: customer.id
        })
      )
      .then(() => res.render("success.html"))
      .catch(err => console.log(err));
  } catch (err) {
    res.send(err);
  }
});
Now finally use node index.js to start your sever and start using the app.
Extra tips
- Always use test mode during development
- Make Sure to hide your API keys using environment variables
- Check out the Stripe Documentation here


