
Introduction
Hello, DEV friends! 👋
This series of a really short (but useful) articles will aim at a general demonstration of how the Kotlin language can elegantly solve many of the (non-)trivial problems.
🔥 Disclaimer: The purpose of this article is to show the essence of the solution, not to dive into the subject in detail. For a deeper dive, links to the Kotlin documentation pages will be left.
Yes, let's do it! 👇
📝 Table of contents
- The result of our efforts
- Project structure
- Create the UI package
- Create the entry point
- Learn Kotlin
The result of our efforts
Let's go backwards. This will help you better understand what we will be trying to get out of this.
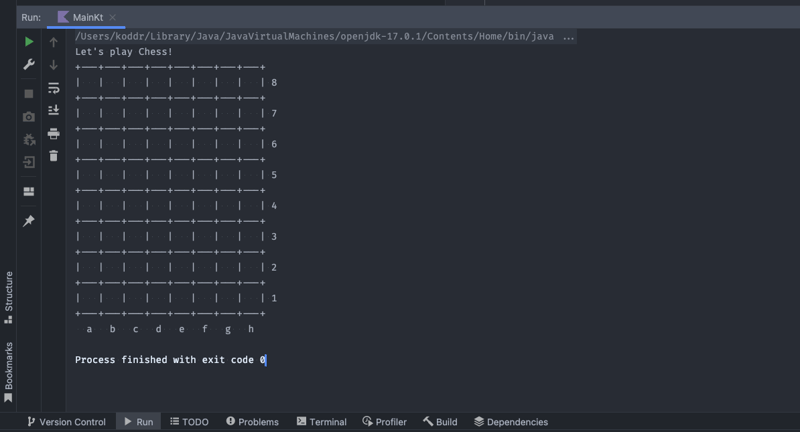
I chose a game of chess to show you how to work with repetitive elements and draw a console UI for your projects (or even games). This is what the result of our program will look like:
Let's play Chess!
+---+---+---+---+---+---+---+---+
|   |   |   |   |   |   |   |   | 8
+---+---+---+---+---+---+---+---+
|   |   |   |   |   |   |   |   | 7
+---+---+---+---+---+---+---+---+
|   |   |   |   |   |   |   |   | 6
+---+---+---+---+---+---+---+---+
|   |   |   |   |   |   |   |   | 5
+---+---+---+---+---+---+---+---+
|   |   |   |   |   |   |   |   | 4
+---+---+---+---+---+---+---+---+
|   |   |   |   |   |   |   |   | 3
+---+---+---+---+---+---+---+---+
|   |   |   |   |   |   |   |   | 2
+---+---+---+---+---+---+---+---+
|   |   |   |   |   |   |   |   | 1
+---+---+---+---+---+---+---+---+
  a   b   c   d   e   f   g   h
As you may notice, the numbers are on the right, not on the left, as many people have used to. This is because it is much easier to position elements in a line-by-line printout.
☝️ If you don't like it that much, you can always change just one line of code (which I'll show below). That will be your homework! That's it, yeah.
Project structure
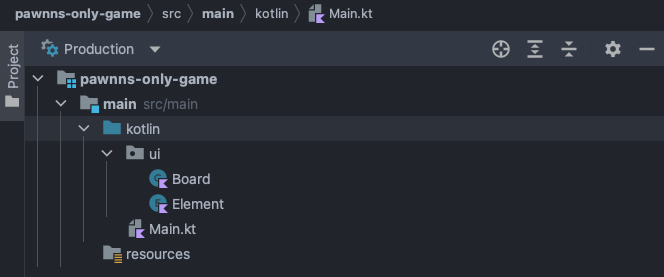
The structure of the project (game) will be as Kotlin idiomatic as possible.
As always, the entry point will be in Main.kt. All UI elements and the drawing class itself in the ui package:
Create the UI package
To improve reusability, let's immediately put some UI elements into the Kotlin's built-in enum class:
// ./src/main/kotlin/ui/Element.kt

package ui

enum class Element(val view: String) {
    EMPTY_CELL(" "),
    DIVIDER("+---+---+---+---+---+---+---+---+"),
    ALPHABETICAL_INDEXES("a   b   c   d   e   f   g   h")
}
Okay, move on to the rendering engine itself.
😉 By the way, I'll use a wonderful Kotlin data classes for it.
So, let's create an array-structure with the given number of rows and cells and display the entire assembled UI via println() in our draw() method.
Sounds like a plan, let's do it! 👇
// ./src/main/kotlin/ui/Board.kt

package ui

data class Board(val title: String) {
    // Array for building the board:
    private val board = Array(8) { Array(8) { Element.EMPTY_CELL } }

    // Function for forming and drawing the board with
    fun draw() {
        // 1️⃣
        val boardAsString = board.mapIndexed { index, row ->
            val cells = row.joinToString(" | ") { it.view }
            "| $cells | ${index + 1}\n${Element.DIVIDER}"
        }

        println(title) // print game's title
        println(Element.DIVIDER) // print starting divider

        // 2️⃣
        println(boardAsString.reversed().joinToString("\n"))

        // print ending string with left padding
        println("  ${Element.ALPHABETICAL_INDEXES}")
    }
}
1️⃣ : To simplify, we will expand our array with the function mapIndexed(), where each element will be a string with an already prepared UI.
2️⃣ : To display line numbering reverse, we use Kotlin's built-in reversed() function. And then just output the result using the joinToString() function, which specifies the string translation (\n), as an element separator.
Create the entry point
And, finally, let's create an entry point of our console game (Main.kt):
// ./src/main/kotlin/Main.kt

import ui.Board

fun main() {
    val board = Board("Let's play Chess!")
    board.draw()
}
💡 You can give your playing field any name you want. Just add it to the primary constructor of the
Boarddata class.
Run our program (Shift + Ctrl + R) and 💥 BOOM 💥 everything works the way we wanted it to:
Learn Kotlin
Do you want to learn Kotlin? 👩🎓 👨🎓
Then come to JetBrains Academy, where there is a free basic course in this language for free! There you will find both theoretical part and many practical tasks of any level of complexity.
Photos and videos by
- Kotlin mascot authors https://kotlinlang.org/docs/kotlin-mascot.html
- Vic Shóstak https://github.com/koddr
P.S.
If you want more articles (like this) on this blog, then post a comment below and subscribe to me. Thanks! 😻
❗️ You can support me on Boosty, both on a permanent and on a one-time basis. All proceeds from this way will go to support my OSS projects and will energize me to create new products and articles for the community.
And of course, you can help me make developers' lives even better! Just connect to one of my projects as a contributor. It's easy!
My main projects that need your help (and stars) 👇
- 🔥 gowebly: A next-generation CLI tool that makes it easy to create amazing web applications with Go on the backend, using htmx, hyperscript or Alpine.js and the most popular CSS frameworks on the frontend.
- ✨ create-go-app: Create a new production-ready project with Go backend, frontend and deploy automation by running one CLI command.


