Social login is a great way to offer your customers a simple and secure authentication method. Why force them to create and forget yet another password? The vast majority of your users will have an account with Facebook or Google, so why no go ahead and let them use one of these accounts to log in?
In this tutorial, you are going to integrate two social login providers: Google and Facebook. You are also going to use two Okta features that allow you to customize the authentication experience: hosted logins and custom authorization server domains.
Okta can host your login page and allow you to edit the look and feel of it. This is a great solution because you do not have to worry about properly coding a secure login page, and Okta can keep the relevant code and templates up to do. However, you can still apply your branding and styling.
Using your own custom domain further adds a layer of professionalism. Instead of seeing the default Okta auth server domain, you can use the hosted login page with whatever domain or subdomain you choose.
Create a Spring Boot + Angular App with JHipster
JHipster is an open source project that allows you to generate a Spring Boot and Angular application quickly and easily. It even contains support for Okta out of the box! To use JHipster, you’ll need to have Node.js 10 and Java 8 installed. Then run the following command to install JHipster:
npm i -g generator-jhipster@5.8.1
Next, create a directory to create your project in. For example, okta-spring-boot-social-login-example. Navigate to the directory in a terminal window. Create an app.jh file in that directory and populate it with the following code:
application {
  config {
    baseName social,
    packageName com.okta.developer.social,
    prodDatabaseType postgresql,
    authenticationType oauth2,
    buildTool gradle,
    clientFramework angular,
    useSass true,
    testFrameworks [protractor]
  }
}
This is JHipster’s Domain Language (JDL), which can be used to select with options you’d like to use when creating a new app. You can learn more about it here.
Run the following command to create a new Spring Boot + Angular application that’s configured to work with OAuth 2.0 and OIDC.
jhipster import-jdl app.jh
If you’d rather not use JHipster, you can clone our GitHub repo that already has the project created.
git clone https://github.com/oktadeveloper/okta-spring-boot-social-login-example.git okta-social-login
cd okta-social-login
You’re also going to need a free developer.okta.com account. If you do not have an Okta developer account, go on over to developer.okta.com and sign up!
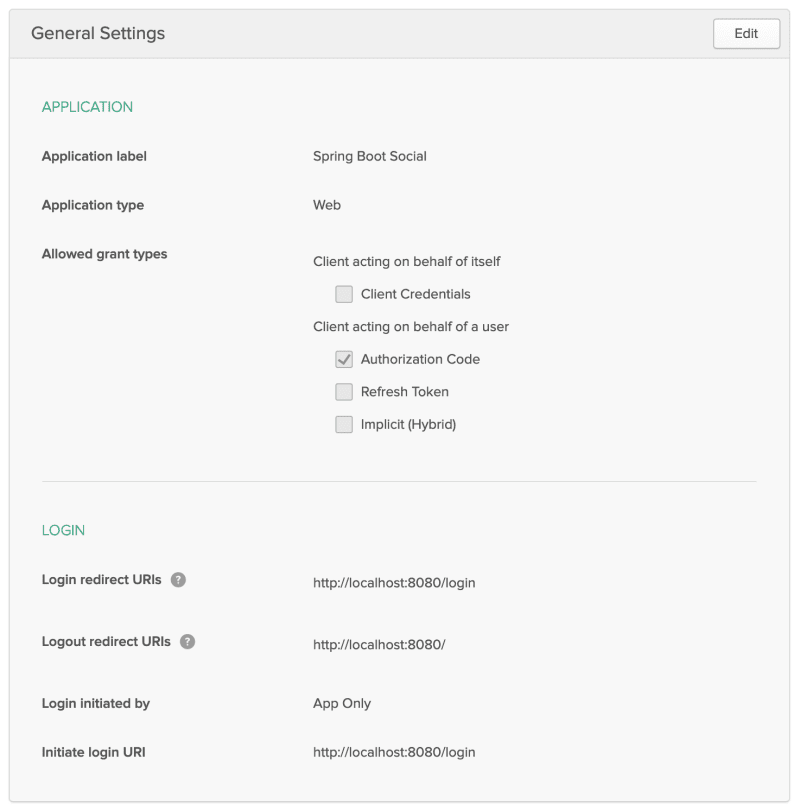
You’ll also need an OAuth 2.0 / OpenID Connect application that we can use to configure social login. To create one, log in to your Okta developer account and navigate to Applications > Add Application > Web > Next. Select Authorization Code and set the Login redirect URI to be http://localhost:8080/login. Click Done followed by Edit. Add http://localhost:8080 as a Logout redirect URI.
Next, create a ROLE_ADMIN and ROLE_USER group and add users into them. These are the default authorities that JHipster uses. You'll also need to make sure these groups are available in the ID token.
Navigate to API > Authorization Servers, click the Authorization Servers tab and edit the default one. Click the Claims tab and Add Claim. Name it "groups", and include it in the ID Token. Set the value type to "Groups" and set the filter to be a Regex of .*.
Your Okta OIDC Application’s configuration should match the following screenshot. This is also where you’ll get your client ID and client secret.
Finally, you will need a domain name that you can use to set up as custom Okta URL for your sign-in page. You’ll need access to the DNS Zone entries to be able to create a CNAME record for a domain or subdomain.
The custom domain doesn’t actually need to be a subdomain. It can be a plain, old domain just as easily. But for this tutorial, I figure more people have access to setting up a subdomain on a domain name they have already (who doesn’t have a few dozen lying around?).
Configure the OAuth 2.0 Settings for Your Spring Boot App
The app you created (or cloned) is configured to work with Keycloak by default. To change it to Okta, modify src/main/resources/config/application.yml to use your app settings.
security:
    oauth2:
        client:
            access-token-uri: https://{yourOktaDomain}/oauth2/default/v1/token
            user-authorization-uri: {yourCustomDomain}
            client-id: {yourClientId}
            client-secret: {yourClientSecret}
            scope: openid profile email
        resource:
            user-info-uri: https://{yourOktaDomain}/oauth2/default/v1/userinfo
You can also keep your settings outside of your app, and override them with environment variables. For example, create an ~/.okta.env file:
export SECURITY_OAUTH2_CLIENT_ACCESS_TOKEN_URI="https://{yourOktaDomain}/oauth2/default/v1/token"
export SECURITY_OAUTH2_CLIENT_USER_AUTHORIZATION_URI="{yourCustomDomain}"
export SECURITY_OAUTH2_RESOURCE_USER_INFO_URI="https://{yourOktaDomain}/oauth2/default/v1/userinfo"
export SECURITY_OAUTH2_CLIENT_CLIENT_ID="{yourClientId}"
export SECURITY_OAUTH2_CLIENT_CLIENT_SECRET="{yourClientSecret}"
Then, run source ~/.okta.env before running your app. You can also add source ~/.okta.env to your .bashrc or .zshrc files so these variables are always set.
If you’re using our starter app from the git repo, make sure you update the application.yml and fill in the necessary information. You’ll need the following:
- Okta application client ID
- Okta application client secret
- Your Okta URL. Something like:
https://dev-123456.okta.com
The access-token-uri, user-authorization-uri, and user-info-uri should contain your Okta URL. In the next section, you'll update user-authorization-uri to use your custom domain, but for the moment, you can use your Okta URL.
For example, my application.yml looks as follows:
security:
    oauth2:
        client:
            access-token-uri: https://dev-533919.oktapreview.com/oauth2/default/v1/token
            user-authorization-uri: https://okta.andrewcarterhughes.com/oauth2/default/v1/authorize
            client-id: {myClientId}
            client-secret: {myClientSecret}
            scope: openid profile email
        resource:
            user-info-uri: https://dev-533919.oktapreview.com/oauth2/default/v1/userinfo
You should be able to run ./gradlew bootRun from the terminal to run the app.
To test the app, log out of your developer.okta.com account or open an incognito window and go to http://localhost:8080. Click the sign in link.
This should redirect you to the Okta login screen.
Once you log in, you’ll see a welcome message with your email:
You are logged in as user "{youremail@domain.com}".
The app is not configured to use the custom domain at all yet. You're going to do that in the next section.
Configure the Custom Domain Name for Your Spring Boot App
Great! So now you have a working Spring Boot app that’s already authenticating with Okta using OAuth 2.0, right? The next step is to configure Okta to use your custom domain or subdomain. This is necessary so that we can customize the hosted login form and add the “Login with Google” and “Login with Facebook” buttons.
First, you need to update the user-authorization-uri value in your application.yml file (or the associated SECURITY_OAUTH2_CLIENT_USER_AUTHORIZATION_URI env variable, if you're loading the values from the shell). The value needs to be changed to use your custom domain instead of the Okta preview domain.
Mine changed to this:
security:
    oauth2:
        client:
            ...
            user-authorization-uri: https://okta.andrewcarterhughes.com/oauth2/default/v1/authorize
            ...
Next, you need to configure Okta to use the custom domain.
From the top menu of the developer.okta.com dashboard, click on the Customization and select Domain Name.
Follow the instructions for adding a custom domain name. You will need a domain or subdomain that you have control over (can edit the zone file for).
You’ll also need to generate an SSL certificate for the domain/subdomain. I suggest using certbot and Let’s Encrypt. If you don’t know about Let’s Encrypt, you should! They’re a free, open certificate authority started by the Electronic Frontier Foundation, or EFF.
certbot is a command line utility that allows you to easily generate free SSL certificates. If you don’t have certbot installed, here are the instructions for installing it.
You can run certbot locally on your development machine in “manual” mode. You’re not installing this cert on a server; you’re generating this cert locally and uploading it to Okta so that they can install it.
Here’s the certbot command:
certbot --config-dir ./config --work-dir work --logs-dir logs -d $YOUR_CUSTOM_DOMAIN --manual --preferred-challenges dns certonly
Once you’ve generated your SSL certs, you’ll need to give the certificate and private key to Okta to complete the custom domain. DNS entries will take a few minutes to update. The website warns that it may take up to 48 hours, but this is rarely the case.
Customize the Hosted Sign-In Page
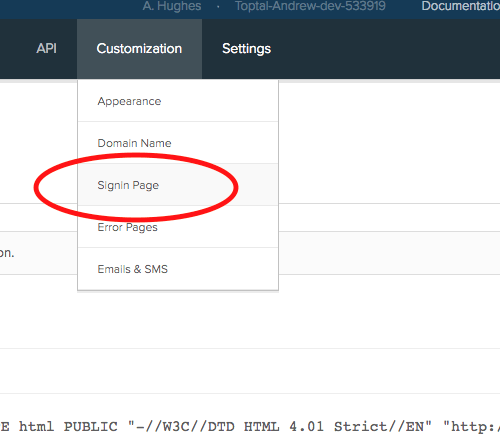
Once you have configured the custom Okta domain name, from the developer.okta.com dashboard, click on the Customization top menu and select SignIn Page.
Now that you have a custom domain name, you can edit the Okta sign-in page, which allows you to add the social login links.
You can verify that the sign-in page is editable, and you can play with the template file and Save and Publish and click Preview to see your changes.
We’re not quite ready to do anything here yet. We’ll come back here to add our social login buttons later.
Update the Default Authorization Server
We need to update the default authorization server to use the custom URL.
From the developer.okta.com dashboard, go to API in the top menu and click on Authorization Servers. Select the default server. Click the Edit button and change the issuer from the “Okta URL” to the “Custom URL”. Everything else should be able to stay the same.
Click Save. Now we’re ready to configure Google and Facebook for social login!
Okta has some great documentation on configuring social login, including some tips for specific social providers.
Configure Facebook for Social Login
- Go to https://developers.facebook.com and register for a developer account if you haven’t already done so.
- Head over to the Facebook App Dashboard: https://developers.facebook.com/apps.
- Create a Facebook app. Instructions for creating a Facebook application can be found here: https://developers.facebook.com/docs/apps/register.
- Once you’ve created your facebook app, go to the app dashboard, click the Settings link on the left-hand side, and select the Basic submenu.
- Save the App ID and App Secret values. You’ll need them later.
- You’ll also need to add a Facebook Login product. From the left menu, click the “+” sign next to products and add a Facebook Login product.
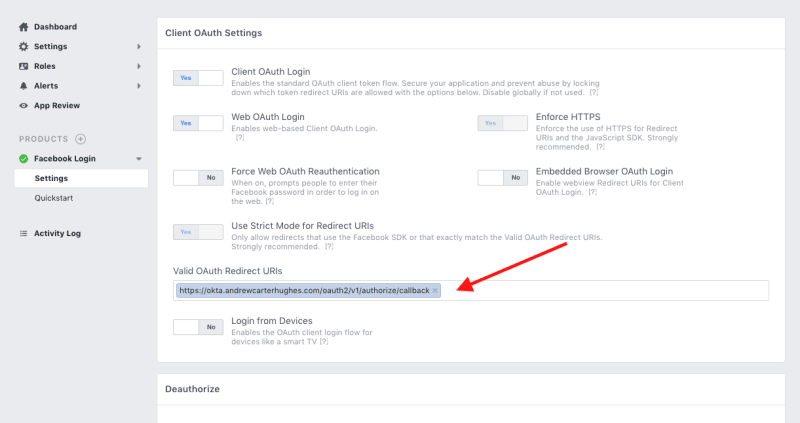
- Configure the Valid OAuth Redirect URIs to include your redirect URI with your custom domain. Mine was:
https://okta.andrewcarterhughes.com/oauth2/v1/authorize/callback. - Save changes.
Configure Google for Social Login
- Go to https://console.developers.google.com and register for a developer account.
- Create a Google API Console project.
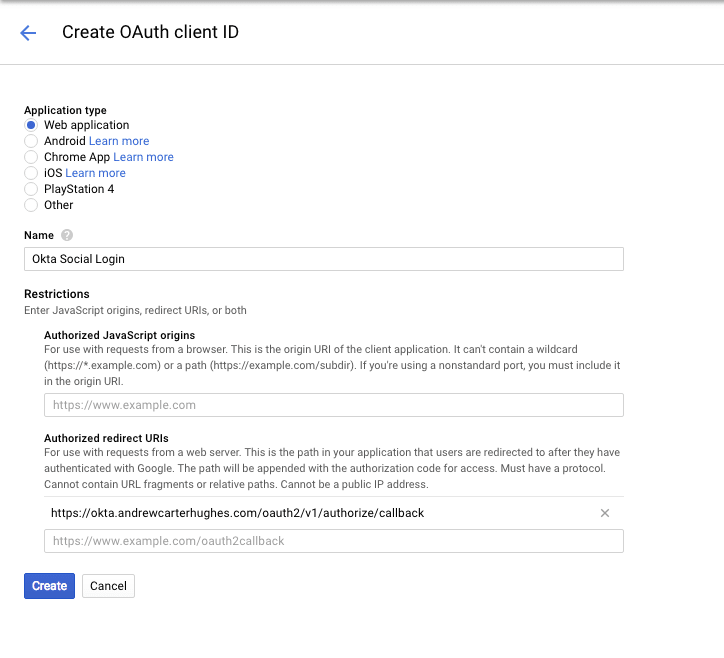
- Once your Google App is open, click on the Credentials menu and then Create Credentials followed by OAuth client ID.
- Select Web Application type for the OAuth client type.
- Give the client a name.
- Copy the client ID and client secret, as you’ll need them later.
- Fill in your customized redirect URL in the Authorized redirect URIs. It’s the same one you used for Facebook and ends with
/oauth2/v1/authorize/callback. - Click Create.
Configure Facebook and Google as Identity Providers
Log into your developer.okta.com dashboard and navigate to Users > Social Identity and Providers.
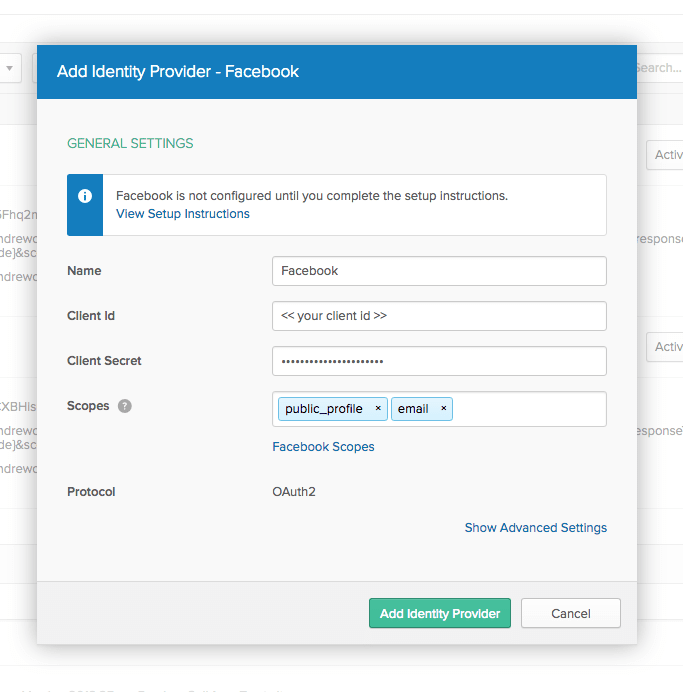
From the Add Identity Providers dropdown, choose Facebook.
Pick a name. Enter your client ID and client secret values. Everything else can stay the same. Click Add Identity Provider.
Do this again for Google, using the client ID and client secret from your Google OAuth 2.0 client IDs.
The Okta Identity Providers page should now look like this. Keep track of the two IdP IDs because you’ll want them in a moment.
NOTE: The access token obtained from the social IdP is stored in Okta and can be used to make subsequent requests to the IdP on the user’s behalf (with consent of course). Also, Okta automatically updates social provider updates, protecting your apps from provider deprecation.
Customize Your Hosted Sign-In Page
The last thing you need to do is to add the social login IdPs to the Okta Sign-in Widget on your customized sign-in page.
Go to your Okta developer dashboard. Select Customization from the top menu, and below that: Sign in page.
On this page, you need to add the identity provider definitions to the config variable. You’ll also need the IdP IDs from above, as well as your custom Okta domain and the OIDC Application client ID.
<script type="text/javascript">
    // "config" object contains default widget configuration
    // with any custom overrides defined in your admin settings.
    var config = OktaUtil.getSignInWidgetConfig();

    / ***ADD THIS BLOCK HERE*** /
    config.idps = [
        {type: 'FACEBOOK', id: '0oafacraoim5Fhq2m0h7'},
        {type: 'GOOGLE', id: '0oafjy2yev7CXBHis0h7' }
    ];
   / ************************************** /

    // Render the Okta Sign-In Widget
    var oktaSignIn = new OktaSignIn(config);
    oktaSignIn.renderEl({ el: '#okta-login-container' },
        OktaUtil.completeLogin,
        function(error) {
            // Logs errors that occur when configuring the widget.
            // Remove or replace this with your own custom error handler.
            console.log(error.message, error);
        }
    );
</script>
The config property idps is where we’re configuring the Okta Sign-In Widget to display the social login buttons.
Look at the docs for the Okta Sign-In Widget to learn about more configuration options.
Test Your Spring Boot App’s Social Login!
Sign out of the developer.okta.com dashboard, and restart your spring boot app using ./gradlew bootRun.
Wait for the app to start. Navigate to http://localhost:8080.
If your Facebook and Google accounts use different email addresses than your Okta developer account, you may need to add a user to the Okta application.
The hosted login page will now show the social login buttons!
Learn More about Spring Boot, Secure Authorization, and Social Login
If you’d like to learn more about Spring Boot, Spring Security, or modern application security, check out any of these great tutorials:
- Get Started with Spring Boot, OAuth 2.0, and Okta
- Add Single Sign-On to Your Spring Boot Web App in 15 Minutes
- Secure Your Spring Boot Application with Multi-Factor Authentication
- Build a Secure API with Spring Boot and GraphQL
Another great resource for Spring Boot security with Okta: Okta Spring Boot Starter GitHub project.
If you have any questions about this post, please add a comment below. For more awesome content, follow @oktadev or subscribe to our YouTube channel.

