This post is the first part of a series about Kubernetes. Rather than a series of tutorials, this is meant to be a periodic log of my journey learning the concepts and tools regarding orchestration using Kubernetes.
Installation
As I intended to learn how to use Kubernetes (not managing it), I started a Kubernetes cluster in Google Cloud Platform and worked from there. Hence, I will not address Kubernetes cluster installation and configuration in this series. For more details on how to use the GCP Kubernetes cluster, click here.
First: the concepts
One thing that always helps me better understand and learn a new technology or tool is to understand what is the purpose of the tool or technology, what it is used for, and get the concepts right.
Making sure you understand the basic concepts is a great help in the road ahead of improving your knowledge of the tool/technology you're learning.
So, let's start by understanding what is Kubernetes.
Kubernetes
Kubernetes is an orchestration tool that allows us to manage containerized applications across a group of nodes. Not only providing mechanisms to quickly run those but also how to update, deploy and provide access to them.
Pod: the atom in the Kubernetes universe

A pod is the smallest unit inside the Kubernetes cluster and it represents a collection of application containers and volumes running in the same isolated execution environment. Each container in the same Pod shares the same IP address, namespace, and storage.
Although I described a pod as a collection of containers, the most common pattern is to have one container per pod. If you need to think twice about group multiple containers in the same pod, ask yourself
Will these containers work properly if they land on different machines?
If the answer is "no", you should indeed group those containers in the same pod, otherwise, just don't do it.
Kubectl: the basics
Before going any further, let's see some basic capabilities of kubectl (Kubernetes command-line tool).
Version and Status
To ensure kubectl and Kubernetes is working properly, you can run:
kubectl version
And you should see something like the image below, where it's listed the version of your Kubernetes cluster and client.

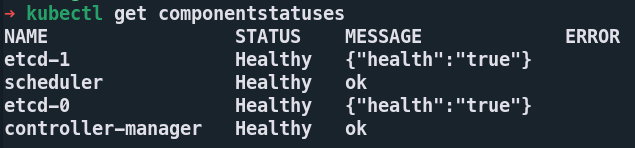
Furthermore, you can also check the status of your Kubernetes cluster main components with:
kubectl get componentstatuses
Which should provide you with an output similar to this one:
Nodes
To get information about the nodes that make up the Kubernetes cluster and can be scheduled with work run the following command:
kubectl get nodes
This command, as you can see in the following image, gives you a list with some basic information for every node of your cluster. As I said earlier, my cluster is on Google Cloud Platform, so, depending on your setup (a local cluster or a cluster in another cloud provider), the output may be a little different.

Pods
Now, to quickly show you about pods, let's create one by running:
kubectl run kubernetes-hello-world --image=paulbouwer/hello-kubernetes:1.9 --port=8080
Note that kubectl run is not the ideal way to do things, but let's do it for the sake of the example. In the next post, we will explore the right way to define resources (the declarative way). You should see an output similar to this one:

Now, if you run:
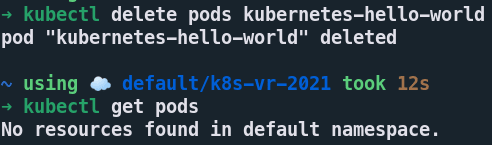
kubectl get pods
You will get the following output, where you can see the pod that was created with the kubectl run command.

You can also check more details with other commands such as describe and logs, as follows:
kubectl describe pods kubernetes-hello-world
kubectl logs kubernetes-hello-world
The first gives you a detailed description of the specified pod, as shown below:
Name:         kubernetes-hello-world
Namespace:    default
Priority:     0
Node:         gke-kuar-cluster-default-pool-41051aa0-hs4q/10.138.15.194
Start Time:   Thu, 11 Mar 2021 17:44:41 +0000
Labels:       run=kubernetes-hello-world
Annotations:  <none>
Status:       Running
IP:           10.96.14.3
IPs:
  IP:  10.96.14.3
Containers:
  kubernetes-hello-world:
    Container ID:   docker://db09b9c745c03f3e757f1f386f5df8e04e48faaace587cfa72ed1f3e6a751300
    Image:          paulbouwer/hello-kubernetes:1.9
    Image ID:       docker-pullable://paulbouwer/hello-kubernetes@sha256:be6b5ba3abdca6e01689e0d1d27b41410fb5bf5793da407108a89ef355f362f0
    Port:           8080/TCP
    Host Port:      0/TCP
    State:          Running
      Started:      Thu, 11 Mar 2021 17:44:50 +0000
    Ready:          True
    Restart Count:  0
    Environment:    <none>
    Mounts:
      /var/run/secrets/kubernetes.io/serviceaccount from default-token-dzc9f (ro)
Conditions:
  Type              Status
  Initialized       True
  Ready             True
  ContainersReady   True
  PodScheduled      True
Volumes:
  default-token-dzc9f:
    Type:        Secret (a volume populated by a Secret)
    SecretName:  default-token-dzc9f
    Optional:    false
QoS Class:       BestEffort
Node-Selectors:  <none>
Tolerations:     node.kubernetes.io/not-ready:NoExecute op=Exists for 300s
                 node.kubernetes.io/unreachable:NoExecute op=Exists for 300s
Events:
  Type    Reason     Age   From               Message
  ----    ------     ----  ----               -------
  Normal  Scheduled  23m   default-scheduler  Successfully assigned default/kubernetes-hello-world to gke-kuar-cluster-default-pool-41051aa0-hs4q
  Normal  Pulling    23m   kubelet            Pulling image "paulbouwer/hello-kubernetes:1.9"
  Normal  Pulled     23m   kubelet            Successfully pulled image "paulbouwer/hello-kubernetes:1.9"
  Normal  Created    23m   kubelet            Created container kubernetes-hello-world
  Normal  Started    23m   kubelet            Started container kubernetes-hello-world
The second option gives you the logs related to the running container(s). These methods of debugging and inspection are available in every resource available in Kubernetes (Pods, Deployments, Services, etc).
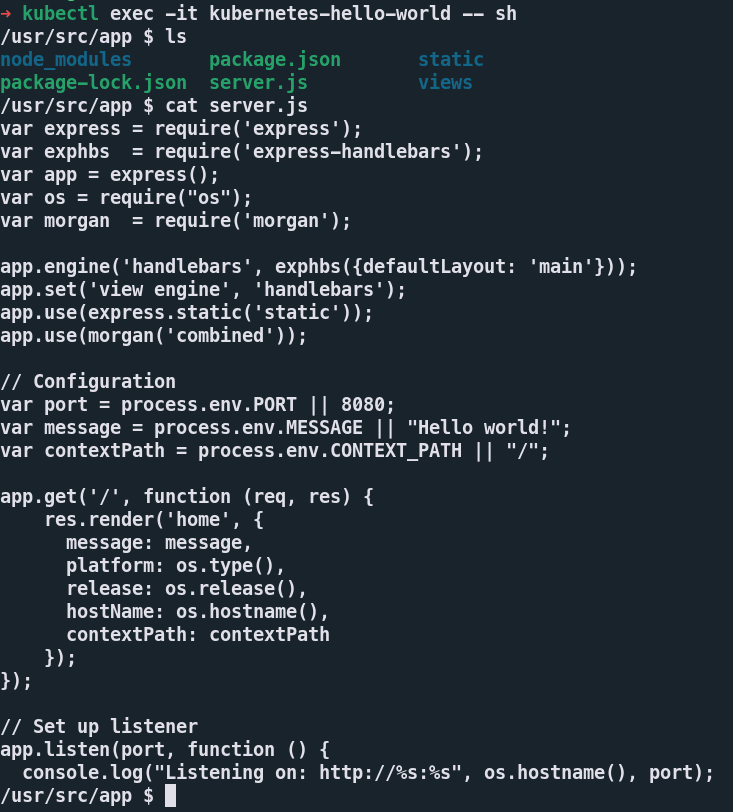
One final way to debug your application besides the logs is to inspect and interact with the running container(s) with exec with:
kubectl exec -it kubernetes-hello-world -- sh
You can see one example of this interaction in the following image:
Finally, to delete the created pod, run:
If you like my explanation, you can follow me, I will publish the following parts of this series in the coming weeks.
Click here for the next part.