AirPrint MFPs (Multifunction Printers) are printers that are compatible with Apple's AirPrint technology. The eSCL (eXtensible Scanner Control Language) protocol, a driverless scanning protocol, is a part of the AirPrint technology. It facilitates wireless scanning functionality on AirPrint MFPs. Users can discover AirPrint MFPs on the same network and initiate scanning operations using their mobile devices. This article focuses on building a hybrid Flutter Android app that utilizes web view and native code to scan documents from AirPrint MFPs.
A List of MFPs Supporting AirPrint
- Canon imageCLASS MF743Cdw
- HP OfficeJet 250
- HP OfficeJet 3830
- Canon PIXMA iX6820
- HP OfficeJet Pro 9025e
- Canon Pixma TR8620
- Pixma TR150
Prerequisites
- An AirPrint supported device in the same network as the Android device
- Install Dynamsoft Service from Google Play.
The Free Online Document Scanning Demo
The Dynamsoft service app is an Android background service that provides a communication channel between the web browser and the wireless scanners.
You can click the Online Demo button to launch the free online document scanning demo in mobile web browsers. The demo is also compatible with Windows, Linux, and macOS systems by installing the appropriate Dynamsoft services. For basic document scanning needs, the online demo is sufficient. However, if you require a more robust document scanning solution with advanced features, consider coding with the Dynamic Web TWAIN SDK, which offers a 30-day free trial.
Why Creating Hybrid App instead of Web Browser?
While using the online demo in a web browser, saving and sharing documents could be inconvenient. A hybrid app offers a better user experience. By loading the demo within a web view, a hybrid app provides a seamless integration of web technology and native capabilities. With the use of native code, the app can store the scanned images directly to the local storage, enabling more efficient and flexible processing options for the user. This combination of web and native functionality ensures a smoother and more user-friendly document scanning experience.
Building Android Document Scanning App with Flutter
In the following sections, we will show you how to use Flutter webview to load the online document scanning demo and how to combine JavaScript and Dart code to process the scanned images.
Dependent Flutter Packages
Before getting started, you need to add the following packages to the pubspec.yaml file:
- webview_flutter - A Flutter plugin that provides a WebView widget.
- permission_handler - A Flutter plugin for requesting permissions on Android and iOS.
- webview_flutter_android - A Flutter plugin that provides a WebView widget on Android.
- url_launcher - A Flutter plugin for launching a URL in the mobile platform.
- android_intent_plus - A Flutter plugin for launching Android Intents.
- path_provider - A Flutter plugin for finding commonly used locations on the filesystem.
- share_plus - A Flutter plugin for sharing content via the platform share UI.
Android Permissions
There are two permissions required for the app:
<uses-permission android:name="android.permission.CAMERA"/>
<uses-permission android:name="android.permission.QUERY_ALL_PACKAGES" />
-
android.permission.CAMERA- Required for accessing the camera in the web view. -
android.permission.QUERY_ALL_PACKAGES- Required for launching the external Dynamsoft service app.
Flutter Web View: Load URL, and Handle Navigation and Permission Requests
According to the sample code of the webview_flutter package, the online document scanning demo can be loaded into the Android web view as follows:
_controller = WebViewController()
  ..setJavaScriptMode(JavaScriptMode.unrestricted)
  ..setBackgroundColor(const Color(0x00000000))
  ..setNavigationDelegate(
    NavigationDelegate(
      onProgress: (int progress) {},
      onPageStarted: (String url) {},
      onPageFinished: (String url) {},
      onWebResourceError: (WebResourceError error) {},
      onNavigationRequest: (NavigationRequest request) {
        return NavigationDecision.navigate;
      },
    ),
  )
  ..loadRequest(Uri.parse('https://demo3.dynamsoft.com/web-twain/mobile-online-camera-scanner/'));
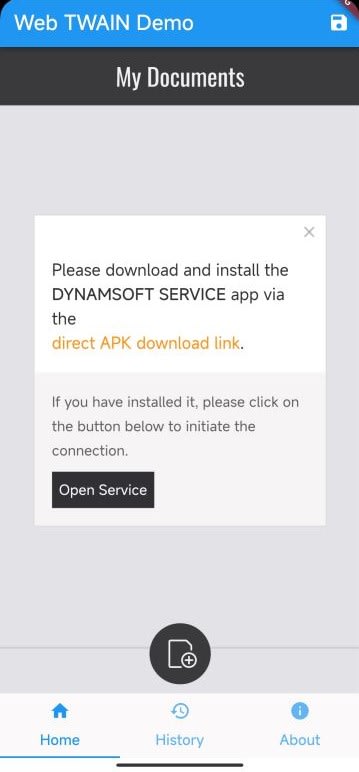
If the online demo cannot connect to a background Dynamsoft service, it will prompt you to install it:
When using an Android web browser, simply click the Open Service button to install or launch the Dynamsoft service app. However, when operating within the web view, you may encounter a 404 page. To address this issue, we need to handle the request in the onNavigationRequest callback. The Dynamsoft service activity can be initiated by its package and componentName. In cases where the Dynamsoft service app is not installed on the device, we can take the appropriate action by opening the Google Play store.
Future<void> launchURL(String url) async {
  await launchUrlString(url);
}

Future<void> launchIntent() async {
  if (Platform.isAndroid) {
    try {
      AndroidIntent intent = const AndroidIntent(
        componentName: 'com.dynamsoft.mobilescan.MainActivity',
        package: 'com.dynamsoft.mobilescan',
      );
      await intent.launch();
    } catch (e) {
      // If the app is not installed, open the Google Play store to install the app.
      launchURL(
          'https://play.google.com/store/apps/details?id=com.dynamsoft.mobilescan');
    }
  }
}

onNavigationRequest: (NavigationRequest request) {
  if (request.url.startsWith('intent://')) {
    launchIntent();
    return NavigationDecision.prevent;
  } else if (request.url.endsWith('.apk')) {
    launchURL(
        'https://play.google.com/store/apps/details?id=com.dynamsoft.mobilescan');
    return NavigationDecision.prevent;
  }
  return NavigationDecision.navigate;
},
Another problem you may encounter is the camera access within the Android web view. The online demo allows you to capture documents from both scanners and cameras. By default, the camera access is disabled in the Android web view. You must grant the camera permission in the native code.
The workaround is to handle the WebViewPermissionRequest in the onPermissionRequest callback. We can change the WebViewController creation code as follows:
Future<void> requestCameraPermission() async {
  final status = await Permission.camera.request();
  if (status == PermissionStatus.granted) {
  } else if (status == PermissionStatus.denied) {
  } else if (status == PermissionStatus.permanentlyDenied) {
  }
}

@override
void initState() {
  super.initState();

  late final PlatformWebViewControllerCreationParams params;
  params = const PlatformWebViewControllerCreationParams();

  _controller = WebViewController.fromPlatformCreationParams(
    params,
    onPermissionRequest: (WebViewPermissionRequest request) {
      request.grant();
    },
  )
    ..setJavaScriptMode(JavaScriptMode.unrestricted)

  ...

  requestCameraPermission();
}
Now, the demo should work as expected in the Flutter web view. The next step is to optimize the user experience by adding some Dart code.
Flutter Tab Bar
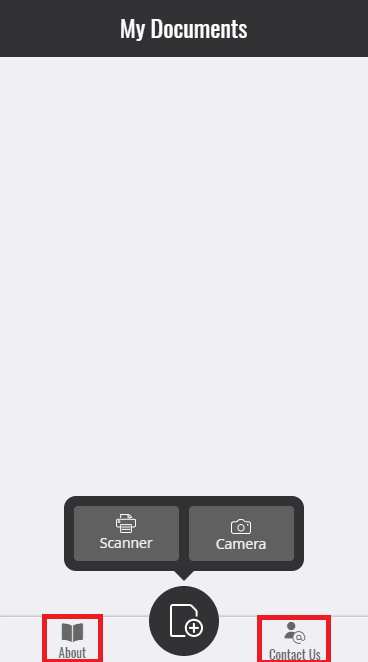
In comparison to the UI of the original online demo, you may have observed that we have made some changes by hiding the About and Contact Us tabs implemented in HTML5.
A Flutter tab bar is added at the bottom of the app for switching the web view and other native views.
How to hide the HTML elements in JavaScript?
-
Enable the
Debuggingoption in the web view.
if (_controller.platform is AndroidWebViewController) { AndroidWebViewController.enableDebugging(true); } -
Open
edge://inspect/#devicesorchrome://inspect/#devicesin Edge or Chrome to inspect the HTML elements. -
In the console, execute the following JavaScript code to hide the
AboutandContact Ustabs:
let parentElement = document.getElementsByClassName('dcs-main-footer')[0];
let tags = parentElement .getElementsByTagName('div');
tags[0].remove();
tags[6].remove();
In addition, hide the result panel, which is replaced by the native history page:
document.getElementsByClassName('dcs-main-content')[0].style.display = 'none'; -
Use the
onProgresscallback to execute the JavaScript code:
NavigationDelegate(
    onProgress: (int progress) {
      if (progress == 100) {
        String jscode = '''
      let parentElement = document.getElementsByClassName('dcs-main-footer')[0];
      let tags = parentElement .getElementsByTagName('div');
      tags[0].remove();
      tags[6].remove();
      document.getElementsByClassName('dcs-main-content')[0].style.display = 'none';
      ''';
        _controller
            .runJavaScript(jscode)
            .then((value) => {setState(() {})});
      }
    },
)
How to create a tab bar in Flutter?
class _MyAppPageState extends State<MyAppPage>
    with SingleTickerProviderStateMixin {
  late TabController _tabController;

  @override
  void initState() {
    super.initState();
    _tabController = TabController(vsync: this, length: 3);

    ...
  }

  @override
  Widget build(BuildContext context) {
    return Scaffold(
      body: TabBarView(
        controller: _tabController,
        children: [
          HomeView(title: 'Web TWAIN Demo', controller: _controller),
          const HistoryView(title: 'History'),
          const AboutView(title: 'About the SDK'),
        ],
      ),
      bottomNavigationBar: TabBar(
        labelColor: Colors.blue,
        controller: _tabController,
        tabs: const [
          Tab(icon: Icon(Icons.home), text: 'Home'),
          Tab(icon: Icon(Icons.history_sharp), text: 'History'),
          Tab(icon: Icon(Icons.info), text: 'About'),
        ],
      ),
    );
  }
}
Save Base64 Images from Web View to Local Storage
As a document is acquired within the web view, the image data can be retrieved as a base64 string.
DWObject.ConvertToBase64([DWObject.CurrentImageIndexInBuffer], 1, (result, indices, type) =>{})
We add a communication channel between the web view and native code using the addJavaScriptChannel method.
_controller = WebViewController.fromPlatformCreationParams(
    params,
    onPermissionRequest: (WebViewPermissionRequest request) {
      request.grant();
    },
  )
    ..addJavaScriptChannel(
      'ImageData',
      onMessageReceived: (JavaScriptMessage message) {
        saveImage(message.message).then((value) {
          showToast(value);
        });
      },
    )
The JavaScript code can then call postMessage to send a message to Dart code. We create a button to trigger the image saving operation when the JavaScript image buffer is not empty. The onMessageReceived callback is invoked when the message is received.
IconButton(
  icon: const Icon(Icons.save),
  onPressed: () async {
    widget.controller.runJavaScript(
        'DWObject.ConvertToBase64([DWObject.CurrentImageIndexInBuffer], 1, (result, indices, type) =>{ImageData.postMessage(result._content)})');
  },
),
How to save a base64 string to a local file in Flutter?
String getImageName() {
  // Get the current date and time.
  DateTime now = DateTime.now();

  // Format the date and time to create a timestamp.
  String timestamp =
      '${now.year}${now.month}${now.day}_${now.hour}${now.minute}${now.second}';

  // Create the image file name with the timestamp.
  String imageName = 'image_$timestamp.jpg';

  return imageName;
}

Future<String> saveImage(String base64String) async {
  Uint8List bytes = base64Decode(base64String);

  // Get the app directory
  final directory = await getApplicationDocumentsDirectory();

  // Create the file path
  String imageName = getImageName();
  final filePath = '${directory.path}/$imageName';

  // Write the bytes to the file
  await File(filePath).writeAsBytes(bytes);

  return filePath;
}
The showToast() method is implemented with platform-specific code:
-
Add the following Kotlin code in
MainActivity.kt:
override fun configureFlutterEngine(flutterEngine: FlutterEngine) { super.configureFlutterEngine(flutterEngine) MethodChannel(flutterEngine.dartExecutor.binaryMessenger, "AndroidNative") .setMethodCallHandler { call, result -> when (call.method) { "showToast" -> { val message = call.argument<String>("message") showToast(message!!) result.success(null) } else -> { result.notImplemented() } } } } private fun showToast(message: String) { Toast.makeText(this, message, Toast.LENGTH_SHORT).show() } -
Invoke the
showToast()method in Dart code:
void showToast(String message) {
  const platform = MethodChannel('AndroidNative');
  platform.invokeMethod('showToast', {'message': message});
}
View and Share Scanned Images
After saving the scanned images to the local storage, we can get the file list as follows:
Future<List<String>> getImages() async {
  // Get the app directory
  final directory = await getApplicationDocumentsDirectory();

  // Get the list of files in the app directory
  List<FileSystemEntity> files = directory.listSync();

  // Get the file paths
  List<String> filePaths = [];
  for (FileSystemEntity file in files) {
    if (file.path.endsWith('.jpg')) {
      filePaths.add(file.path);
    }
  }

  return filePaths;
}
To view the image, we create a new stateless widget and pass the file path as a parameter:
class DocumentView extends StatelessWidget {
  final String filePath;
  const DocumentView({super.key, required this.filePath});

  @override
  Widget build(BuildContext context) {
    return Scaffold(
      appBar: AppBar(
        title: const Text('Document Viewer'),
      ),
      body: Center(child: Image.file(File(filePath))),
    );
  }
}
An image file can be shared with the Share.shareXFiles() method:
IconButton(
  icon: const Icon(Icons.share),
  onPressed: () async {
    if (selectedValue == -1) {
      return;
    }

    await Share.shareXFiles([XFile(_results[selectedValue])],
        text: 'Check out this image!');
  },
),


