TL;DR: Let’s see how to create interactive floor plans using the Syncfusion Vue Diagram Library. This blog covers setting up a Vue app, installing necessary dependencies, and integrating the Diagram component. You’ll also learn to create a reusable symbol palette for floor planning, including elements like doors, walls, and furniture. Enhance your floor planning process with drag-and-drop, zoom, and customization features.
Are you looking to create interactive floor plans for interior design, architecture, real estate, or facility management?
Syncfusion Vue Diagram Library makes designing visually appealing and functional floor planners easy. This powerful tool provides all the essential features—like drag-and-drop, copy/paste, import/export, and pan/zoom—that make building intuitive and engaging diagrams a breeze.
In this blog, we’ll explore how to harness the full potential of the Vue Diagram Library to create interactive user interfaces that streamline the floor planning process, enabling designers to develop layouts quickly and efficiently.
Floor planner diagram symbols
A floor planner designer offers various symbols for doors, walls, dining rooms, kitchens, living areas, and other essential components.
Creating a diagram surface
Let’s follow these steps to add the Syncfusion Vue Diagram Library to your app:
Step 1: Set up your project
Start by creating a new folder named Floor Planner.
Step 2: Install Vue CLI
Open your terminal or command prompt and execute the following command to install the vue cli NPM package globally.
npm install -g @vue/cli
Step 3: Create a new Vue app
Now, create a new Vue app with your desired app name and execute the following command.
vue create floor-planner
Step 4: Navigate to your project directory
Change your working directory to the newly created app using the following command.
cd floor-planner
Step 5: Start the development server
Launch a development server to view your app in action by running the following command.
npm run serve
This will open your app in your default web browser at http://localhost:8080/.
Step 6: Add dependencies
Now, open the package.json file and add the following dependencies to it.
 "dependencies": {
    "@syncfusion/ej2-vue-buttons": "*",
    "@syncfusion/ej2-vue-diagrams": "*",
    "@syncfusion/ej2-vue-dropdowns": "*",
    "@syncfusion/ej2-vue-inputs": "*",
    "@syncfusion/ej2-vue-lists": "*",
    "@syncfusion/ej2-vue-navigations": "*",
    "@syncfusion/ej2-vue-popups": "*",
    "@syncfusion/ej2-vue-splitbuttons": "*",
    "bootstrap": "^5.2.0",
    "bootstrap-vue": "^2.22.0",
    "core-js": "^3.8.3",
    "vue": "~2.6.14",
    "vue-template-compiler": "~2.6.14",
    "vue-class-component": "^7.2.3",
    "vue-property-decorator": "^9.1.2",
    "vue-router": "^3.5.1",
    "vuex": "^3.6.2"
  },
Step 7: Install dependencies
Use the following command to install the above-mentioned dependent packages:
npm install
Step 8: Include scripts and styles
Then, add the necessary script and style references to the index.html file. Refer to the following code example.
<head>
 <title> Essential JS2 for Vue - Floor Planner</title>
 <script src="https://cdn.syncfusion.com/ej2/syncfusion-helper.js" type ="text/javascript"></script>
 <script src="https://cdn.syncfusion.com/ej2/20.4.38/dist/ej2.min.js" type="text/javascript"></script>
 <link href="https://cdn.syncfusion.com/ej2/20.4.38/fluent.css" rel="stylesheet">
 <link href="https://cdn.syncfusion.com/ej2/ej2-vue-buttons/styles/fluent.css" rel="stylesheet">
 <link href="https://maxcdn.bootstrapcdn.com/bootstrap/3.3.7/css/bootstrap.min.css" rel="stylesheet">
 <link href="https://cdn.syncfusion.com/ej2/20.4.38/ej2-base/styles/fluent.css" rel="stylesheet">
 <link href="https://cdn.syncfusion.com/ej2/20.4.38/ej2-vue-popups/styles/fluent.css" rel="stylesheet">
 <link href="https://cdn.syncfusion.com/ej2/20.4.38/ej2-vue-splitbuttons/styles/fluent.css" rel="stylesheet">
 <link href="https://cdn.syncfusion.com/ej2/20.4.38/ej2-vue-navigations/styles/fluent.css" rel="stylesheet">
 <link href="https://cdn.syncfusion.com/ej2/20.4.38/ej2-vue-inputs/styles/fluent.css" rel="stylesheet">
 <link href="https://cdn.syncfusion.com/ej2/20.4.38/ej2-vue-dropdowns/styles/fluent.css" rel="stylesheet">
 <link href="assets/Diagram_Builder_icon_v4/Diagram_Builder_Icon/style.css" rel="stylesheet">
 <link href="assets/index.css" rel="stylesheet">
 <link href="assets/dbstyle/diagrambuilder.css" rel="stylesheet"/>
</head>
Step 9: Integrate the Vue Diagram component
To include the Vue Diagram component in your app, import the DiagramComponent from ej2-vue-diagrams. Then, configure the required properties, such as width and height and a collection of nodes and connectors, in the App.vue file.
Refer to the following code example.
<div class="db-diagram-container">
 <div id="diagramContainerDiv" class="db-current-diagram-container">
  <ejs-diagram
       id="diagram"
       ref="diagram"
       :width="width"
       :height="height"></ejs-diagram>
 </div>
</div>
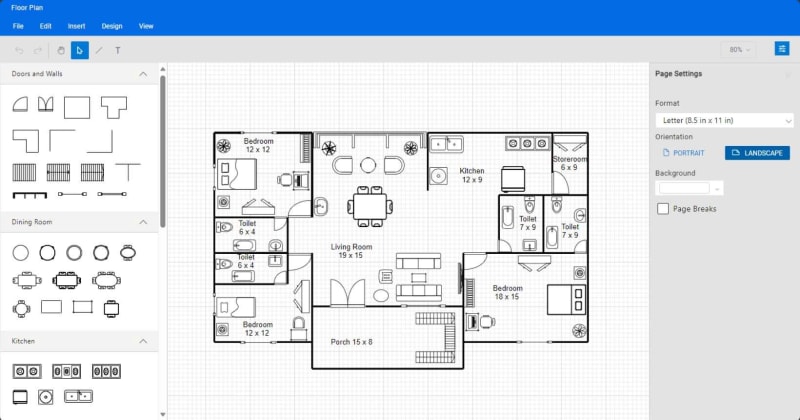
The following image shows the diagramming page that was created.

Note: For more details, refer to the getting started with Vue Diagram Library documentation.
Creating reusable floor planner symbols
To create a reusable floor planner with customizable symbols, you can use the Vue Diagram control’s symbol palette. This feature allows you to build a gallery of reusable nodes and connectors that can be dragged and dropped onto a diagram canvas multiple times.
Let’s walk through the steps to build a symbol palette designed explicitly for floor planning.
Step 1: Create the container for the symbol palette
Start by defining an HTML <div> element that will serve as the container for the symbol palette.
<div class="db-palette-parent">
 <ejs-symbolpalette id="symbolpalette" ref="paletteObj" width="100%" height="100%"></ejs-symbolpalette>
</div>
Step 2: Initialize the symbol palette
Next, initialize the Syncfusion Diagram Symbol Palette by specifying the necessary attributes, such as width and height, and the collection of symbols to be included.
//Initializes the symbol palette.
<div class="db-palette-parent">
 <ejs-symbolpalette id="symbolpalette" ref="paletteObj" width="100%" height="100%" :palettes='palettes. Palettes' :getSymbolInfo='palettes.getSymbolInfo' :symbolMargin='palettes.symbolMargin' :getNodeDefaults='palettes.setPaletteNodeDefaults' :enableSearch='palettes.enableSearch'>
 </ejs-symbolpalette>
</div>
Step 3: Define and customize the symbol palette
Now, define and customize the symbols for your palette according to your needs. You can create different sets of symbols, such as shapes for the dining room, doors, living room, bathroom, etc. Here is a basic example of how to define these symbols.
export class Palettes {

    private getDiningRoomShapes(): NodeModel[] {

        let diningShapes: NodeModel[] = [
            { id:'Circle Study Table',addInfo:'Circle Study Table', dragSize:{height:40,width:40}, shape :{ type: 'Path', data:"M57 29C57 44.464 44.464 57 29 57C13.536 57 1 44.464 1 29C1 13.536 13.536 1 29 1C44.464 1 57 13.536 57 29Z"}},
            { id:'Circle Study Table2',addInfo:'Circle Study Table',dragSize:{height:40,width:40}, shape :{ type: 'Path', data:'M57 29C57 44.464 44.464 57 29 57C13.536 57 1 44.464 1 29C1 13.536 13.536 1 29 1C44.464 1 57 13.536 57 29Z M53 29C53 42.2548 42.2548 53 29 53C15.7452 53 5 42.2548 5 29C5 15.7452 15.7452 5 29 5C42.2548 5 53 15.7452 53 29Z'}},
            { id:'Circular Table for Two',addInfo:'Dual Circle Study Table',shape :{ type: 'Path', data:"M12.7839 6.68319C12.3695 3.67862 14.704 1 17.737 1H33.4357C36.4079 1 38.7239 3.57736 38.4072 6.53267L37.5 14.7962C33 12.2962 30.4479 12.2502 25.5 12.0049C20.8774 12.1817 18.4551 13.0876 13.9551 15.0876L12.7839 6.68319Z M32 2C32 4.20914 30.2091 6 28 6L23 6C20.7909 6 19 4.20914 19 2V1L32 1V2Z M38.6314 67.656C38.8308 70.546 36.5401 73 33.6433 73H17.5439C14.579 73 12.2654 70.4347 12.5705 67.4855L13.4604 58.6325C17.7149 60.6639 20.3595 61.8118 25.5 61.9951C30.7634 61.8969 34.0464 60.4596 38.1993 58.8266L38.6314 67.656Z M19 72C19 69.7909 20.7909 68 23 68H28C30.2091 68 32 69.7909 32 72V73H19V72Z M51 37C51 50.8071 39.8071 62 26 62C12.1929 62 1 50.8071 1 37C1 23.1929 12.1929 12 26 12C39.8071 12 51 23.1929 51 37Z M48 37C48 49.1503 38.1503 59 26 59C13.8497 59 4 49.1503 4 37C4 24.8497 13.8497 15 26 15C38.1503 15 48 24.8497 48 37Z"}},
            { id:'Rectangle Dining Table',addInfo:'Rectangle Dining Table', dragSize:{width:60,height:40},shape :{ type: 'Path', data: 'M26.5284 6.47992C26.2452 3.54248 28.5543 1 31.5053 1H47.4947C50.4457 1 52.7548 3.54248 52.4716 6.47992L51.65 15L27.35 15L26.5284 6.47992Z M46 2C46 4.20914 44.2091 6 42 6L37 6C34.7909 6 33 4.20914 33 2V1L46 1V2Z M52.4716 73.5201C52.7548 76.4575 50.4457 79 47.4947 79H31.5053C28.5543 79 26.2452 76.4575 26.5284 73.5201L27.35 65H51.65L52.4716 73.5201Z M33 78C33 75.7909 34.7909 74 37 74H42C44.2091 74 46 75.7909 46 78V79H33V78Z M73.5201 27.5284C76.4575 27.2452 79 29.5543 79 32.5053V48.4947C79 51.4457 76.4575 53.7548 73.5201 53.4716L65 52.65V28.35L73.5201 27.5284Z M78 47C75.7909 47 74 45.2091 74 43V38C74 35.7909 75.7909 34 78 34H79V47H78Z M6.47992 53.4716C3.54248 53.7548 1 51.4457 1 48.4947L1 32.5053C1 29.5543 3.54249 27.2452 6.47992 27.5284L15 28.35L15 52.65L6.47992 53.4716Z M61 15H19C16.7909 15 15 16.7909 15 19V61C15 63.2091 16.7909 65 19 65H61C63.2091 65 65 63.2091 65 61V19C65 16.7909 63.2091 15 61 15Z M2 34C4.20914 34 6 35.7909 6 38L6 43C6 45.2091 4.20914 47 2 47H1L1 34H2Z' }},
            { id:'Rectangle Study Table',addInfo:'Rectangle Study Table',dragSize:{width:38,height:22}, shape :{ type: 'Path', data:'M79 1H3C1.89543 1 1 1.89543 1 3V49C1 50.1046 1.89543 51 3 51H79C80.1046 51 81 50.1046 81 49V3C81 1.89543 80.1046 1 79 1Z'}},
           . . . . . .
           . . . . . .
        ];

        return diningShapes;
    }

    private getDoorShapes(): NodeModel[] {

        let doorShapes: NodeModel[] = [
            { id: 'Door close',addInfo:'Door close', shape: { type: 'Path', data: 'M1 71L1 79L72 79V71M1 71L72 71M1 71C1 32.3401 32.3401 1 71 1H72V71' }},
            { id: 'Double door close',addInfo:'Double door close', shape: { type: 'Path', data:"M143 71V79L1 79L1 71M143 71L1 71M143 71V1H142C103.34 1 72 32.3401 72 71M143 71H72M1 71L1 1H2C40.6599 1 72 32.3401 72 71M1 71L72 71M72 78.5V71"}},
            { id:'Room',addInfo:'Room', shape :{ type: 'Path', data:"M4 4H104V104H4V4Z"}},
            { id:'T Room',addInfo:'T Room', shape :{ type: 'Path', data:"M4 4H273V145.749H192.981V250H71.25V110.312H4V4Z"}},
            { id:'L Room',addInfo:'L Room', shape :{ type: 'Path', data:"M4 4H273V250H146.5V110.312H4V4Z"}},
            { id:'Wall Corner',addInfo:'Wall Corner', shape :{ type: 'Path', data:"M104 4H4V104"}},
            { id:'Wall Corner1',addInfo:'Wall Corner', shape :{ type: 'Path',data:'M0 100L100 100L100 0'}},
            { id:'T Wall',addInfo:'T Wall', shape :{ type: 'Path', data:"M106 4.00002L206 4.00004M106 4.00002L106 104M106 4.00002L0 4"}},
            { id:'Window Garden',addInfo:'Window Garden',dragSize:{width:76,height:29}, shape :{ type: 'Path', data:"M1.5 0H0V1.5V38.5H3V3H152V38.5H155V1.5V0H153.5H1.5ZM6.5 5H5V6.5V38.5H8V8H53V38.5H56V8H100V38.5H103V8H147V38.5H150V6.5V5H148.5H103H101.5H100H56H54.5H53H6.5Z"}},
            { id:'Window1',addInfo:'Window',dragSize:{width:66,height:7}, shape :{ type: 'Path', data:'M22 5.5L124 5.50001M145 9L128 9V1L145 1V9ZM1 1L18 1L18 9L1 9L1 1ZM128 8L124 8V2L128 2V8ZM18 2L22 2L22 8L18 8L18 2Z'}},

            { id:'Window2',addInfo:'Window',dragSize:{width:66,height:7}, shape :{ type: 'Path', data:"M22 3.5L124 3.50001M22 6.5L124 6.50001M145 9L128 9V1L145 1V9ZM1 1L18 1L18 9L1 9L1 1ZM128 8L124 8V2L128 2V8ZM18 2L22 2L22 8L18 8L18 2Z"}},
           . . . . . .
           . . . . . .

        ];

        return doorShapes;
    }
    private getlivingRoomShapes(): NodeModel[] {

        let livingRoomShapes: NodeModel[] = [
            { id:'TV',addInfo:'TV',dragSize:{width:48,height:20},shape :{ type: 'Path', data:'M55 23H4C2.34315 23 1 24.3431 1 26V40H58V26C58 24.3431 56.6569 23 55 23ZM55 23L48.1968 4.29128C47.4783 2.31534 45.6004 1 43.4979 1H16.5021C14.3996 1 12.5217 2.31533 11.8032 4.29128L5 23H55ZM16 1V23M25 1V23M34 1V23M43 1V23M1 36.5H58'}},
            { id:'Flat TV',addInfo:'Flat TV',dragSize:{width:66,height:13}, shape :{ type: 'Path', data:'M1 15H92M1 15V20H92V15M1 15V10H92V15M79 7L85 1M79 20L85 26M14 7L8 1M14 20L8 26M37 2V7M39 2V7M41 2V7M43 2V7M45 2V7M47 2V7M49 2V7M51 2V7M53 2V7M55 2V7M23 2H70L76 7H17L23 2ZM5 7H88V10H5V7Z'}},
            { id:'Flat TV1',addInfo:'Flat TV',dragSize:{width:66,height:13}, shape :{ type: 'Path', data:'M1 14H92M1 14V19H92V14M1 14V9H92V14M37 1V6M39 1V6M41 1V6M43 1V6M45 1V6M47 1V6M49 1V6M51 1V6M53 1V6M55 1V6M23 1H70L76 6H17L23 1ZM5 6H88V9H5V6Z'}},
            { id:'Elevator',addInfo:'Elevator',dragSize:{width:37,height:37}, shape :{ type: 'Path', data:'M14.3536 14.6464L77.3536 77.6464M77.3536 14.3536L14.3536 77.3536M14 14H78V78H14V14ZM11 11H81V81H11V11ZM9 89H1V1H91V89H83V9H9V89Z'}},
           . . . . . .
           . . . . . .

        ];

        return livingRoomShapes;
    }
    private getBathRoomShapes(): NodeModel[] {

        let bathRoomShapes: NodeModel[] = [
            { id:'Toilet1',addInfo:'Toilet',dragSize:{width:30,height:30}, shape :{ type: 'Path', data: 'M46.4065 37.9425C46.4065 55.0951 36.823 69.0002 25.0011 69.0002C13.1792 69.0002 3.5957 55.0951 3.5957 37.9425C3.5957 30.1141 5.2059 23.4623 8.5 18C8.61402 18 25 18 25 18H41.2425C44.5366 23.4623 46.4065 30.1141 46.4065 37.9425Z M41.2161 43.5006C41.2161 53.9728 33.9559 62.4621 24.9999 62.4621C16.0439 62.4621 8.78369 53.9728 8.78369 43.5006C8.78369 33.0284 16.0439 24.5391 24.9999 24.5391C33.9559 24.5391 41.2161 33.0284 41.2161 43.5006Z M1 3.61538C1 2.17095 2.17095 1 3.61538 1H46.3846C47.8291 1 49 2.17095 49 3.61538V15.3846C49 16.8291 47.8291 18 46.3846 18H3.61538C2.17095 18 1 16.8291 1 15.3846V3.61538Z M26.9995 9C26.9995 10.1046 26.1041 11 24.9995 11C23.8949 11 22.9995 10.1046 22.9995 9C22.9995 7.89543 23.8949 7 24.9995 7C26.1041 7 26.9995 7.89543 26.9995 9Z M31 33C31 37.4183 28.3137 41 25 41C21.6863 41 19 37.4183 19 33C19 28.5817 21.6863 25 25 25C28.3137 25 31 28.5817 31 33Z '}},
            { id:'Toilet2',addInfo:'Toilet',dragSize:{width:30,height:30}, shape :{ type: 'Path', data:'M46.989 33.0731C46.989 53.4671 37.3818 69.9996 25.5307 69.9996C13.6795 69.9996 4.07227 53.4671 4.07227 33.0731C4.07227 19.1497 4 18 4 18C4.17549 18.0144 15.9306 18.2553 26.5002 17.9993C36.1582 17.7654 46.989 17.9999 46.989 17.9999C46.989 17.9999 46.989 21.6119 46.989 33.0731Z M41 44.5C41 54.7173 34.0604 63 25.5 63C16.9396 63 10 54.7173 10 44.5C10 34.2827 16.9396 26 25.5 26C34.0604 26 41 34.2827 41 44.5Z M1 3.61538C1 2.17095 2.17095 1 3.61538 1H46.3846C47.8291 1 49 2.17095 49 3.61538V15.3846C49 16.8291 47.8291 18 46.3846 18H3.61538C2.17095 18 1 16.8291 1 15.3846V3.61538Z M26.9995 9C26.9995 10.1046 26.1041 11 24.9995 11C23.8949 11 22.9995 10.1046 22.9995 9C22.9995 7.89543 23.8949 7 24.9995 7C26.1041 7 26.9995 7.89543 26.9995 9Z M31 34C31 38.4183 28.3137 42 25 42C21.6863 42 19 38.4183 19 34C19 29.5817 21.6863 26 25 26C28.3137 26 31 29.5817 31 34Z'}},

           . . . . . .
           . . . . . .
        ];

        return bathRoomShapes;
    }

           . . . . . .
           . . . . . .

    public palettes: PaletteModel[] = [
        { id: 'door', expanded: true, symbols: this.getDoorShapes(), iconCss: 'e-ddb-icons e-flow' ,title: 'Doors and Walls' },
    { id: 'diningRoom', expanded: true, symbols: this.getDiningRoomShapes(), iconCss: 'e-ddb-icons e-flow', title: 'Dining Room' },
    { id: 'kitchen', expanded: true, symbols: this.getKitchenShapes(), iconCss: 'e-ddb-icons e-flow', title: 'Kitchen'},
    { id: 'bedRoom', expanded: true, symbols: this.getBedRoomShapes(), iconCss: 'e-ddb-icons e-flow', title: 'Bed Room' },
    { id: 'livingRoom', expanded: true, symbols: this.getlivingRoomShapes(), iconCss: 'e-ddb-icons e-flow', title: 'Living Room' },
    { id: 'bathRoom', expanded: true, symbols: this.getBathRoomShapes(), iconCss: 'e-ddb-icons e-flow', title: 'Bath Room' },
    ];
    public expandMode: ExpandMode = 'Multiple';

    public enableSearch: boolean = true;
    public symbolMargin: MarginModel = { left: 5, right: 5, top: 5, bottom: 10 };

    public getSymbolInfo(symbol: NodeModel): SymbolInfo {
        return { fit: true };
    }
The following image shows the collection of reusable floor planner shapes in the symbol palette.
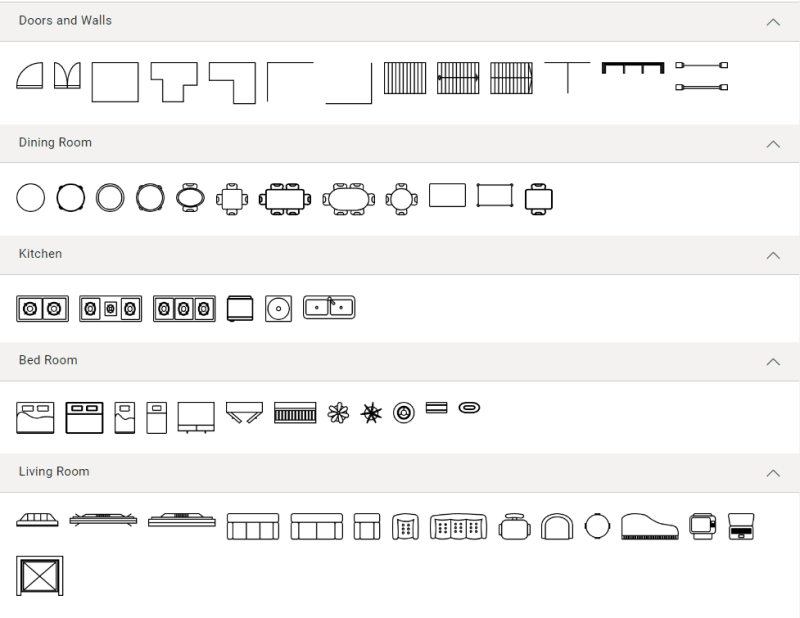
Note: Refer to the symbol palette in the Vue Diagram Library documentation for more info on adding, grouping, and customizing the symbols in the palette.
Designing a floor planner diagram in Vue
Follow these steps to design your floor planner diagram using the Vue Diagram Library:
Step 1: Add floor planner symbols to the editor
Begin by dragging symbols from the symbol palette and dropping them onto the diagram surface at your desired locations. This allows you to place elements where you want them on the floor plan.
Step 2: Moving symbols
Now, you can change the position of the dropped symbols by simply clicking and dragging them to the desired location on the diagram surface.

Step 3: Loading and saving the floor planner diagram
The Vue Diagram Library provides functionality to save your current work and load it later.
Select the Save option from the File menu to save your diagram, which stores the diagram as a file on your local drive.
To load a saved diagram, go to the File menu, choose the Open option to browse, and select your file. This flexibility allows you to pause and resume your design work or effortlessly change previously saved diagrams.
Refer to the following GIF image for a visual demonstration.

Note: For more details, refer to loading and saving diagrams in Vue Diagram Library documentation.
Step 4: Undo or redo the diagram action
The Vue Diagram component supports undo and redo operations, tracking the changes made to a diagram. You can use these features to delete a mistake quickly or restore an action you previously undid.
You can undo an action using the Ctrl + Z keyboard shortcut, clicking the Undo button on the toolbar, or using the Undo commands from the Edit menu. This will undo the most recent action that was performed.
To redo an action, use the Ctrl + Y keyboard shortcut, click the Redo button on the toolbar, or use the Redo commands from the Edit menu. This will redo the most recently undone action.
Refer to the following image.

Step 5: Export the floor planner diagram
You can export the created floor planner diagram as an image file in different formats, such as JPEG, PNG, and SVG. This allows you to share the diagram via email or other digital means or embed it in a document or presentation.
To do this, click the File menu and select Export. A dialog box will appear where you can specify the name and image file format to save the floor planner diagram. You can also export only the content area of the diagram by excluding the blank areas or export the entire diagram (including blank areas) based on the width and height specified in the page settings.
Step 6: Print the floor planner diagram
To print a diagram, click the File menu and select Print. This will open the Print dialog box, where you can select your printer and customize the print settings, such as orientation, paper size, and page margins. Then, click on the Print button to print the floor planner diagram.
Refer to the following image.

Step 7: Pan and zoom
The Vue Diagram component provides several options for panning and zooming:
- Pan using the scrollbars: Use the scrollbars on the right and bottom sides to move the diagram in any direction.
- Pan using the mouse wheel: Rotate the mouse wheel forward or backward to scroll up or down; hold the Shift key while rotating the wheel to scroll left or right.
- Pan using the pan tool: You can also pan a diagram by selecting the Pan tool from the toolbar. Then, hold down the left mouse button and drag the mouse to move the diagram in any direction.
- Zoom using keyboard shortcuts: Use Ctrl + mouse wheel to zoom in and out quickly.
- Zoom using the toolbar option: Adjust the zoom level using the zoom dropdown in the upper-right corner. Choose Zoom To Fit to display the entire diagram within the window.
GitHub reference
For more details, refer to creating a floor planner diagram in Vue GitHub demo.
Conclusion
Thanks for reading! In this blog, we’ve seen how to easily create a floor planner diagram using the Syncfusion Vue Diagram Library. You can also use the Vue Diagram Library to create organizational charts, flowcharts, mind maps, floor plans, network diagrams, or logic circuit diagrams. Try it out and leave your feedback in the comments section below!
If you’re an existing Syncfusion user, the newest version of Essential Studio is available from the License and Downloads page. If you’re new to Syncfusion, you can take advantage of our 30-day free trial to explore the features and capabilities of our controls.
If you have questions, you can reach us through our support forum, support portal, or feedback portal. We are always happy to assist you!