What is Git
Git is a distributed version-control system for tracking changes in source code during software development.It is designed for coordinating work among programmers, but it can be used to track changes in any set of files.
This basically means:
- It's a system that records changes to our files over time.
- You can recall and go back a specific version of that file at any time.
- Other developers can collaborate and have a local version of the files in their own computers.
Why use git ?
- You can store revisions of your project in one directory.
- Easily go back to your revisions at anytime.
- Work on new features without messing up with the original codebase.
- Collaborate with other developers without a geographically constriction.
What is Github?
Github is an online service that you can host your project, share your code and helps other developers to download and work on it. Later they can upload their code edit and merge with main branch/codebase( master branch).
How to install Git
- Go to the Git website
- If you are using windows i would recommend Cmder. It's a command line interface for windows. Download the full version that comes with git installed. (I have used it and it's absolutely worth it).
How set your username & email
Open your cdmer (I am going to use it as I work through this post)
git config --global user.name jane tracy
For setting up the email
git config --global user.email janetracy00@gmail.com
To see user details that you registered as
   git config user.name
   git config user.email
Basic command controls
- To create a folder : mkdir test
- To create a file: touch index.html style.css app.js
- To delete a file : rm index.html
- To see inside a folder : ls (Ls)/ dir
- To move up a folder : cd ..
- To delete a folder : rmdir test
What is a Git repository (.git)
This is a folder inside your project where git tracks all the changes made in the files and build a history reference over time. In your project the git repository folder you will see a .git folder.
Note: The git repository should be at the root of the project folder, for it to track changes to the whole project.
git init
A work through the stages in git
1) git status
Running git status will show you which files are currently in the staging area.
git status
If the names of the files listed are in red that means they are not in the staging area. But if they are green, they are in the staging and are ready to commit.
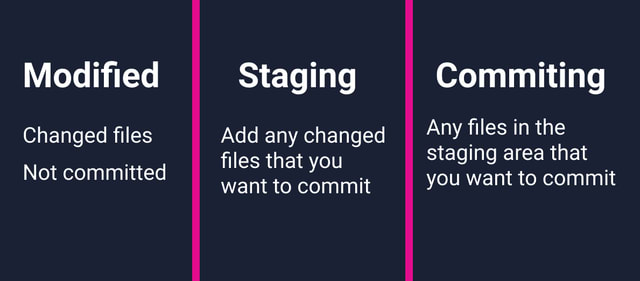
2) git add
Running git add moves the file/files in the staging area. This helps you to review your changes before you commit.
To add a single file
git add index.html
To add multiple files
git add .
3) git rm
This helps to unstage any file in the staging area.
git rm --cached index.html
4) git commit
Running this will commit your files in the staging area. You can also add a descriptive message to the commit to help you when reviewing your project folder in the future.
git commit -m "added index and styles file"
5) git log / git log --oneline
git log helps you to see the commit history. Each commit has a unique id, the author details, date, time and the commit message.
git log/ git log --oneline
git log --oneline show the shorter version(log in one line). It includes the id and the commit message.
    ## get commits by a specific author
    git log --author jane

    ## get commits by message
    ## get commit that contains 'index'
    git log --all --grep index

    ## get commit in the last 2 weeks
    git log --since=2.weeks
Undoing things
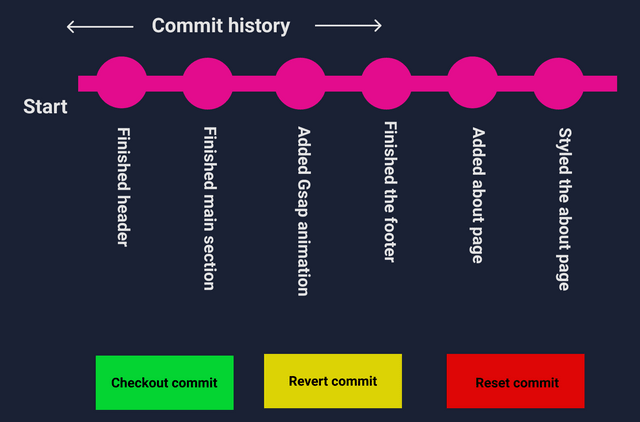
6) git checkout commit
This helps you to go back to a previous commit. But any changes done will not be saved and the commit history won't be ruined. This is read only stage and this is why it's safer than revert or reset. If you want to create a new branch to retain commits you create, you can by using -c with the switch command.
    git switch -c <new-branch-name>
    ## undo this by:
    git switch -
7) git revert
It inverts the changes introduced by the commit and creates a new commit with the inverse code.This is safer than using git reset plus it doesn't delete the commit permanently.
8) git reset
This doesn't delete a commit but the commit will not have a direct path from a ref to access them. It alters the commit history. This commits can be found and restored using git reflog.
   git checkout 91471e4
   git revert 91471e4
   git reset 91471e4

   ## Any pending work that was hanging out in the
   Staging Index and Working Directory will be lost.
   git reset 91471e4 --hard

   ##The Staging Index is reset to the state of the specified
     commit.Any changes that have been undone from the Staging
     Index are moved to the Working Directory.
     git reset 91471e4 --mixed

  ##The ref pointers are updated and the reset stops there. The
    Staging Index and the Working Directory are left untouched.
    git reset 91471e4 --soft
For more details about git reset and how it works.
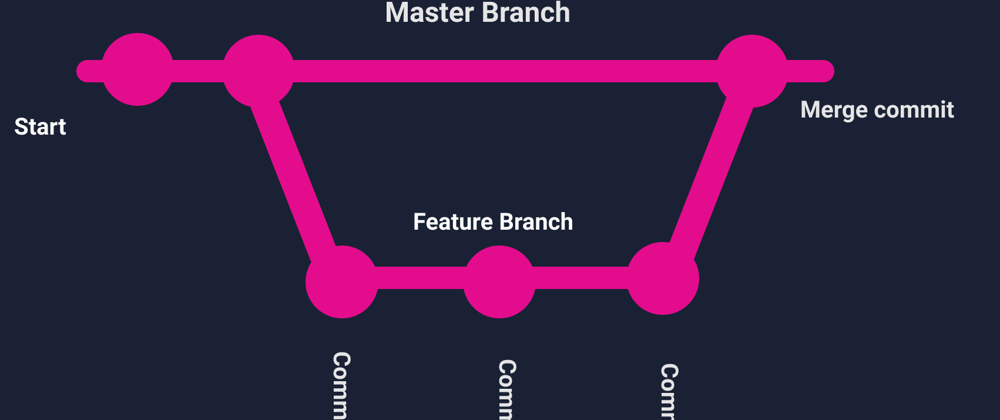
9) git branch
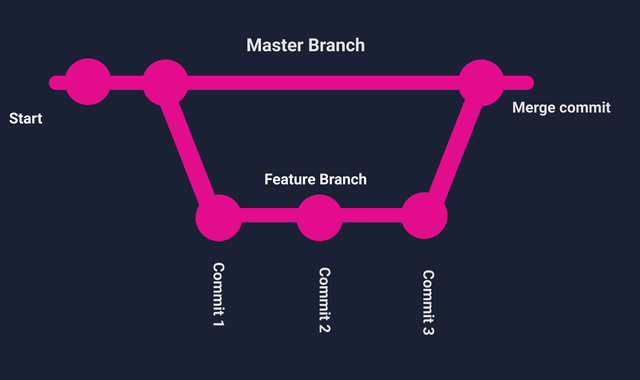
If you have a new feature you want to try out instead of making commits to the master branch, you can create a new branch which copies the state of code in the master branch, then add new commits and finally merge it to the master branch at the end. If you are not happy with the new feature, you can just delete the branch and go back to the initial codebase.
    ##To create a branch
    git branch feature-1

    ##To switch to a branch
    git checkout feature-1
    ## To create and switch to a branch
    git checkout -b feature-a
    ## To push a branch up on github
    git push origin feature-a

    ## To check the branches
    git branch -a

    ## To delete a branch
    git branch -d feature-1
    ## To forcefully delete a branch even if it's unmerged
    git branch -D feature-1

    ## To rename a current branch
    ## Rename feature-1 to feature-a
    git branch -m feature-a
10) git merge
It will combine multiple sequences of commits into one example you can use it to combine feature-1 to the master branch.
git merge feature-1
When you have a conflict it might be someone has changed code in the master branch when you were working on another branch. The merge can't happen until you solve the conflict and you can do it manually. Read more about git merge
How to create a repository in Github
11) git push
1) Method one
Let's say you have a project you have been coding and you want to publish it in github for collaboration or just hosting. You can go in github and create a new repository, copy the url of your repo and run:
   ## To push it into the master branch
   git push <url link> master
When you want to edit code and push it again to github. You can first create an alias for the remote repo by:
   git remote add origin <url>
   git remote add origin https://github.com/muchirijane/git-learning.git

   ## To push it into the master branch
   git push -U origin master
12) git clone
2) Method Two
Create a repository in Github and clone it to your computer
   git clone <url>
   ## you have a url repo
   git clone https://github.com/muchirijane/git-learning.git

   ## To push it up in Github to the master branch
   git push origin master

   ## To see urls of the remote repositories
   git remote -v
Collaborating in Github
13) git pull
1) Step 1
This fetches and downloads code from the remote repo(github repo) and updates the local repository to match it.
git pull origin master
2) step 2
Create a new branch, add your code and make commits
git checkout -b feature-2
3) Step 3
Push your branch to github and create a pull request
git push origin feature-2
Conclusion
Git is very useful and important to learn if you want to level up in the tech field. I haven't cover ever git or github command but this are the basics that can help you start. You can check tutorials in youtube to learn more. In future i will make part 2 with more advanced commands.
If you want to know how to create git aliases use this website.
🔥 Bonus section
Forking in Github
You can use this method to do your first open source project.
Let's do an example by contributing to first contributions.
1) Step one: Fork the github repository
This is done by clicking the fork button on top of the page. This will create a copy of the repository in your own Github account.

2) Step two: Clone the project
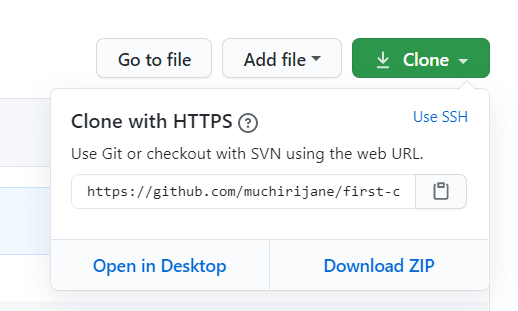
Click on the clone button and the click on the copy to clipboard icon.
This will create a copy of the project files to your computer.
Ps: Your create an 'open source' folder where you want copy the project files.
Open your terminal or in my case cdmer and run
   git clone <url>
   ## Let's get the url for contributions repo
   git clone https://github.com/muchirijane/first-contributions.git
3) Run git status
Before you start coding run git status to make sure everything in the project files are update with the 'origin/master branch'
git status
4) Create a new branch
In this open source for beginners your task is to add your name.
The branch name will include your name
   git checkout -b <add-your-name-in-the-branch>
   ## My name to the branch
   git checkout -b add-jane-tracy
5) Make your contribution
For this case, you are required to add your name to the contribution.md file
After that run git add, git commit and push your branch
   git add .
   ## commit the changes
   git commit -m "added jane muthoni to the contributors list"
   ## Let's push our branch
   git push origin <branch-name-you-created>
   git push origin add-jane-muthoni
6) Compare and Pull request
Nope! you are not done yet, one more step.
To contribute your code to the origin repository.
Click compare and pull request

7) Create a new pull request

You can leave a comment if you want to and click create pull request button.
👩💻💃 Congratulation on your first open source contribution
If you have done the above steps your branch will be merged to the master branch by the original owner of the Github repository.

I so proud of you. This is just the first step. Use first contributions to make your first pull request and checkout this list for more projects.
Let's connect with my Github too.
You can also support me, if this article helped you. 🙂