When creating a website for Production, you would want the world to have a great experience using it. One of the best tools for this purpose is the Lighthouse, a Chrome Dev-tool that analyses how various your site fares on different metrics.
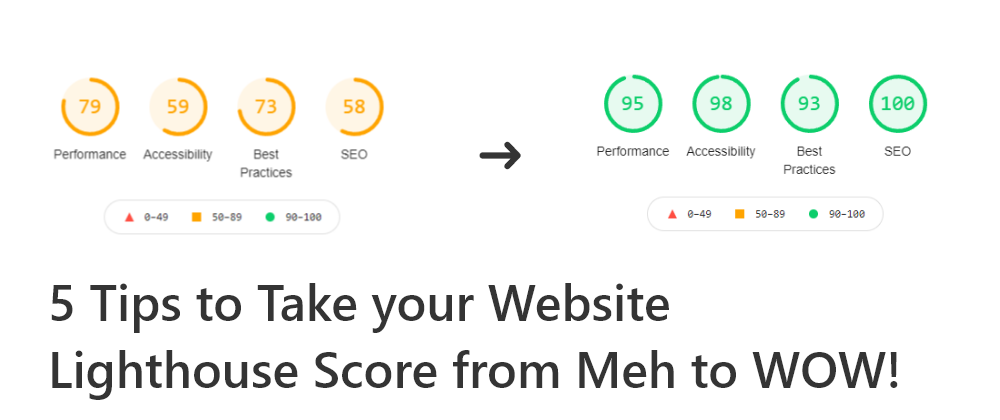
Sadly, pushing for a perfect Lighthouse score isn't easy. While creating my portfolio website, I started off with the following score:

But after following a few simple steps, I managed to take the score in each category to 90+

1. Use Responsive Images & Art Direction
The most often way to use images is to use:
<img src="link-to-image">
But there is are far more optimized methods to use images:
<!-- Responsive images -->
<img
    srcSet="link-to-img 480w, link-to-img@2x 720w, link-to-img@3x 960w"
    sizes="(max-width: 1200px) 480px, (max-width: 2560px) 720px, 960px"
    src="imgUrl@3x"
>

<!-- Art Direction -->
<picture>
    <source media="(max-width: 1200px)" srcSet="link-to-img">
    <source media="(max-width: 2560px)" srcSet="link-to-img@2x">
    <source media="(min-width: 2560px)" srcSet="link-to-imgl@3x">
    <img src="link-to-img@3x">
</picture>
Using these methods allows browsers to load up the images that are the most appropriate for the size of the screen you are using, often saving it from downloading a huge amount of data unnecessarily.
To learn more about Responsive Images and Art Direction, check out the MDN Docs
2. Use Server Side Rendering and Lazy Loading
My portfolio was initially made with React (bootstrapped with create-react-app), but since vanilla React is computed on Client-side, it hampers both Performance and SEO. Re-writing the entire website in Next.js provided some serious improvement to the Lighthouse Score.
Another important concept is Lazy Loading. It is the style of programming that defers the loading of resources till they are required. This provides huge gains in performance during the initial load of the website. It's very easy to implement Lazy Loading in React based applications:
import React, { lazy, Suspense } from 'react';

const LazyComponent = lazy(() => import('./LazyComponent'));

function Component() {
  return (
    <div>
      <Suspense
          // fallback will be displayed while the lazy component loads
          fallback={<div>Loading...</div>}
      >
        <LazyComponent />
      </Suspense>
    </div>
  );
}
3. Minify your resources
It is always a good idea to minify the JavaScript and CSS in the production environment. It drastically reduces the size of the items to be loaded and also gets rid of unused code.
Webpack is a great tool for this purpose. It minimizes JavaScript by default in the Production environment. For other resources, like CSS, you can use additional plugins like the css-minimizer-webpack-plugin.
const CssMinimizerPlugin = require("css-minimizer-webpack-plugin");

module.exports = {
  module: {
    rules: [
      {
        test: /\.css$/,
        use: ["style-loader", "css-loader"],
      },
    ],
  },
  optimization: {
    minimizer: [
      new CssMinimizerPlugin(),
    ],
  },
};
To learn more about Webpack, checkout this article
4. Use Compressed images
The next-gen image formats such as WebP can provide far better compression than a PNG or JPEG. This in turn means faster downloads, less data consumption, and therefore, an overall faster site.

You can also go with vector graphics format such as SVG instead of the commonly use raster graphics which too help tremendously in the domain of performance gains.
5. Use alt, aria-label, and aria-labelledby
These tags help you improve the Website's Accessibility.
-
alt: Thealtattribute is the HTML attribute used in HTML documents to specify alternative text that is to be rendered when the element (generally images) to which it is applied cannot be rendered.
<img src="link-to-img" alt="image-description"> -
aria-label: Thearia-labelattribute is used to define a string that labels the current element. Use it in cases where a text label is not visible on the screen.
<button aria-label="Close" onclick="dialog.close()"> X </button> -
aria-labelledby: Similar to thearia-labelattribute, but it should be used if there is visible text labeling the element.
<div role="dialog" aria-labelledby="dialog-header">
    <h2 id="dialog-header">Choose a File</h2>
    <!-- ... Dialog contents -->
</div>
Wrapping Up
We went through some tricks to boost all aspects of the Lighthouse Score for your website. Use them on your website and witness the magic before your eyes.
Wishing you a Perfect 100 Lighthouse Score!

Finding personal finance too intimidating? Checkout my Instagram to become a Dollar Ninja
Thanks for reading
Need a Top Rated Front-End Development Freelancer? Contact me on Upwork
Want to see what I am working on? Check out my GitHub
I am a freelancer who will start off as a Digital Nomad in mid-2022. Want to catch the journey? Follow me on Instagram
Follow my blogs for Weekly new Tidbits on Dev
FAQ
These are a few commonly asked questions I get. So, I hope this FAQ section solves your issues.
-
I am a beginner, how should I learn Front-End Web Dev?
Look into the following articles: Would you mentor me?
Sorry, I am already under a lot of workload and would not have the time to mentor anyone.Would you like to collaborate on our site?
As mentioned in the previous question, I am in a time crunch, so I would have to pass on such opportunities.
Connect to me on


