What is Flipper?
It's an open-source debugging tool made by Facebook for mobile apps – both for iOS and Android. It existed for quite some time, but it has not been widely used. However, it can change with the release of React Native 0.62, which has Flipper integrated by default.
Flipper is using remote debugging, which lets the app run in the environment as close to production one as possible. It gives you more confidence when debugging apps in comparison to direct debugging.
But the biggest advantage of Flipper which differs it from other debugging tools is plugin library that allows you to install plugins directly from Flipper interface and extend its capabilities. You can also make your plugins and share them! But let's go from the start.
Direct vs Remote Debugging
You may be wondering: "What is remote or direct debugging?" or "Why do I want to use Remote Debugging at all?". Let me explain. :)
By default, when React Native app runs on the target device, it uses javascript core as its engine. Things look different when you start debugging your app, for example, using web remote debugging or React Native Debugger.
In this case, the app is running on your local machine using V8 underneath. It is an issue because it can lead to errors which may be missed just because they don't appear on V8 or vice versa. Also, the performance of your app is different when running on your machine versus a real device.
Want To Build A Commercial App in React Native?
Get a FREE Consultation Call To Set Up The FundamentalsHow to start using Flipper
As I mentioned at the beginning, if your app is using React Native 0.62+, you already have Flipper integration in your app. Just install Flipper, and you are good to go!.
If you are using older versions, there are some additional steps to make Flipper work with your app. Follow these URLs for both iOS and Android.
First steps
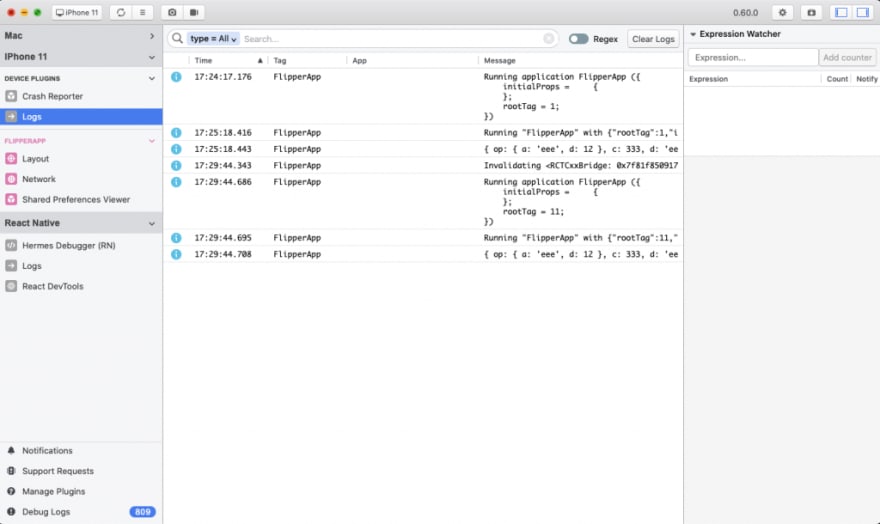
This is what you will see after starting Flipper (assuming you are running a React Native app on your machine or connected device).
From here you can access things like:
- Crash Reporter – Logs from crashes
- Logs (which consist of logs from js and native logs without the need to launch Xcode or Android Studio)
- Layout – the equivalent of Elements browser from Chrome debug console
- Network – lets you browse all your incoming/outgoing network requests
- Shared Preferences Viewer – this lets you view and edit shared preferences
- Hermes Debugger – debugger for Android apps using Hermes
- React DevTools – whole React DevTools as a plugin inside Flipper
If you want you can install many other plugins that you might need using plugins manager, it allows you to browse your installed plugins, removing them updating or adding new ones.
Writing your own plugins
Using Flipper, you can make your plugins to help you debug/test specific use cases in your app. You can make any interaction with your app - exchanging data, sending or receiving events and wrap it with helpful UI.
Flipper plugin consists of two main parts:
- Mobile Client – which is the code running on a target device
- Desktop App – which is an Electron App running on your machine
Desktop App
To start writing plugins for Flipper, you need to install flipper-pkg either using yarn or npm. Then you can create plugins using flipper-pkg init.
You will be asked for id and title of your plugin.
Then replace the code in index.tsx of your plugin with the code below:
import {
  Text,
  Panel,
  ManagedDataInspector,
  createTablePlugin,
  TableBodyRow,
} from 'flipper';
import React from 'react';

type Row = {
  id: string;
  title: string;
};

const columns = {
  title: {
    value: 'Title',
  },
};

const columnSizes = {
  title: 'flex',
};

function renderSidebar(row: Row) {
  return (
    <Panel floating={false} heading={'Info'}>
      <ManagedDataInspector data={row} expandRoot={true} />
    </Panel>
  );
}

function buildRow(row: Row): TableBodyRow {
  return {
    columns: {
      title: {
        value: <Text>{row.title}</Text>,
      },
    },
    key: row.id,
    copyText: JSON.stringify(row),
    filterValue: `${row.title}`,
  };
}

export default createTablePlugin<Row>({
  method: 'testMethod',
  columns,
  columnSizes,
  renderSidebar,
  buildRow,
});
Let me explain what's happening here. We are using builtin Flipper method createTablePlugin which allows creating native-looking tables just like Logs of Network plugins have.
Using Row we define what data we have in each row of our table. Next columns and columnSizes define our column names and their width. Then we have two methods. buildRow as name suggests tells Flipper how we want to fill our row with data and for example how to handle copying. renderSidebar fills sidebar with data from row.
The last step is to export our plugin filling it with our configuration and method field, which tells on which method name it should react.
After we are done we can use yarn lint or npm run lint to check if our app doesn't have any errors and then flipper-pkg pack <plugin-directory> -o <output-directory> to create a bundle of our app which then can be installed in flipper. We can install it later using plugins manager by dragging our bundle onto it.
Mobile Client
Although Flipper allows writing native clients for Android and iOS, we will focus now only on React Native ones.
First, we have to add react-native-flipper plugin to our app using yarn or npm. For a simple test of the plugin, you can add this code to your app.
import {addPlugin} from 'react-native-flipper';

  const arr = [
    {id: '0', title: 'test1'},
    {id: '1', title: 'test2'},
  ];

  addPlugin({
    getId() {
      return 'test';
    },
    onConnect(connection) {
      arr.forEach((item) => {
        connection.send('testMethod', item);
      });
    },
    onDisconnect() {},
  });
This code will send two simple messages to our desktop plugin. First, we import the addPlugin method, which allows us to register our client. Add plugin should at least implement getId method which identifies our client and should return the same id you have defined when creating your desktop app so they could identify each other.
Then there are onConnect and onDisconnect. They are triggered when our app connects or disconnects from desktop app respectively. onConnect has connection which we will use to send or receive events to/from our app. Here using send method we first provide name of our method which we defined earlier while we were exporting our desktop app in this case it is testMethod and next we provide an object with the data we want to send.
Result
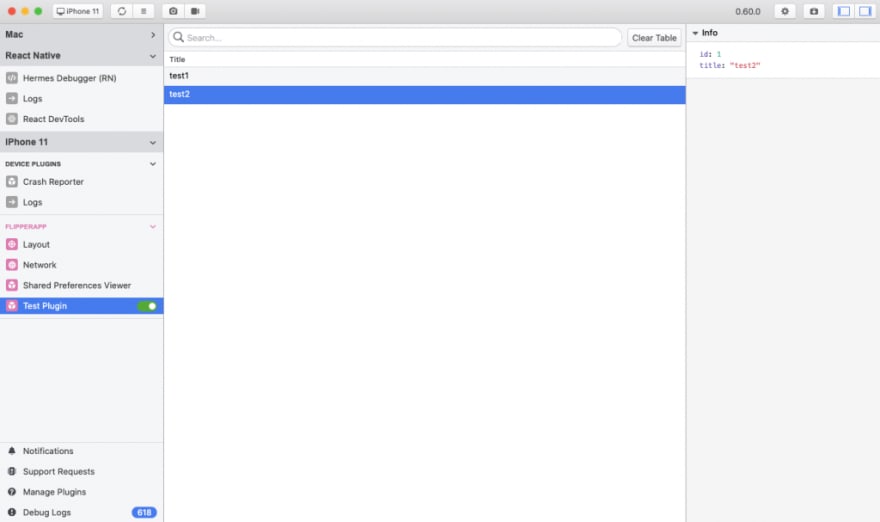
After all of this is done we should see our plugin in Flipper, after enabling it you should see two entries in the table and when you click on one of them a sidebar with details of the sent object should appear.
Final thoughts
Using Flipper makes mobile app development easier because of all its features. Flipper consists of many tools that are essential for debugging apps like logs, network and dev tools. But also it can be extended with other plugins which give it limitless possibilities to fit in any complex use case where other tools may not be enough. Also, Remote debugging is a nice addition here, making us closer to a real production-ready app while we test our apps.
This guide was made based on my own experience and whatever i could find on Flipper Docs. If you want to find more in-depth info about creating flipper plugins please check there.


