As a front-end developer, I would like to say that the NestJs framework was the best choice to start touching the backend part of the applications. I was always asking my tutor in Apiumhub about design patterns, clean architecture, and microservices. He then showed me the link to the NestJs’s fully completed and very well-structured documentation. It was a good discovery for me to get lost on this page and learn about decorators, providers, dependency injection, testing, authentication, and more topics from different areas.
What is NestJs?
First of all, what is this NestJs? It is an open-source Node.js framework for developing challenging backend systems that use the design paradigm convention over configuration that eliminates the need for explicit configuration by allowing developers to utilize common tools and code in a particular way.
You can create scalable, testable, and loosely coupled applications. It is significantly influenced by Angular and one important feature is the power of dependency injection, which allows injecting one module into another, promoting code reuse.
What does NestJs provide and what are the benefits of using it?
NestJs is created for both Monoliths and Microservices. You can build Rest APIs, MVC applications, GraphQL applications, Web Sockets, or CLIs, and CRON jobs.
Since Nest applications are written in TypeScript, error detection at compile time protects our code and avoids errors while writing numerous microservices that all have the same response mode.
NestJS makes it possible to create outstanding, well-organized, and lightweight microservices. Due to the structure imposed by NestJs, developers must write the controller, service, and repository in specific locations and in a specific manner. This improves the development process since it prevents mistakes that could result in having to spend a lot of effort later on refactoring the codebase and allows more attention to be focused on the design of endpoints rather than the application structure.
It has a useful command-line interface tool called NestCLI that facilitates the generation of the boiler code (Modules, Middleware, Controller, etc.) Also, TypeScript, Prettier, and Eslint configurations are fully set up with NestJS.
It offers integration with Jest and Supertest, and by dependency injection system, it makes mocking components easier in the testing environment.
NestJs’s documentation is one of the most thorough and understandable by quickly scanning the documentation, you can find the answer to your bug and cut down on the amount of time spent debugging.
NestJs Fundamental Concepts
Decorators
A decorator is an expression that accepts three arguments: a target, a name, and a property descriptor, and returns a function. You apply it by inserting the decorator at the very top of whatever it is you are trying to decorate, followed by the @ character. There are three different decorators such as class ( @Controller() ), method( @Get() ), or argument ( @Body() ).
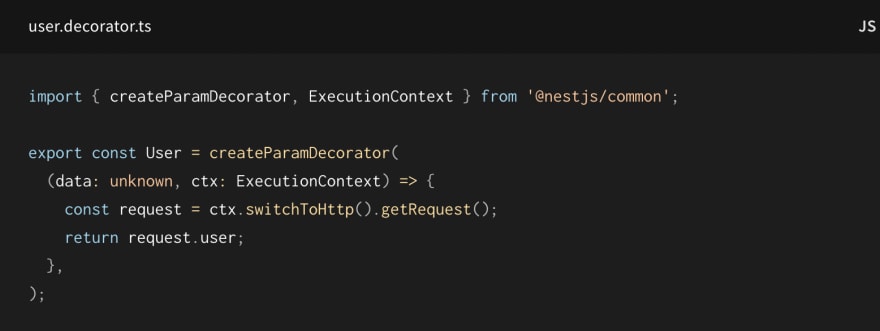
In NestJs everything can be controlled with decorators. You can connect a controller to a collection of routes, specify a request method, add request body content or parse request parameters. You can also create your own custom decorators to use inside your project. Like in the NestJs documentation example:
Controllers
Controllers handle incoming requests and return responses to the client. You can specify a URL as the principal route for this controller and a method decorator like @Get, @post, @Put, or @Delete using the @Controller decorator.
Providers
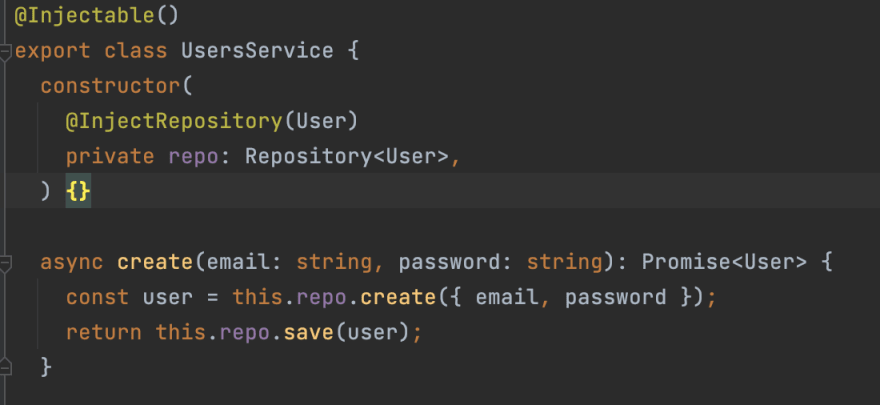
Providers are an essential concept in NestJs. The core Nest classes, such as services (handles data access and business logic), repositories (handles the access to a database), factories, etc, can be thought of as providers. It is possible to build new providers and inject them into controllers or existing providers. For example, a service provider will be used with @Injectable decorator which adds metadata and declares that this service can be managed by the Nest IoC container. Nest IoC manages interactions between providers.
From Stephen Grider’s ‘ NestJS: The Complete Developer’s’ GuideCourse
Modules
Modules are the fundamental building pieces of the Nest applications. The AppModule is included automatically when you create a Nest application. To effectively arrange your components, it is advised to group each of your features into a module.
By default, the module includes providers. As a result, providers that are neither directly a part of the current module nor directly exported from the imported modules cannot be injected.
Pipes
There are two common uses for pipes: transforming the input data to the desired form and validating it to throw an exception if it is invalid.
Guards
Guards decide whether or not a specific request will be processed by the route handler depending on particular run-time conditions. They help set up authentication and authorization logic easily.
Conclusion
In this article, we recapitulated some of the key ideas of NestJs. With NestJs you may construct domain-wise clear boundaries, write reusable modules, and write loosely coupled and maintainable code. It is incredible how many decorators are available in this framework to perform various functions requiring minimal to no coding. Additionally, dependency injection makes it simple to mock services, for instance, in your controller tests.
NestJs has a large community and good documentation to explore on its website. Additionally, I’ve included a colleague’s Spanish NestJs tutorial that illustrates key ideas with concrete examples and lists helpful tools and libraries to use with NestJs.
Resources
- Why I choose NestJS over other Node JS frameworksby S M Asad Rahman @Medium
- Why NestJS is The Best Node.js Framework for Microservices? by Mohammad Yaser Ahmadi @Medium
- NestJS and its Advantages for Backend Developers by Code everywhere @Medium
- NestJS Tutorial Español – Introducción al framework de NodeJS by Albert Hernandez @Youtube


