Cover image by Joel Filipe
To view the final code for this app, check out the repo here.
In my previous tutorial I showed how to use an Amplify serverless function to deploy a REST API running an Express server. What if we wanted to take a similar approach, but instead deploy a GraphQL API running in an Amplify function?
In this 10 minute tutorial, you'll learn how to deploy a full stack serverless GraphQL app using Amplify functions, Apollo, and React.
We'll be using the apollo-server-lambda package to make this even easier, needing only a few lines of code to transform a typical Lambda handler into a GraphQL server.
If you're interested in deploying a serverless GraphQL API using AWS AppSync (the managed GraphQL service provided by Amplify), check out this tutorial
Getting Started
To get started, first install and configure the newest version of the Amplify CLI.
To see a video walkthrough of how to configure the CLI, click here.
$ npm install -g @aws-amplify/cli

$ amplify configure
Now, create a new React project to hold the front-end code and install the necessary dependencies:
$ npx create-react-app fs-apollo

$ cd fs-apollo

$ npm install apollo-boost @apollo/react-hooks graphql
Next, initialize a new Amplify project:
$ amplify init

# Chooose your environment name and default text editor
# You can answer the defaults for the rest of the questions and then choose the profile you created when you ran amplify configure
Creating the GraphQL API
Now, we can create the API. To do so, we can use the Amplify add command. Using the api category, the CLI will create a serverless function as well as an http endpoint that we can use for our GraphQL server.
$ amplify add api

? Please select from one of the below mentioned services: REST
? Provide a friendly name for your resource to be used as a label for this category in the project: apolloapi
? Provide a path (e.g., /items): /graphql
? Choose a Lambda source: Create a new Lambda function
? Provide a friendly name for your resource to be used as a label for this category in the project: apolloserver
? Provide the AWS Lambda function name: apolloserver
? Choose the function runtime that you want to use: NodeJS
? Choose the function template that you want to use: Hello World
? Do you want to access other resources created in this project from your Lambda function? N
? Do you want to edit the local lambda function now? N
? Restrict API access: N
? Do you want to add another path? N
The CLI has created a few things for us:
- API endpoint
- Lambda function
- Some boilerplate code for the handler function
Next, we'll change into the function directory and install the dependencies for the Apollo server:
$ cd amplify/backend/function/apolloserver/src

$ npm install apollo-server-lambda graphql

$ cd ../../../../../
Now, let's open the code for the function.
Open amplify/backend/function/apolloserver/src/index.js. Here, you will see the main function handler:
exports.handler = async (event) => {
    // TODO implement
    const response = {
        statusCode: 200,
        body: JSON.stringify('Hello from Lambda!'),
    };
    return response;
};
This is the code that we will be replacing with our Apollo server. Update the function with the following code:
const { ApolloServer, gql } = require('apollo-server-lambda')

/* Construct a schema, using GraphQL schema language */
const typeDefs = gql`
  type Query { hello: String }
`

/* Provide resolver functions for your schema fields */
const resolvers = {
  Query: {
    hello: () => 'Hello from Apollo!!',
  },
}

const server = new ApolloServer({
    typeDefs,
    resolvers,
    context: ({ event, context }) => ({
      headers: event.headers,
      functionName: context.functionName,
      event,
      context,
    }),
  })

exports.handler = server.createHandler({
  cors: {
    origin: '*',
    credentials: true,
  },
})
In the typedefs definition you can define the GraphQL schema you'd like to have for your application. In this example, we only have a single query that returns the string "Hello from Apollo!!".
Now, we can deploy the function and GraphQL API:
$ amplify push
The client
Now that the back end has been deployed, let's update the client to interact with the server. To do so, open src/App.js and update it with the following:
import React from 'react'
import logo from './logo.svg'
import './App.css'

import ApolloClient, { gql } from 'apollo-boost'
import { ApolloProvider, useQuery} from '@apollo/react-hooks';
import config from './aws-exports'

/*
* The endpoint is created by the Amplify CLI and stored in the aws-exports.js file
*/
const { endpoint } = config.aws_cloud_logic_custom[0]

/* Define the query */
const query = gql`{ hello }`;

function App() {
  /* Use useQuery hook to call GraphQL API */
  const { loading, error, data } = useQuery(query);
  if (loading) return <p>Loading...</p>;
  if (error) {
    console.log('error: ', error)
    return <p>Error :(</p>;
  }

  return (
    <div className="App">
      <header className="App-header">
        <img src={logo} className="App-logo" alt="logo" />
        <h1>{data.hello}</h1>
      </header>
    </div>
  );
}

/* Create client using the GraphQL endpoint  */
const client = new ApolloClient({
  uri: endpoint + '/graphql'
});

const AppWithProvider = () => (
  <ApolloProvider client={client}>
    <App />
  </ApolloProvider>
);

export default AppWithProvider
To test it out, run the start command:
$ npm start
Updating the server
To update the server, make whatever changes you'd like to update and then run the push command:
$ amplify push
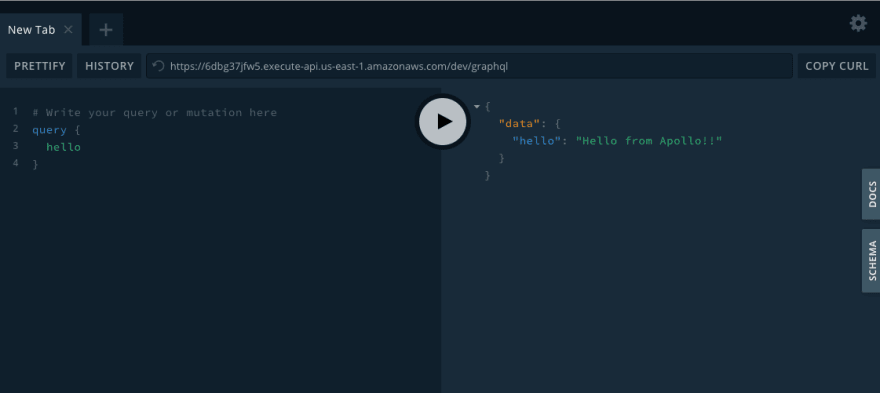
GraphQL Playground
Once the server is up and running, you can also use the GraphQL playground by navigating to the GraphQL endpoint /graphql in your browser. The url is available in the aws-exports.js file and should look something like this:
https://6dbg37jfw5.execute-api.us-east-1.amazonaws.com/dev/graphql
Video Walkthrough
I've also created a step by step video walkthrough of this tutorial.


