
Written by Nelson Michael✏️
The simplicity of deploying a static website with GitHub Pages is a process that can be easily transferred to React applications. With just a few steps, it’s easy to host a React app on GitHub Pages for free or build it to deploy on your own custom domain or subdomain.
In this article, we’ll explore how to deploy React apps on GitHub Pages. We’ll also demonstrate how to create a custom domain on GitHub Pages for our static website.
Let's get started! Jump ahead:
- Prerequisites
- What is GitHub Pages?
- React app deployment demo with GitHub Pages
- Adding a custom domain
Prerequisites
- A GitHub account, or set one up
- Familiarity with Git commands
- Node.js installed, or you can install it here
What is GitHub Pages?
GitHub Pages is a service from GitHub that enables you to add HTML, JavaScript, and CSS files to a repository and create a hosted static website.
The website can be hosted on GitHub's github.io domain (e.g., https://username.github.io/repositoryname) or on your own custom domain. A React app can be hosted on GitHub Pages in a similar manner.
How to deploy a React application to GitHub Pages
To deploy your React application to GitHub Pages, follow these steps:
- Set up your React application
- Create a GitHub repository for your project
- Push your React app to your GitHub repository
Setting up the React application
Let’s get started by creating a new React application. For this tutorial, we’ll be using create-react-app but you can set up the project however you prefer.
Open the terminal on your computer and navigate to your preferred directory. For this tutorial, we’ll set up the project in the desktop directory, like so:
cd desktop
Create a React application using create-react-app:
npx create-react-app "your-project-name"
In just a few minutes, create-react-app will have finished setting up a new React application!
Now, let’s navigate into the newly created React app project directory, like so:
cd "your-project-name"
This tutorial is limited to demonstrating how to deploy a React application to GitHub Pages, so we’ll leave the current setup as it is without making any additional changes.
Creating a GitHub repository
The next step is to create a GitHub repository to store our project’s files and revisions.
In your GitHub account, click the + icon in the top right and follow the prompts to set up a new repository. ![]()
After your repository has been successfully created, you should see a page that looks like this: 
Awesome! Let’s proceed to the next step.
Pushing the React app to the GitHub repository
Now that the GitHub remote repository is set up, the next step is to initialize Git in the project so that we can track changes and keep our local development environment in sync with the remote repository.
Tracking and syncing changes
Initialize Git with the following command:
git init
Pushing the code to the GitHub repo
Now, we’ll commit our code and push it to our branch on GitHub. To do this, simply copy and paste the code received when you created a new repository (see the above repo screenshot).
git commit -m "first commit"
git branch -M main
git remote add origin https://github.com/nelsonmic/testxx.git
git push -u origin main
Adding the GitHub Pages dependency package
Next, we’ll install the gh-pages package in our project. The package allows us to publish build files into a gh-pages branch on GitHub, where they can then be hosted.
Install gh-pages as a dev dependency via npm:
npm install gh-pages --save-dev
Adding the deploy scripts
Now, let’s configure the package.json file so that we can point our GitHub repository to the location where our React app will be deployed.
We’ll also need to add predeploy and deploy scripts to the package.json file. The predeploy script is used to bundle the React application; the deploy script deploys the bundled file.
In the package.json file, add a homepage property that follows this structure: http://{github-username}.github.io/{repo-name}
Now, let’s add the scripts.
In the package.json file, scroll down to the scripts property and add the following commands:
"predeploy" : "npm run build",
"deploy" : "gh-pages-d build",
Here’s a visual reference: 
That’s it! We‘ve finished configuring the package.json file.
Committing changes and pushing code updates to the GitHub repo
Now, let’s commit our changes and push the code to our remote repository, like so:
git add .
git commit -m "setup gh-pages"
git push
We can deploy our React application by simply running: npm run deploy. This will create a bundled version of our React application and push it to a gh-pages branch in our remote repository on GitHub.
To view our deployed React application, navigate to the Settings tab and click on the Pages menu. You should see a link to the deployed React application. 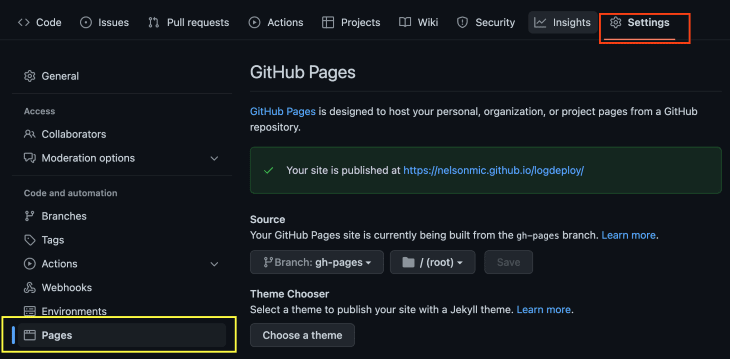
Adding a custom domain
We can deploy our React app to GitHub’s domain for free, but Github Pages also supports custom subdomains Apex domains. Here are examples showing what each type of subdomain looks like:
| Supported custom domain | Example |
|---|---|
www subdomain |
http://logdeploy.com |
| Custom subdomain | app.logdeploy.com |
| Apex domain | logdeploy.com |
Right now, if we navigate to https://nelsonmic.github.io/logdeploy/ we’ll see our recently published website. But, we could also use a custom subdomain or an Apex domain instead.
Here are the steps to set those up:
Deploying to a GitHub custom subdomain
- Purchase a domain name from a domain service provider of your choosing (e.g., Namecheap or GoDaddy)
- Connect the custom domain to GitHub Pages. To do so, click on the Pages menu on the Settings tab. Next, scroll down to the Custom domain field and enter the newly purchased domain name. This will automatically create a commit with a
CNAMEfile at the root of your repository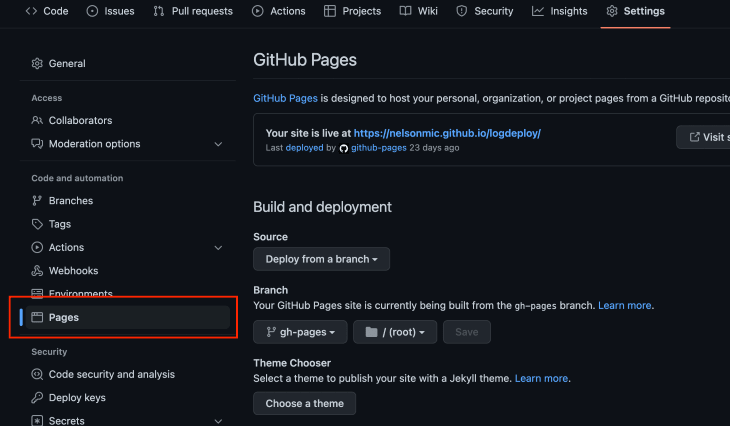
- Ensure the
CNAMErecord on your domain service provider points to the GitHub URL of the deployed website (in the case of this example, nelsonmic.github.io/logdeploy/). To do so, navigate to the DNS management page of the domain service provider and add aCNAMErecord that points tousername.github.iowhereusernameis your GitHub username
Deploying to a GitHub Apex domain
To deploy to an Apex domain, follow the first two steps for deploying to a custom subdomain but substitute the below for the third step: 3. Navigate to the DNS management page of the domain service provider and add an ALIAS record or ANAME record that points your Apex domain to your GitHub Pages IP addresses, as shown:
- 185.199.108.153
- 185.199.109.153
- 185.199.110.153
- 185.199.111.153
Conclusion
GitHub Pages is easy to get started with and free to use, making it a very attractive option for developers of all skill levels.
In this article, we demonstrated how to use GitHub Pages to convert a React app into a static website. We showed how to deploy the React app to GitHub’s domain, as well as to a custom subdomain. If you’re looking for an easy way to share your code with the world, GitHub Pages is a great option.
Full visibility into production React apps
Debugging React applications can be difficult, especially when users experience issues that are hard to reproduce. If you’re interested in monitoring and tracking Redux state, automatically surfacing JavaScript errors, and tracking slow network requests and component load time, try LogRocket.

LogRocket is like a DVR for web and mobile apps, recording literally everything that happens on your React app. Instead of guessing why problems happen, you can aggregate and report on what state your application was in when an issue occurred. LogRocket also monitors your app's performance, reporting with metrics like client CPU load, client memory usage, and more.
The LogRocket Redux middleware package adds an extra layer of visibility into your user sessions. LogRocket logs all actions and state from your Redux stores.
Modernize how you debug your React apps — start monitoring for free.


