Have you ever heard of the Redux Toolkit? State management was developed from Redux and is known as the Redux Toolkit. The boilerplate code for Redux can be minimized using the Redux Toolkit, offering an excellent choice for both beginners and experienced developers. The Redux Toolkit has a ton of features, one of which is the RTK Query (Redux ToolKit Query), which is what we'll be exploring in this article.
Prerequisites
- Knowledge of React and Redux Toolkit.
- Node.js installed on your machine.
- Knowledge of CRUD operations with Fetch or Axios.
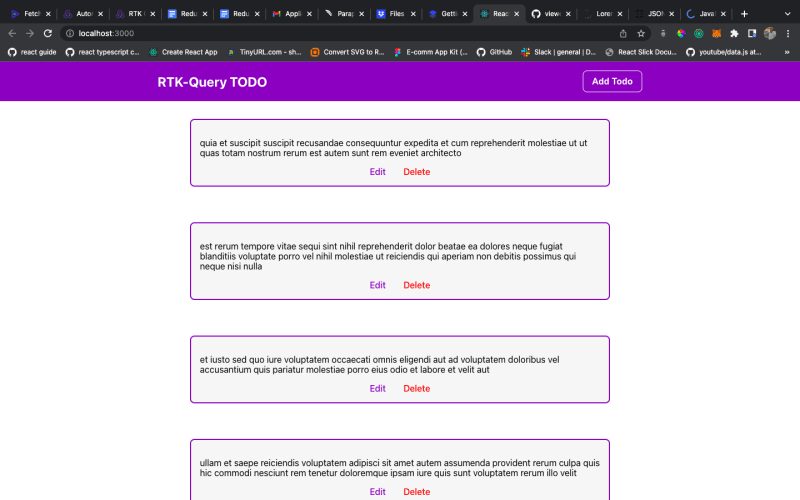
In this article, we’ll learn about RTK Query and how to utilize it in React to fetch data. For this, we'll use information from a fictitious JSON server to develop a straightforward to-do application.
The RTK Query is a data retrieval and caching tool that is quite effective. It lets you avoid having to create data fetching and caching logic manually. RTK Query intended to simplify common instances for data loading in a web application. For example, usually, web applications perform CRUD operations from a server and maintain synchronization between the cached data on the client and the server.
The Redux Toolkit package installation comes with RTK Query, which includes the following API:
-
fetchBaseQuery(): This is a condensed fetch wrapper that seeks to make requests easier. It’s designed to be the
baseQuerythat most developers should use withcreateApi. -
createApi(): This is the foundation of RTK Query's features. It enables you to specify a collection of "endpoints" that specify how to get data from async sources, such as backend APIs and other async sources, along with the setting of how to get the data and convert it.
createApi()makes an "API slice" structure for you that comprises Redux logic and, optionally, React hooks, which enable you to fetch and cache data easily. -
: You can use this as a
Providerif you don't already have a Redux store. -
setupListeners(): This is a tool for enabling the
refetchOnFocusandrefetchOnReconnectcharacteristics. It requires the delivery strategy from your store. You can provide a callback for more precise control by doingsetupListeners(store.dispatch), which will configure listeners with the suggested defaults.
Scaffolding a New React Project
It’s relatively easy to get started with React. You can use the React project creation tool to scaffold a new project with a few sample files to begin.
Use the terminal to run the following command to start a new React project:
yarn create react-app react-RTK Query
Once the project is created, remove the unnecessary files from the src folder after the project has been created.
Run the following command from the terminal to install the form library:
yarn add @reduxjs/toolkit react-redux
Configuring the Redux Store
RTK Query will cache the data it has downloaded from the server in the Redux store, but to allow this, the store must first be configured. The Redux store has to be updated using the Redux slice reducer, and the custom middleware is generated automatically when the API slice is created.
Let's make a file called store.js in the src directory, our Redux store, and head over to our index.js file to enclose our <App/> with a provider:
Step 1
import { configureStore, getDefaultMiddleware } from "@reduxjs/toolkit";

import { todoApi } from "./TodoApi";

export const store = configureStore({
  reducer: {
    [todoApi.reducerPath]: todoApi.reducer,
  },
  middleware: (getDefaultMiddleware) =>
    getDefaultMiddleware().concat(todoApi.middleware),
});
Configuration of Redux store
Step 2
import { Provider } from "react-redux";
import { store } from "./Services/Store";
const root = ReactDOM.createRoot(document.getElementById("root"));
root.render(
  <React.StrictMode>
    <Provider store={store}>
      <App />
    </Provider>
  </React.StrictMode>
);
Wrapping the <App/> component with a provider
Implementing CRUD Operations
Queries
The most typical application of RTK Query is with CRUD operations. However, you are generally advised to only use queries for requests that receive data. A query operation can be performed with any fetching data library. It’s best to use a Mutation for anything that modifies data on the server or could potentially invalidate the cache.
By default, RTK Query includes fetchBaseQuery, a lightweight fetch wrapper that automatically manages request headers and answers parsing in a manner akin to that of widely used libraries like Axios.
Let's begin with creating a new file called TodoApi.js and import the following:
import { createApi, fetchBaseQuery} from "@reduxjs/toolkit/query/react";

export const todoApi = createApi({
  reducerPath: "todoApi",
  baseQuery: fetchBaseQuery({
 baseUrl: "https://jsonplaceholder.typicode.com",
  }),
  endpoints: (builder) => ({})
});
The createApi() takes an object with the following properties:
reducerPath: This particular key specifies the location of the cache's storage in the Redux store.
baseQuery: This enables us to construct a query by only supplying the base URL — each endpoint's default query for data requests.
Endpoints This is a collection of activities that you want to be carried out on your server. With the help of the builder syntax, you define them as an object.
N/B: There are two basic endpoint types: query and mutation.
Query: They serve as endpoints for requests to READ data, specifically for reading data from the server.
Mutation: These data updates are sent to the server through mutations, and the local cache is updated. Mutations may also invalidate cached information and necessitate re-fetches, e.g., CREATE, UPDATE, DELETE.
Specifying endpoints
endpoints: (builder) => ({
    addTodo: builder.mutation({
      query: (todo) => ({
        url: "/posts",
        method: "POST",
        body: JSON.stringify({
          title: todo.title,
          body: todo.body,
          id: todo.id,
        }),
        headers: {
 "Content-type": "application/json; charset=UTF-8",
        },
      }),
      invalidatesTags: ["Todo"]
    }),
    getAllTodos: builder.query({
      query: () => "/posts",
      providesTags: ["Todo"]

    }),
    updateTodo: builder.mutation({
      query: ({ id, ...todo }) => ({
        url: `/posts/${id}`,
        method: "PUT",
        body: JSON.stringify({
          title: todo.title,
          body: todo.body,
        }),
        headers: {
 "Content-type": "application/json; charset=UTF-8",
        },
      }),
      invalidatesTags: ["Todo"]

    }),
    deleteTodo: builder.mutation({
      query: (id) => ({
        url: `/posts/${id}`,
        method: "DELETE",
      }),
      invalidatesTags: ["Todo"]

    }),
  })
These are the endpoints for performing the CRUD operations:
addTodo: Endpoint of a mutation for creating a todo.
getAllTodos: Query endpoint in charge of retrieving all the todos from the server.
updateTodo: Endpoint of a mutation for updating a todo.
deleteTodo: Endpoint of a mutation for deleting a todo.
Now that we have our endpoints, you may be wondering, “How can we utilize them?”
The RTK Query automatically generates a React hook for us to access the endpoints, and they usually begin with "use*NameOfEndpoint**Endpoint type*:
//auto generated hook
export const {
  useAddTodoMutation,
  useDeleteTodoMutation,
  useGetAllTodosQuery,
  useUpdateTodoMutation,
} = todoApi;
Auto-Generated Hook
Fetch All Todos
Let's head over to our App.js file, where we display our todos to the DOM. We also need to import the auto-generated hook:
import { useGetAllTodosQuery } from "./Services/TodoApi";
When a query hook is called, it returns an object with properties like the most recent information for the query request and status booleans for the request's lifecycle state. The most popular properties are shown below:
const { data, error, isLoading, isFetching, refetch } = useGetAllTodosQuery();
Destructuring data from the auto-generated hook
data: This is the most recent result returned, if any.
error: This results in an error, if any.
isLoading: When true, it means that the Query is presently loading for the first time and that no data has been returned. The first request sent out will be fulfilled this way; however, subsequent requests won't.
isFetching: When true, it shows that the Query is currently retrieving data, but it may already contain information from a previous request. This will be true for both the initial request sent and subsequent ones.
<div>
     {error && <p>Something went wrong</p>}
      {isFetching && <p>fetching ...</p>}
     {isLoading && <p>Loading ...</p>}
      {data?.map((todo) => (
 <Card key={todo.id} id={todo.id} todos={todo.body} />
      ))}
 </div>
Mapping through the data to display todos
Add Todo
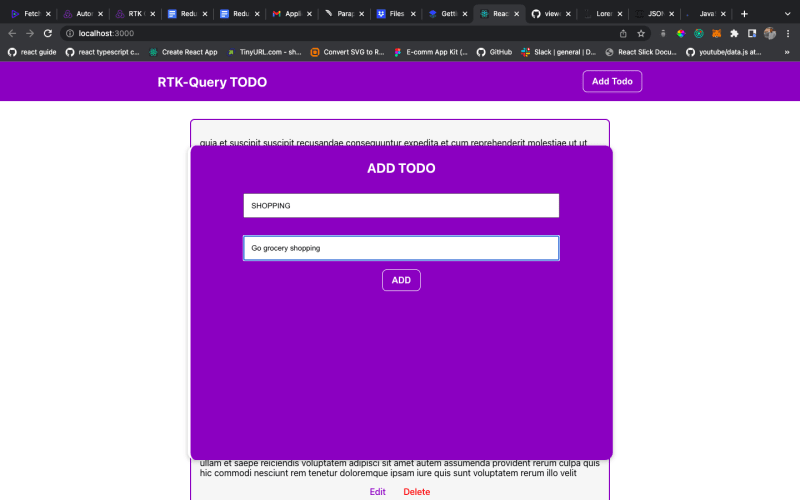
To add a todo, we need to pass an object with the properties title, body and a unique id to the addtodo mutation endpoint that we implemented earlier.
Let's head over to our Modal.js file, where we’ll create a new todo:
import { useAddTodoMutation } from "./Services/TodoApi";
const [addTodo, result] = useAddTodoMutation();
The mutation hook returns a tuple unlike that of the Query. The "trigger" function is the first item in the tuple, and an object with status, error, and data is the second item.
Now that we know that addTask is a trigger function, we need to pass in an object that has the properties we specified in the addTask endpoint:
//add a todo
 const addTodoHandler = () => {
    addTodo({
      title: todo.title,
      body: todo.body,
      id: Math.floor(Math.random() * 100),
    })
      .unwrap()
      .then((data) => {
 console.log(data);
      });
// force re-fetches the data
refetch()

};
The unwrap() function helps if you need to access the error or success payload immediately after a mutation. Wherever we refer to the addTodoHandler in our app, a new todo will be created. However, our UI won't be updated until the page is refreshed.
You can use the refetch method returned as a result property from a useQuery hook to obtain complete granular control over re-fetching data.
RTK Query Caching
Tags is a term you can assign to a particular set of data in RTK Query to manage cache and invalidation behavior for re-fetching purposes. When determining if cached data should be affected by a mutation, it can be thought of as a "label" that is attached to the data and read after the change. The providesTags property for the query endpoint is used to provide the tag names to caches, and the invalidatesTags property for the mutation endpoint is used to remove them from caches.
Update Todo
First, to update a todo, we have to import the mutation hook:
import {useUpdateTodoMutation} from"../../Services/TodoApi"

const [updateTodo] = useUpdateTodoMutation();
Destructuring our trigger function is done with the updateTodo. We call this when we want a particular todo to be edited by passing in the current todo to be updated:
const UpdateTodoHandler = () => {
    updateTodo({ id, ...todo })
      .unwrap()
      .then((data) => {
 console.log(data);
      })
      .catch((err) => {
 console.log(err);
      });
  };
Delete Todo
Also, like our updateTodo, we have to import the mutation hook:
import {useDeleteTodoMutation } from "../../Services/TodoApi";
We also have to use our delete trigger function returned from the mutation hook:
const [deleteTodo] = useDeleteTodoMutation();
And we'd call it whenever we want to delete a particular todo, thereby passing the unique id of the todo to be deleted:
const DeleteTodoHandler = () => {

deleteTodo({id})
      .unwrap()
      .then((data) => {
 console.log("Todo deleted");
      })
      .catch((err) => {
 console.log(err);
      });
  };
Conclusion
With a simple example like the one above where we perform CRUD operations on a JSON server, we display the obtained data in the UI depending on the request's state and cache the information in the form. Therefore, RTK Query not only uses an understandable API, but also significantly minimizes the amount of code written. The functionality of this program can always be expanded, and you can learn more about RTK Query here.


