In this article will explore how to build a flutter app with a python backend. We will learn how to integrate the Flask-RESTful backend, a Python extension, with Flutter as our frontend. We can take advantage of a straightforward API and make some magic happen with a flask extension!
Uniting the king of FRONTEND and the king of BACKEND.
Flutter Python: Install Flask-RESTful and build a Flutter App with Python Backend
Flutter is a user interface toolkit that allows developers to create high-performing and cross-platform apps. It was created by Google and offers great flexibility in app design and development. With Flutter, you can create stunning, smooth, and responsive apps that work on multiple platforms with a single codebase. The UI elements in Flutter are customizable and its hot reload feature helps in faster development and bug fixing.
Flask-RESTful is a helpful extension for the Flask web framework that enables developers to easily create RESTful APIs. It provides the tools and functionality needed to quickly set up a REST API, making it a popular choice for building efficient and scalable web services. Flask-RESTful is powered by the Python programming language, so if you're familiar with Python, you'll find it very easy to work with.
REST API
A REST API (Representational State Transfer API) is a type of application programming interface that adheres to the REST architectural style. It provides a set of standard methods, such as GET, POST, DELETE, etc., that allow developers to send and retrieve data. REST APIs communicate using HTTP, so all HTTP methods can be utilized in a REST API. REST APIs are commonly used for web and mobile applications, as they allow for efficient and flexible communication between the frontend and backend.
Writing our first REST API
In this project, we'll be utilizing the Flask-RESTful library, which is built with Python. To get started, the first step will be to install the library using pip , the popular package manager for Python. With pip ,it's easy to install the Flask-RESTful library and any other necessary packages for our project."
pip install flask-restful
Mac OS: If pip isn’t working for you and you’ve installed the latest Python version, then pip3 will be your call. Same for the python to python3 keyword.
We will start off by creating the file app.py and writing a simple hello world API response.
import flask
from flask_restful import Resource, Api

app = flask.Flask(__name__)
api = Api(app)


class HelloWorld(Resource):
 def get(self):
 return {
 'hello': 'world',
        }


api.add_resource(HelloWorld, '/')

if __name__ == '__main__':
    app.run(debug=True, host='0.0.0.0', port=8080)
Run the command:
python app.py
And open http://localhost:8080
Now, let's now make the API response a bit more complex so that we can effectively demonstrate it on the Flutter frontend. By adding additional information and features to the API response, we can create a more dynamic and interactive user experience in the Flutter app.
import flask
from flask_restful import Resource, Api

app = flask.Flask(__name__)
api = Api(app)


class HelloWorld(Resource):
 def get(self):

        data = [
 'first',
 'API',
 'Response',
 'with',
 'random List',
 'python',
        ]

 return {
 'data': data,
        }


api.add_resource(HelloWorld, '/')

if __name__ == '__main__':
    app.run(debug=True, host='0.0.0.0', port=8080)
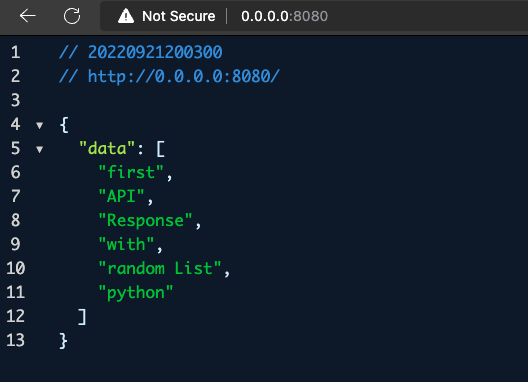
Following this, when you open the localhost it's going to look something like this:
Integration in Flutter | Flutter App with Python Backend
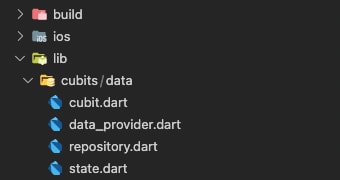
To example, I’m going to use flutter_bloc to handle the REST APIs, followed by cubits and states. The project structure is going to look like this screenshot:
We’ll start with a simple model class that holds a List<String>
import 'dart:convert';

class Data {
 final List<String> words;
 Data({
    required this.words,
  });

 Data copyWith({
    List<String>? words,
  }) {
 return Data(
      words: words ?? this.words,
    );
  }

 Map<String, dynamic> toMap() {
 return <String, dynamic>{
      'words': words,
    };
  }

  factory Data.fromMap(Map<String, dynamic> map) {
 return Data(
      words: List<String>.from((map['words'] as List)),
    );
  }

  String toJson() => json.encode(toMap());

  factory Data.fromJson(String source) =>
      Data.fromMap(json.decode(source) as Map<String, dynamic>);

  @override
  String toString() => 'Data(words: $words)';

  @override
  int get hashCode => words.hashCode;
}
data_provider.dart
Then, we’ll request the data from the API in the data_provider layer.
You may use dio here as well, which is my preference.
part of 'cubit.dart';

class DataDataProvider {
 static Future<Data> fetch() async {
 try {
 final request = await http.get(Uri.parse('http://localhost:8080'));

 return Data.fromJson(request.body);
    } catch (e) {
 throw Exception("Internal Server Error");
    }
  }
}
repository.dart
Next, just pass the data from API to the cubits:
part of 'cubit.dart';

class DataRepository {
 Future<Data> fetch() => DataDataProvider.fetch();
}
state.dart
And we’re handling a few different states here:
- Loading state
- Success state
- Failure state
part of 'cubit.dart';

@immutable
class DataState extends Equatable {
 final Data? data;
 final String? message;

 const DataState({
    this.data,
    this.message,
  });

  @override
 List<Object?> get props => [
 data,
 message,
      ];
}

@immutable
class DataDefault extends DataState {}

@immutable
class DataFetchLoading extends DataState {
 const DataFetchLoading() : super();
}

@immutable
class DataFetchSuccess extends DataState {
 const DataFetchSuccess({Data? data}) : super(data: data);
}

@immutable
class DataFetchFailed extends DataState {
 const DataFetchFailed({String? message}) : super(message: message);
}
cubit.dart
Finally, we’re omitting states based on if we have the data or not.
import 'dart:async';

import 'package:flutter/material.dart';
import 'package:flutter_bloc/flutter_bloc.dart';
import 'package:equatable/equatable.dart';
import 'package:http/http.dart' as http;

import 'package:jugaad/models/data.dart';

part 'data_provider.dart';
part 'repository.dart';
part 'state.dart';

class DataCubit extends Cubit<DataState> {
 static DataCubit cubit(BuildContext context, [bool listen = false]) =>
 BlocProvider.of<DataCubit>(context, listen: listen);

 DataCubit() : super(DataDefault());

  final repo = DataRepository();

  Future<void> fetch() async {
    emit(const DataFetchLoading());
 try {
      final data = await repo.fetch();

      emit(DataFetchSuccess(data: data));
    } catch (e) {
      emit(DataFetchFailed(message: e.toString()));
    }
  }
}
Now let’s handle the flutter frontend using BlocBuilder. The final product will be something like this:
import 'package:flutter/material.dart';
import 'package:flutter_bloc/flutter_bloc.dart';
import 'package:jugaad/cubits/data/cubit.dart';

void main() {
  runApp(const MyApp());
}

class MyApp extends StatelessWidget {
 const MyApp({Key? key}) : super(key: key);

  @override
  Widget build(BuildContext context) {
 return MultiBlocProvider(
      providers: [
        BlocProvider(create: (_) => DataCubit()),
      ],
      child: const MaterialApp(
        debugShowCheckedModeBanner: false,
        title: 'flutter.py',
        home: DataScreen(),
      ),
    );
  }
}

class DataScreen extends StatefulWidget {
 const DataScreen({Key? key}) : super(key: key);

  @override
  State<DataScreen> createState() => _DataScreenState();
}

class _DataScreenState extends State<DataScreen> {
  @override
 void initState() {
 super.initState();

 DataCubit.cubit(context).fetch();
  }

  @override
 Widget build(BuildContext context) {
 return Scaffold(
      body: BlocBuilder<DataCubit, DataState>(
        builder: (context, state) {
          // loading
          if (state is DataFetchLoading) {
            return const Center(
              child: CircularProgressIndicator(),
            );
          }

          // success
          else if (state is DataFetchSuccess) {
            return ListView(
              children: state.data!.words
                  .map(
                    (word) => ListTile(
                      title: Text(word),
                    ),
                  )
                  .toList(),
            );
          }

          // failure
          else if (state is DataFetchFailed) {
            return Center(
              child: Text(state.message!),
            );
          }

          // something unexpected
          return const Center(
            child: Text('Something went wrong'),
          );
        },
      ),
    );
  }
}
And… 🥁🥁🥁
Complexity++
To improve our understanding, I will make the API response more complex and adjust the data.dart model class accordingly. This will illustrate the interaction between the API response and the data model and show us how to present the information effectively in the front end Flutter app.
API response
import flask
from flask_restful import Resource, Api

app = flask.Flask(__name__)
api = Api(app)


class HelloWorld(Resource):
 def get(self):

        data = [
            {
 'word': 'cat',
 'type': 'animal',
            },
            {
 'word': 'football',
 'type': 'sports',
            },
            {
 'word': 'rice',
 'type': 'food',
            },
        ]

 return {
 'data': data,
        }


api.add_resource(HelloWorld, '/')

if __name__ == '__main__':
    app.run(debug=True, host='0.0.0.0', port=8080)
Data.dart
import 'dart:convert';

class Data {
 final String word;
 final String type;
 Data({
    required this.word,
    required this.type,
  });

 Data copyWith({
    String? word,
    String? type,
  }) {
 return Data(
      word: word ?? this.word,
      type: type ?? this.type,
    );
  }

 Map<String, dynamic> toMap() {
 return <String, dynamic>{
      'word': word,
 'type': type,
    };
  }

  factory Data.fromMap(Map<String, dynamic> map) {
 return Data(
      word: map['word'] as String,
      type: map['type'] as String,
    );
  }

  String toJson() => json.encode(toMap());

  factory Data.fromJson(String source) =>
      Data.fromMap(json.decode(source) as Map<String, dynamic>);

  @override
  String toString() => 'Data(word: $word, type: $type)';

  @override
  int get hashCode => word.hashCode ^ type.hashCode;

  @override
  bool operator ==(covariant Data other) {
 if (identical(this, other)) return true;

 return other.word == word && other.type == type;
  }
}
The UI on our flutter app with python backend will look something like this:
That concludes our discussion. I hope you have gained new insights and information about integrating a Python backend with a Flutter app. It is common for individuals to inquire about the type of backends that can be used with Flutter. However, it is important to note that Flutter serves as a UI toolkit and can be paired with any backend of your choice, be it Flask-RESTful, Django, Node.js, or any other.
I encourage you to continue exploring and creating innovative projects with Flutter. Thank you for reading, and I wish you all the best in your fluttering endeavors. 💙


