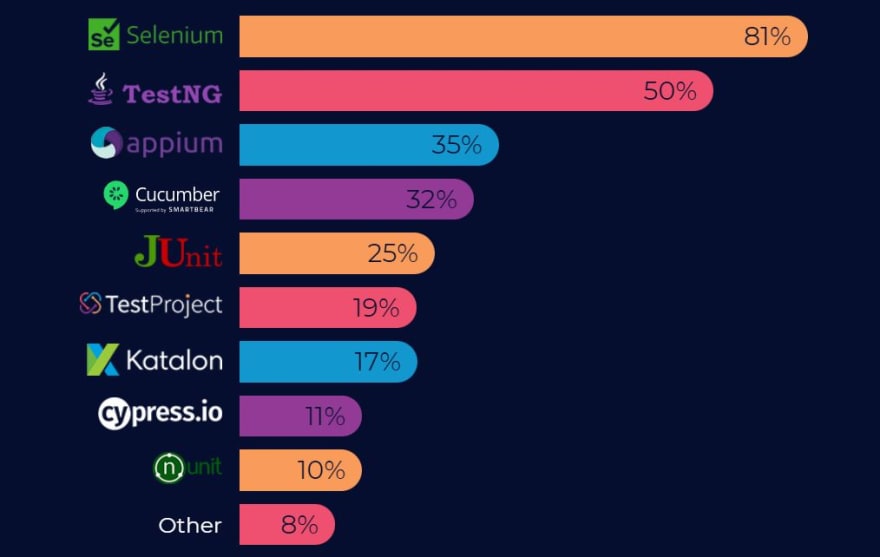
Of the many test automation frameworks available in the market, Selenium is unarguably one of the best test automation frameworks for web automation testing. Selenium works with any programming language that lets you build tests, including Java, Python, C#, JavaScript, Ruby, etc. It can also be integrated with other automation testing frameworks like JUnit and TestNG for better test management and orchestration. However, to get the 100% out of the Selenium automation testing, knowledge and architecture of its components like Selenium Standalone Server and Selenium Server are very important.
This blog helps to understand the difference between Selenium Standalone Server and legacy Selenium Server in detail.
Let’s get started!
Need a great solution for cross browser testing on Safari? Forget about emulators or simulators — use real online browsers. Try LambdaTest to test on safari browsers online!
Selenium Components
Selenium is a suite of tools with a distinct approach to support automation testing. It provides more than just a base for building an automated testing framework — Selenium is an open-source project with a large community, which means there are many ways to contribute to the project, participate in the discussion and gain valuable knowledge.
When writing this blog, Selenium has 22.6k Stars and 6.7k Forks on the Selenium GitHub Page. However, when integrating Selenium into your project, you need to consider that there are different ways of doing this. The latest version of Selenium (Selenium 4) has some interesting innovations. Selenium 4 was released in October 2020, with an exciting set of new features:
However, if you are new to Selenium 4 or want to migrate from Selenium 3 to Selenium 4, this video from the LambdaTest YouTube Channel will help you get started with Selenium 4:
You can follow the channel to stay updated with more videos on Selenium Testing, Cypress Testing, and more.
Selenium has different components, which helps to achieve multiple purposes like Record and Playback test cases directly from the browser, running test cases in a remote machine, writing script-based test cases in various programming languages, and more.
Selenium IDE
It’s an Integrated Development Environment to record and play AUT directly from the browser. Testers who don’t have scripting knowledge can effectively use this IDE to record their interactions with the AUT and playback any number of times in the future.
Selenium IDE is available as a browser extension, and it can only be used with browsers that support extensions. Initially, in Selenium 2, it was available only for the Chrome browser. However, now we can use it with Chrome, Firefox, and Edge browsers. With Selenium 4, the Selenium IDE can also be integrated with Selenium Cloud Grid like LambdaTest. This helps in expediting the testing process as Selenium automation tests can be run in parallel on different browsers & OS combinations.
Test your native, hybrid, and web apps across all legacy and latest mobile operating systems on the most powerful online Android emulator.
Selenium WebDriver
Selenium WebDriver is an Open Source API and a script-based test framework that helps execute the same script in different browsers with the help of browser drivers.
| Browser | Supported OS | Maintained by | Download |
|---|---|---|---|
| Chromium/Chrome | Windows/macOS/Linux | https://chromedriver.storage.googleapis.com/index.html | |
| Firefox | Windows/macOS/Linux | Mozilla | https://github.com/mozilla/geckodriver/releases |
| Edge | Windows/macOS | Microsoft | https://developer.microsoft.com/en-us/microsoft-edge/tools/webdriver/ |
| Internet Explorer | Windows | Selenium Project | https://www.selenium.dev/downloads |
| Safari | macOS High Sierra and newer | Apple | Built-in |
Selenium WebDriver can be integrated with TestNG and JUnit test frameworks to achieve parallel execution, manage test scripts, and generate test reports. To choose the appropriate framework for your test requirements, check out our tutorial on JUnit 5 vs. TestNG.
You can also perform Continuous Integration testing by integrating WebDriver with Maven and Continuous testing with Jenkins.
Selenium Grid
Selenium Grid is a tool that allows you to manage several different Selenium Server instances on different machines. It makes the process of executing tests in parallel easier and allows you to scale your tests across a number of different nodes.
Selenium Grid is most commonly used in automated web testing, however, it can be used for any type of test that requires multiple Selenium Server nodes.
Let’s deep dive into Selenium Grid in the next section:
Selenium Standalone Server or Selenium Grid
Selenium Grid facilitates test cases to execute in multiple machines and browsers simultaneously, which fastens the test case execution speed and drastically reduces the turnaround time. In Selenium 3, Selenium Standalone Server (Selenium Grid ) has two different components.
Selenium Hub: Hub is a central system that accepts test case requests from clients. It also manages threads.
Selenium Node: Node registers itself with the hub, and it’s a place where the actual browser exists. A node machine is connected to the hub, which receives test scripts from the hub and executes them. It is also possible to launch several nodes on different devices running different environments.
In Selenium 4, the Grid becomes more flexible. For example, once the user starts the server, the Grid automatically works as both nodes and hubs, so the user does not need to start hub and node separately as in Selenium 3 Grid.
It also supports advanced tools like Docker, which is used in the DevOps process. Now Grid 4 has a more user-friendly UI also.
There are three ways to run Selenium Grid 4:
Starting as Standalone, Gird itself acts as hub and node.
Start as a separate Hub and Node.
Fully Distributed (Router, Session, Distributor, etc.)
A comprehensive end to end Testing tutorial that covers what e2e testing is, its importance, benefits, and how to perform it with real-time examples.
Executing Test Cases using Selenium Grid in Standalone mode
In this section of the article, we will see how to execute test cases using Selenium Grid in Standalone mode.
Step1: Download Selenium Standalone Server/Grid jar file, i.e., selenium-server-4.1.1.jar
Step 2: Start the server as Standalone. Open the terminal and navigate to where the jar file is downloaded, and then type:
“java -jar selenium-server-4.1.1.jar standalone”
Step 3: Now, the local Grid is ready with the attached node and starts to accept and execute test cases.
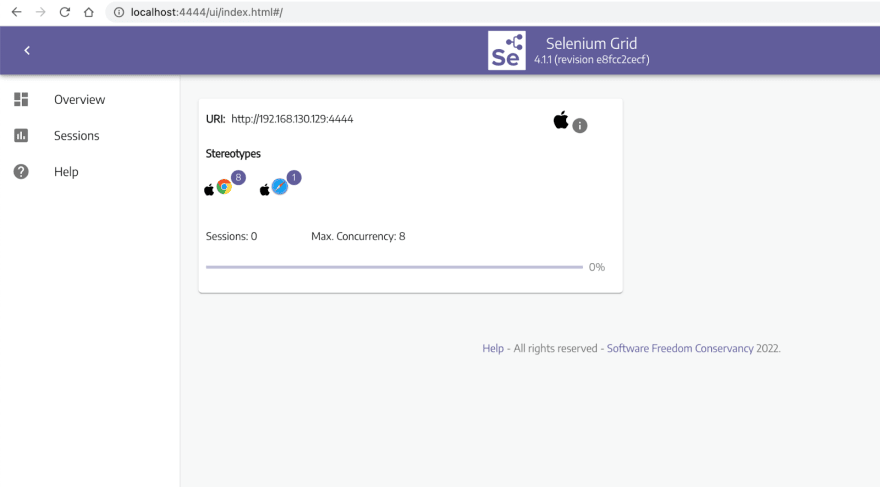
Once the Server is started, all the available browsers and session details of browsers can be viewed at http://localhost:4444/ui/index.html#/.
Step 4: To execute test cases, initialize the browser from the grid and invoke via RemoteWebDriver, passing the grid URL and browser capability.
package LambdaTest;
   import java.net.MalformedURLException;
    import java.net.URL;

    import org.openqa.selenium.By;
    import org.openqa.selenium.WebElement;
    import org.openqa.selenium.remote.CapabilityType;
    import org.openqa.selenium.remote.DesiredCapabilities;
    import org.openqa.selenium.remote.RemoteWebDriver;
    import org.testng.annotations.AfterTest;
    import org.testng.annotations.BeforeTest;
    import org.testng.annotations.Test;

    public class TestCaseRunToGrid {

       public  RemoteWebDriver driver = null;


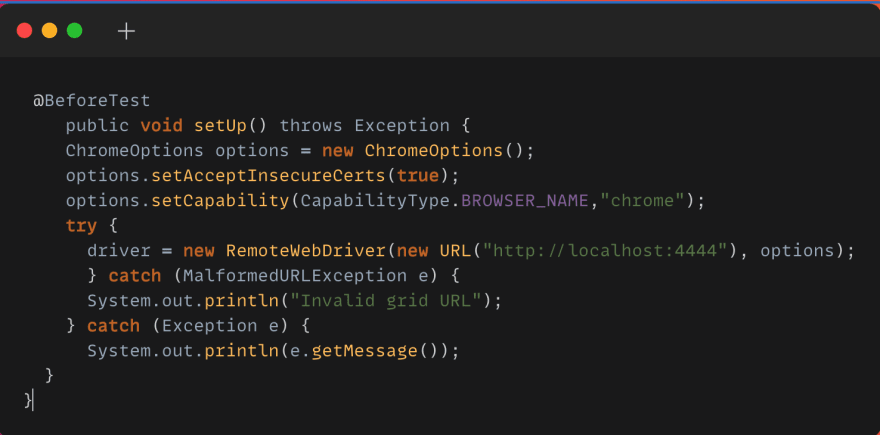
       @BeforeTest
       public void setUp() throws Exception {

           ChromeOptions options = new ChromeOptions();
            options.setAcceptInsecureCerts(true);
            options.setCapability(CapabilityType.BROWSER_NAME,"chrome");

           try {
             driver = new RemoteWebDriver(new URL("http://localhost:4444"), options);

           } catch (MalformedURLException e) {
               System.out.println("Invalid grid URL");
           } catch (Exception e) {
               System.out.println(e.getMessage());
           }
       }

       @Test
       public void firstTestCase() {
           try {
               System.out.println("Logging into Lambda Test Selenium PlayGround page ");
               driver.get("https://www.lambdatest.com/selenium-playground/simple-form-demo");
               WebElement messageText=driver.findElement(By.cssSelector("input#user-message"));
               messageTextBox.sendKeys("Welcome to cloud grid");

               WebElement getValueButton = driver.findElement(By.cssSelector("#showInput"));
               getValueButton.click();
               System.out.println("Clicked on the Get Checked Value button");
           } catch (Exception e) {

           }
        }

       @AfterTest
       public void closeBrowser() {
           driver.close();
           System.out.println("The driver has been closed.");
       }

    }
Code Walkthrough
In this code block, I have used one of the most popular test automation frameworks, TestNG. TestNG is a java based framework designed for Unit, Functional, and End to End testing. If you are new to TestNG, you can go through this Selenium TestNG Tutorial to get started with your first TestNG automation script.
With TestNG Assertions and Annotations, you can group and orchestrate the large test case execution, validate the expected result, and execute test cases in parallel.
@BeforeTest is the TestNG Annotation that executes the statements before each TestMethod runs. Prerequisites for each test method like launching the browser, configuring browser parameters, launching the application URL, setting browser properties kind of statements can be included in this code block.
In Selenium 3, DesiredCapabilities Class helps to set up properties of the browser. However, the DesiredCapabilities Class is replaced by Options in Selenium 4.
Each browser has a respective Option Class that provides methods to change the browser’s properties such as cookies, incognito, headless, disabling pop-ups, and adding extensions.
Here is the Options object that would be used for setting the browser-specific capabilities:
Chrome — ChromeOptions
Firefox — FirefoxOptions
Internet Explorer (IE) — InternetExplorerOptions
Safari — SafariOptions
Microsoft Edge — EdgeOptions
RemoteWedDriver is a Class with all driver classes like ChromeDriver, EdgeDriver, FirefoxDriver, InternetExplorerDriver, OperaDriver, SafariDriver as SubClass.
To use this Class, we have to import the “org.openqa.selenium.remote” package.
The RemoteWebDriver accepts two parameters, one is the hub URL, and the other one is an object of Browser Option. Here, I have launched Chrome browser using ChromeOption object, which provides the property of the browser to launch.
@test Annotation is one of the most important TestNG Annotations, which drives a simple Java method as a test case.
WebElement is a Selenium class, where the driver.findElement returns a WebElement object. Here, the Elements can be identified using multiple locator strategies.
Selenium Locators makes it easy to locate elements on a webpage and perform actions on them, which helps to ease the process of Selenium Automation Testing.
Advantages of Selenium Standalone Server
Helps to handle test execution in the distributed way either in VM or Cloud Selenium Grid.
Helps to perform cross browser test automation.
Can achieve parallel execution using Selenium Cloud Grid, where you can execute multiple test cases in parallel in different environments.
Limitations of working on local Selenium Grid
Initial setup of various nodes in different OS, browser, browser versions and setting up devices for mobile testing is burdensome for the QA team. It requires skilled resources to set up Hub and Node in various environments.
The performance also wholly depends on the Server/VM used to set up nodes.
It’s tough to scale down or up the number of nodes on demand.
Selenium Cloud Grid is the best solution to overcome all these shortcomings of the local grid.
Watch this video to learn about collecting performance metrics in Selenium 4 using the Chrome DevTools Protocol on the LambdaTest platform.
Why do we need Selenium Cloud Grid?
Easy maintenance — the team doesn’t need to take any hassle to maintain the software or hardware needs of servers for node setup.
Scalability — easy to manage the number of nodes/parallel execution
Reliability — Cloud servers have near-perfect availability, so there is a low risk of interruption.
A complete Manual testing tutorial covering all aspects of manual testing, including strategies and best practices.
Executing Test Cases using cloud Selenium Grid
This needs a minor update on code snippets, where the localhost gets to communicate with Selenium Cloud Grid like LambdaTest and access the URL.
Step 1: Register on LambdaTest and get the Username and Access Key from the LambdaTest Profile Section.
    package LambdaTest;

    import java.net.MalformedURLException;
    import java.net.URL;
    import java.util.HashMap;

    import org.openqa.selenium.By;
    import org.openqa.selenium.WebElement;
    import org.openqa.selenium.chrome.ChromeOptions;
    import org.openqa.selenium.firefox.FirefoxOptions;
    import org.openqa.selenium.remote.CapabilityType;
    import org.openqa.selenium.remote.DesiredCapabilities;
    import org.openqa.selenium.remote.RemoteWebDriver;
    import org.testng.annotations.AfterTest;
    import org.testng.annotations.BeforeTest;
    import org.testng.annotations.Test;

    public class TestCaseRunToCloudGrid {

       public  RemoteWebDriver driver = null;

       public String username = "";//LambdaTest userName
       public String accesskey = "";//LambdaTest Accesskey
       public String gridURL = "@hub.lambdatest.com/wd/hub";

       @BeforeTest
       public void setUp() throws Exception {

       DesiredCapabilities capabilities = new DesiredCapabilities();
       capabilities.setCapability("browserName", "Chrome");
       capabilities.setCapability("browserVersion", "97.0");
       HashMap<String, Object> ltOptions = new HashMap<String, Object>();
       ltOptions.put("user",username);
       ltOptions.put("accessKey",accesskey);
       ltOptions.put("build", "Selenium 4 grid Sample");
       ltOptions.put("name", "Selenium 4 grid Sample");
       ltOptions.put("platformName", "Windows 11");
       ltOptions.put("selenium_version","4.0.0");
       capabilities.setCapability("LT:Options", ltOptions);
           try {
               driver = new RemoteWebDriver(new URL("https://" + username + ":" + accesskey + gridURL),capabilities);
           } catch (MalformedURLException e) {
               System.out.println("Invalid grid URL");
           } catch (Exception e) {
               System.out.println(e.getMessage());
           }
       }

       @Test
       public void firstTestCase() {
           try {
               System.out.println("Logging into Lambda Test Selenium PlayGround page ");
               driver.get("https://www.lambdatest.com/selenium-playground/simple-form-demo");
               WebElement messageTextBox = driver.findElement(By.cssSelector("input#user-message"));
               messageTextBox.sendKeys("Welcome to cloud grid");

               WebElement getValueButton = driver.findElement(By.cssSelector("#showInput"));
               getValueButton.click();
               System.out.println("Clicked on the Get Checked Value button");
           } catch (Exception e) {

           }
        }

       @AfterTest
       public void closeBrowser() {
           driver.close();
           System.out.println("The driver has been closed.");
       }

    }
Code Walkthrough
These public variables store the values for the LambdaTest username, key, and hub URL to execute the test case in Cloud Grid.
How the cloud grid understands the browser properties needs to be changed to scale up from local Grid to Selenium Cloud Grid. Here, only the hub URL and capabilities need to be updated by generating capabilities from LambdaTest Capability Generator.
Selenium testing tools like LambdaTest allows you to perform cross browser testing at scale. list of browsers provides 3000+ browsers with a combination of different OS and versions. The ltOptions map here stores all the browser properties required to launch the browser from the cloud hub.
RemoteWebDriver accepts two parameters, one as a Hub URL with credentials and the second one as a Capability object which has all the properties about the browser to launch. Here it is Windows 11 OS, Chrome Browser version 97.0.
Once the code is executed, you can also view your test results, logs, and the test recording as well in your LambdaTest Automation Dashboard.
You can also see the test results on the LambdaTest Analytics Dashboard. The dashboard shows all the details and metrics related to your tests under the Test Overview and Test Summary section.
If you’re a software developer or tester with an interest in Selenium automation testing, this Selenium 101 certification course can help you develop your skillset.
Here’s a short glimpse of the Selenium 101 certification from LambdaTest:
A comprehensive UI testing tutorial that covers what ui testing is, its importance, benefits, and how to perform it with real-time examples.
Selenium Server
The Selenium server in Selenium 2 is entirely different from what we call Selenium Standalone Server/Selenium Grid in Selenium 4 and Selenium 3.
Selenium Remote Control (RC) was the main Selenium project that stood for a long time before Selenium WebDriver(Selenium 2.0) came into existence. But unfortunately, it depreciated due to its complex JavaScript layers and redundant API.
Selenium RC components
Client libraries for scripting language binding
Selenium Server to launch and interact with the browser
Selenium server helps to execute Selenium RemoteControl client scripts. Now it’s completely deprecated, and we don’t have the option to download this jar itself.
However, when we look into older versions to better understand, To execute RemoteControl scripts, we need to start the Selenium Server first.
Here, I have mentioned a RemoteControl script, which executes the code in the local Selenium server, using LocalHost.
Difference Between Selenium Standalone Server and Selenium Server
| Selenium Standalone Server | Selenium Server |
|---|---|
| Supports WebDriver scripts | Selenium RC commands/scripts |
| It can launch up to 5 browsers, so it supports parallel execution | Executes on only one browser at a time |
| Supports headless browser and fasten the execution | Headless htmlUnit browsers are not supported. |
In this Ad hoc testing tutorial, let’s deep dive into what ad hoc testing is, its advantages, disadvantages, types, characteristics, and their best practices.
Conclusion
In this article, we have seen the difference between Selenium Standalone Server and Selenium Server. Understanding the difference between Selenium Standalone server and Legacy Selenium Server helps use the Selenium Grid effectively either in local, distributed mode or in Cloud Selenium Grid.


